Now is the best time to level up your .NET skills (Affiliate)
If your goal this year was to finally master software architecture in .NET or stop feeling “stuck” in legacy codebases, now is the time to take action.
Get 40% off Milan Jovanovic's .NET courses and finally understand Clean Architecture, REST APIs, and Modular Monolith Architecture.
The deal is active until February 18.
As someone who has watched all these courses — you won't find better courses on these topics.
Affiliate note: I earn a small percentage if you purchase through this link.
Starting a new .NET project is exciting, but it can also be overwhelming.
There are so many decisions to make, and the choices you make in the first few days will affect your project for months or even years.
I have created dozens of .NET projects over the years, and today I want to share my experience with you.
In this post, we will explore the following essential steps to start a new .NET project:
1. Directory.Build.props - Set Project-Wide Standards
Every .NET solution should start with a Directory.Build.props file. This file defines project-wide settings that apply to all projects in your solution.
Without this file, you end up duplicating the same configuration across multiple .csproj files.
When you want to change a setting, you have to update every project file manually. This leads to inconsistencies and wasted time.
Directory.Build.props solves this problem by centralizing configuration in one place.
You create this file in the same directory as your .sln file, and MSBuild automatically applies it to all projects in the solution.
Here is the configuration I use for every new project:
If needed, you can also put Directory.Build.props on any directory level in your project hierarchy and override settings there.
Here is what each setting does:
Nullable: Enables nullable reference types, which help prevent null reference exceptions. The compiler warns you when you might be using a null value incorrectly.
ImplicitUsings: Automatically includes common namespace imports in every file. You do not need to write using System; or using System.Linq; anymore.
AnalysisLevel: Sets the code analysis level to the latest version. You get the most recent code quality checks from Microsoft.
AnalysisMode: Enables all code analysis rules. This gives you the most comprehensive feedback on code quality.
TreatWarningsAsErrors: Prevents compilation if there are any warnings. This forces you to fix issues immediately rather than letting them accumulate.
CodeAnalysisTreatWarningsAsErrors: Applies the same strict treatment to code analysis warnings.
EnforceCodeStyleInBuild: Runs code style checks during build, not just in the IDE. Your CI/CD pipeline will catch style violations.
These settings create a strong foundation for code quality. They catch issues early and enforce consistency across your entire solution.
Code quality is something you need to care about from day 1.
It's easier to follow the best coding practices than to fix them later.
For this, we can use static code analysis.
Static code analyzers examine your code without running it.
They catch common mistakes, enforce coding standards, and identify potential bugs before they reach production.
The analyzers run during compilation, so you get immediate feedback in your IDE and in your CI/CD pipeline.
Add these analyzer packages to your Directory.Build.props file:
SonarAnalyzer.CSharp: Focuses on code quality, security vulnerabilities, and code smells. It identifies complex methods, duplicated code, and potential bugs.
Meziantou.Analyzer: Catches performance issues, security vulnerabilities, and incorrect API usage. It has hundreds of rules covering async/await patterns, LINQ usage, string handling, and more.
Roslynator.Analyzers: Provides code analysis and refactoring suggestions. It helps you write cleaner, more idiomatic C# code.
xunit.analyzers: Ensures you write tests correctly. It catches common testing mistakes, such as missing assertions or incorrect test attributes.
The IncludeAssets configuration ensures that these analyzers run during compilation but do not get included in your published application.
With TreatWarningsAsErrors enabled, your build will fail if any analyzer finds an issue. This might seem strict, but it prevents technical debt from accumulating.
You should always strive to have zero warnings in your project. Many developers ignore warnings, but warnings often indicate real problems that will cause bugs later.
For more information about code quality best practices, check out this article.
Analyzers identify issues, but you also need to configure which rules matter for your team and how strict they should be.
The .editorconfig file defines coding standards and specifies the severity level for each analyzer rule. You can mark rules as errors, warnings, suggestions, or turn them off completely.
Place this file in the same directory as your .sln file. Every developer on your team will automatically follow the same rules, regardless of which IDE they use.
Here is a basic .editorconfig file to get started:
ini
1root=true23[*]4charset=utf-85indent_style=space6indent_size=47insert_final_newline=true8trim_trailing_whitespace=true910[*.cs]11# Nullable reference types12dotnet_diagnostic.CS8600.severity=error13dotnet_diagnostic.CS8601.severity=error14dotnet_diagnostic.CS8602.severity=error15dotnet_diagnostic.CS8603.severity=error16dotnet_diagnostic.CS8604.severity=error1718# Code style rules19dotnet_style_qualification_for_field=false:warning20dotnet_style_qualification_for_property=false:warning21dotnet_style_qualification_for_method=false:warning22dotnet_style_qualification_for_event=false:warning2324# Naming conventions25dotnet_naming_rule.interface_should_begin_with_i.severity=error26dotnet_naming_rule.interface_should_begin_with_i.symbols=interface27dotnet_naming_rule.interface_should_begin_with_i.style=begins_with_i2829dotnet_naming_symbols.interface.applicable_kinds=interface30dotnet_naming_style.begins_with_i.required_prefix=I31dotnet_naming_style.begins_with_i.capitalization=pascal_case3233# Async methods should end with Async34dotnet_naming_rule.async_methods_end_in_async.severity=error35dotnet_naming_rule.async_methods_end_in_async.symbols=any_async_methods36dotnet_naming_rule.async_methods_end_in_async.style=end_in_async3738dotnet_naming_symbols.any_async_methods.applicable_kinds=method39dotnet_naming_symbols.any_async_methods.applicable_accessibilities=*40dotnet_naming_symbols.any_async_methods.required_modifiers=async4142dotnet_naming_style.end_in_async.required_suffix=Async43dotnet_naming_style.end_in_async.capitalization=pascal_case
You can download the complete .editorconfig file from my article.
You can customize this file to match your team's preferences. The key is to agree on standards early and enforce them automatically.
With .editorconfig, code reviews become faster because developers do not need to argue about formatting or naming conventions.
The tooling enforces these rules automatically.
As your solution grows, managing NuGet package versions across multiple projects becomes challenging.
Different projects end up using different versions of the same package, which can cause compatibility issues and make updates harder.
Central Package Management (CPM) solves this problem by managing all package versions in one place.
You need to create a Directory.Packages.props file that defines all package versions for your solution.
Place this file in the same directory as your .sln file:
xml
1<Project>2<PropertyGroup>3<ManagePackageVersionsCentrally>true</ManagePackageVersionsCentrally>4</PropertyGroup>56<ItemGroup>7<!-- Web -->8<PackageVersionInclude="Microsoft.AspNetCore.OpenApi"Version="10.0.0"/>910<!-- Database -->11<PackageVersionInclude="Microsoft.EntityFrameworkCore"Version="10.0.0"/>12<PackageVersionInclude="Microsoft.EntityFrameworkCore.Design"Version="10.0.0"/>13<PackageVersionInclude="Npgsql.EntityFrameworkCore.PostgreSQL"Version="10.0.0"/>1415<!-- Testing -->16<PackageVersionInclude="xunit"Version="2.9.3"/>17<PackageVersionInclude="xunit.runner.visualstudio"Version="3.1.5"/>18<PackageVersionInclude="Microsoft.NET.Test.Sdk"Version="18.0.1"/>1920<!-- Code Analysis -->21<PackageVersionInclude="Meziantou.Analyzer"Version="2.0.257"/>22<PackageVersionInclude="SonarAnalyzer.CSharp"Version="10.16.0.128591"/>23<PackageVersionInclude="Roslynator.Analyzers"Version="4.14.1"/>24<PackageVersionInclude="xunit.analyzers"Version="1.26.0"/>25</ItemGroup>26</Project>
You need to add the ManagePackageVersionsCentrally property in this file to enable CPM.
With CPM enabled, your project files reference packages without specifying versions:
Setting up local development environments is often frustrating.
Developers spend hours installing databases, configuring connection strings, and getting dependencies to work together.
Even with Docker, you still have a lot of manual setup, including volumes and configuration for each container.
.NET Aspire solves this problem by providing a consistent way to manage your application's dependencies, configuration, and deployment.
Aspire is an application framework for building observable, production-ready, cloud-native applications with .NET.
It handles service discovery, configuration, health checks, and telemetry out of the box.
Starting from version 13, .NET Aspire was rebranded to Aspire and is now a multi-language application platform.
Aspire introduces two new project types to your solution:
AppHost: The orchestrator that defines your application's architecture and dependencies.
ServiceDefaults: Shared configuration and observability setup applied to all services.
Here is how to add Aspire to your new project:
Step 1: Install the Aspire project templates:
bash
1dotnet new install Aspire.ProjectTemplates
Step 2: Install the Aspire CLI:
bash
1dotnet tool install --global aspire.cli
Step 3: Add Aspire support to your solution through Visual Studio or Rider, or use the CLI to create a new Aspire project.
Step 4: Configure your dependencies in the AppHost project:
Aspire automatically injects connection strings through environment variables. You do not need to configure them manually in appsettings.json.
With Docker integration, Aspire starts all your dependencies automatically when you run the AppHost project.
PostgreSQL, Redis, and any other services run in containers, and Aspire manages their lifecycle.
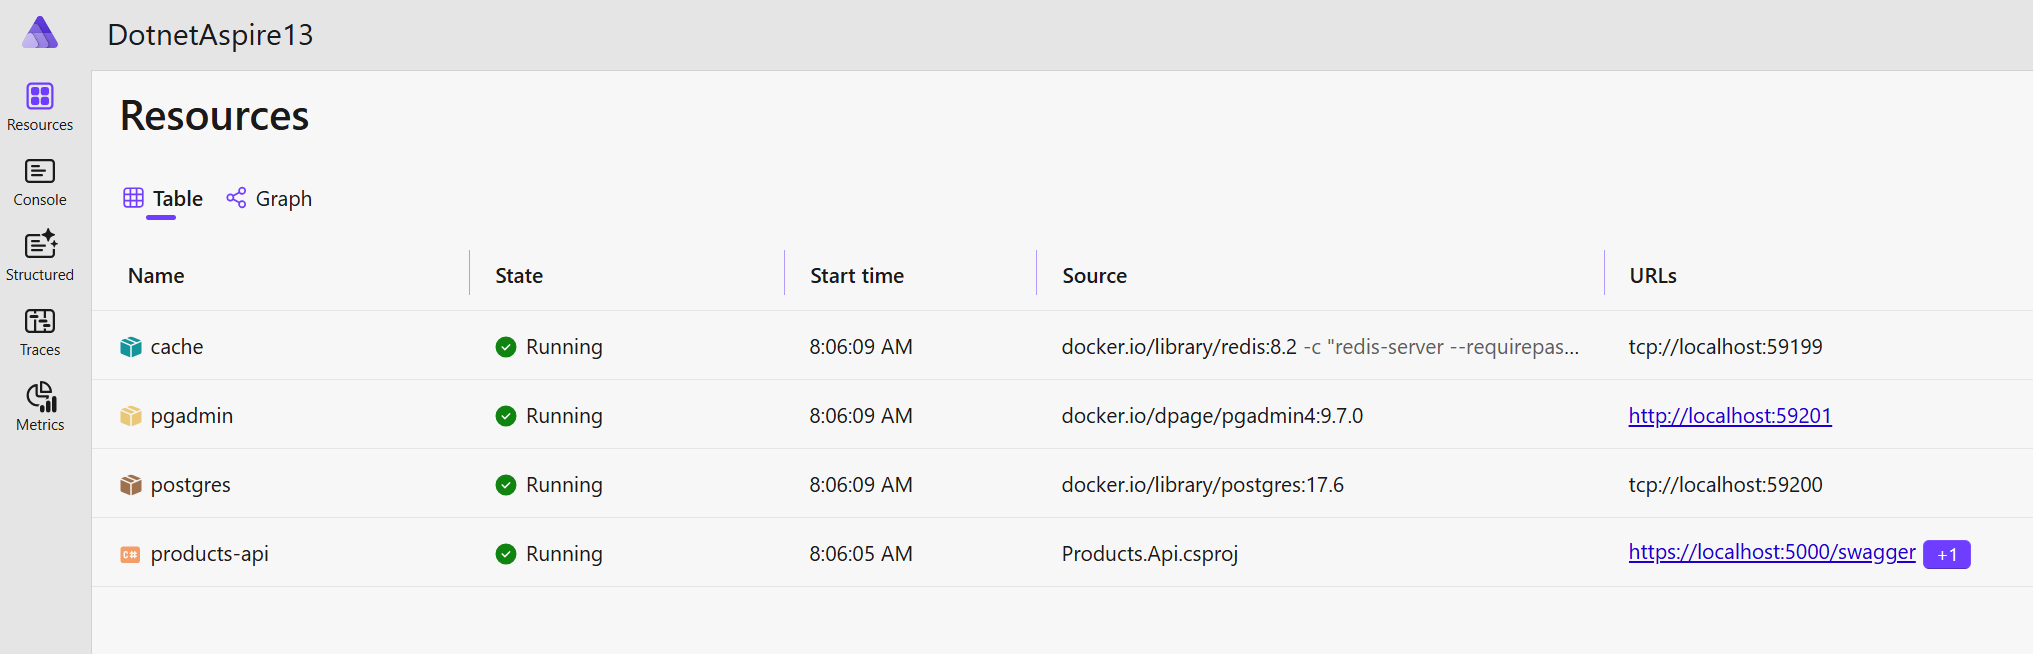
The Aspire dashboard opens in your browser and shows all running services, their health status, logs, and distributed traces.
Here are the key benefits of using Aspire:
Simplified local development: Run all your services, databases, and dependencies with a single command.
Built-in observability: OpenTelemetry integration for logs, metrics, and traces comes preconfigured.
Service discovery: Services automatically discover each other without hardcoded URLs.
Configuration management: Centralized configuration that works locally and in the cloud.
Easy deployment to Docker Compose and Cloud: Deploy your entire application stack to Docker, Azure or AWS with minimal setup.
Consistent developer experience: New team members can get the entire application running in minutes.
For a complete guide on deploying .NET applications with Aspire, read this article.
Understanding what happens inside your application is essential.
OpenTelemetry provides a standardized way to collect and analyze telemetry data from your applications, giving you visibility into their behavior.
Every application has external dependencies such as databases, caches, APIs, and other services.
Monitoring these dependencies is essential for understanding how your application performs and interacts with the rest of the system.
OpenTelemetry collects logs, metrics, and traces from your applications:
Logs explain what happened.
Traces reveal where and how long operations took.
Metrics show how often events occur.
When you use Aspire, OpenTelemetry is already configured for you. The ServiceDefaults project contains the observability setup:
Aspire automatically configures OpenTelemetry to send logs, metrics, and traces to the Aspire dashboard.
However, Aspire does not persist OpenTelemetry and Dashboard data.
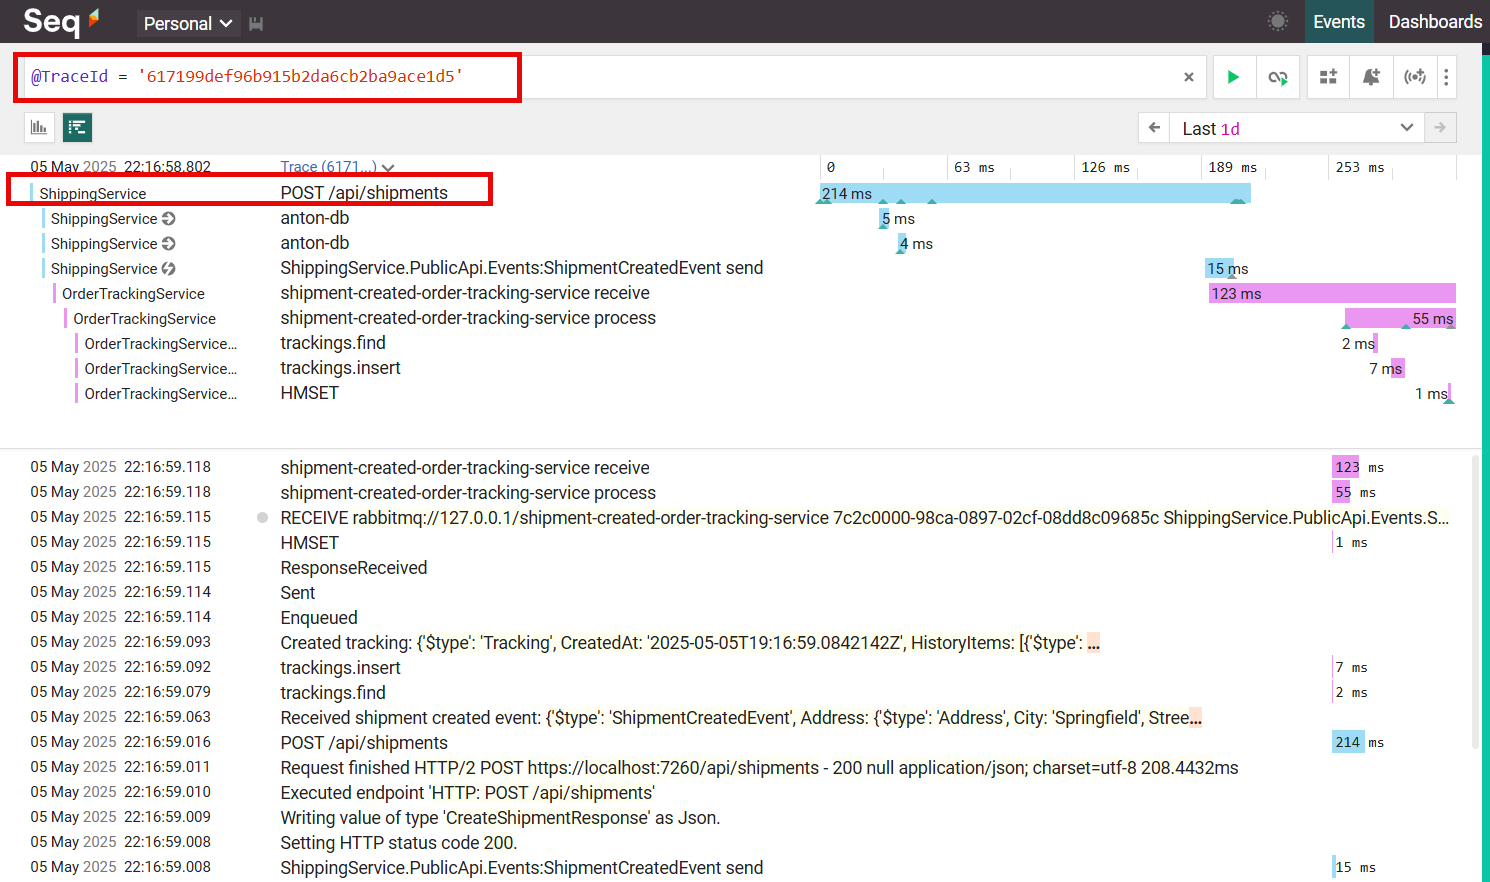
In production, you need a more robust solution for storing and analyzing telemetry data.
You can configure additional exporters to send data to Jaeger, Seq, Grafana, or other observability tools.
By default, OpenTelemetry instruments ASP.NET Core and HttpClient. For additional dependencies like PostgreSQL or Redis, install the instrumentation packages:
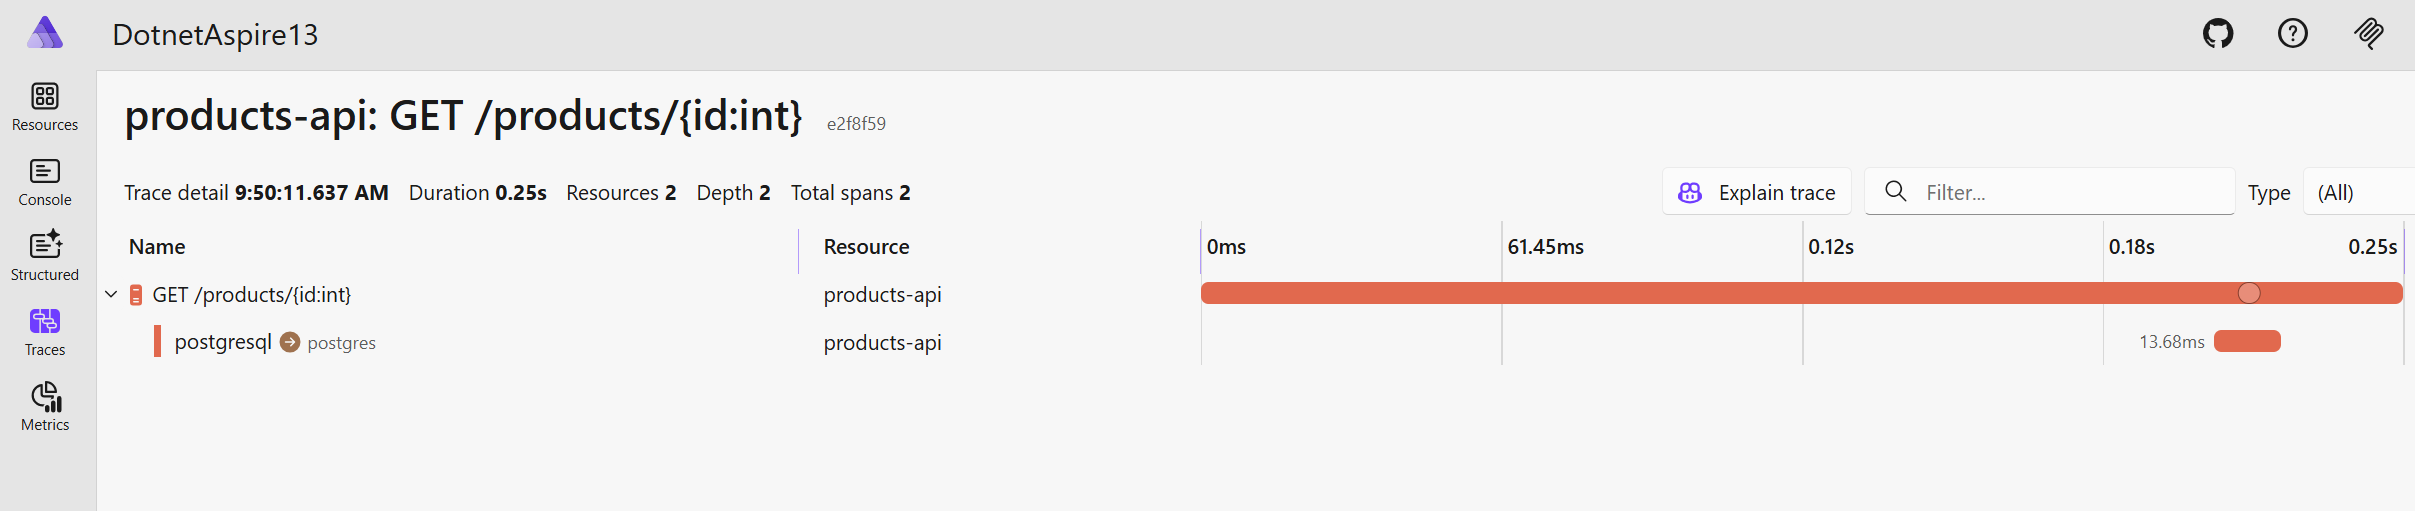
The Aspire dashboard shows distributed traces across all your services. You can see exactly which database queries ran, how long they took, and where bottlenecks exist.
Starting with observability from day one helps you understand performance characteristics early.
You can identify slow queries, optimize API calls, and troubleshoot issues before they reach production.
For more information on OpenTelemetry, read this article.
Modern software development requires automated pipelines. You cannot afford to deploy manually or skip automated tests.
A good CI/CD pipeline ensures that every code change is built, tested, and deployed consistently.
It catches bugs before they reach production and accelerates your delivery speed.
Without proper CI/CD pipelines, you waste time on manual tasks and increase the risk of human error.
For .NET developers using GitHub, GitHub Actions is the natural choice.
It integrates seamlessly with your repository and provides everything you need to build and test .NET applications.
Create a .github/workflows/ci.yml file in your repository:
This pipeline runs on every push to the main branch and on every pull request.
It restores dependencies, builds the solution, runs tests, and builds a Docker image using Aspire.
The Aspire CLI generates a Docker Compose file that includes all your services and their dependencies. The pipeline then builds the Docker images for deployment.
Follow these best practices for CI/CD pipelines:
Keep pipelines fast: Aim for under 10 minutes for CI builds.
Run tests on every pull request: Catch issues before they merge into the main branch.
Store secrets securely: Use GitHub Secrets for sensitive data like API keys and connection strings. Never commit secrets to your repository.
Fail fast: If tests fail, stop the pipeline immediately. Do not waste time building Docker images for broken code.
Use caching: Cache NuGet packages and build artifacts to speed up subsequent runs.
You can download my free .NET Backend Project Template and save weeks of development time.
It is built as a Modular Monolith using industry-best practices and patterns, including Vertical Slice Architecture and Clean Architecture.
Skip all the boilerplate — start with a fully configured Modular Monolith .NET template so you can focus on delivering business value from day one.
The project is ready to run in Docker with a one-click setup, including a fully configured database and external dependencies.
Starting a new .NET project with the right foundation saves time and prevents technical debt.
Here are the seven essential steps for every new .NET project in 2026:
1. Directory.Build.props: Set project-wide standards for nullable reference types, implicit usings, code analysis, and strict warning treatment.
2. Static Code Analysis Packages: Add Meziantou.Analyzer, SonarAnalyzer.CSharp, Roslynator.Analyzers, and xunit.analyzers to catch issues during compilation.
3. .editorconfig: Enforce coding standards and configure severity levels for analyzer rules.
4. Directory.Packages.props: Centralize NuGet package version management across all projects in your solution.
5. Aspire + Docker: Simplify local development with automatic service orchestration, configuration management, and Docker integration.
6. OpenTelemetry: Get built-in observability with logs, metrics, and traces configured automatically through Aspire.
7. GitHub Actions: Automate build, test, and Docker image creation with a CI/CD pipeline.
These practices will pay off quickly throughout the project's lifetime.
The best time to establish quality standards is at the beginning. Start your next .NET project with these seven steps, and you will build better software faster.
Hope you find this newsletter useful. See you next time.
Whenever you're ready, here's how I can help you:
The .NET Senior Playbook is built to:
Fast-track you from junior or mid-level to senior
Keep you growing as a senior
Help you beat any .NET interview
Covers everything: C#, ASP.NET Core, EF Core, system design — answer each question first, reveal the solution, and a test after every chapter proves it stuck. Finish, and you earn a verifiable certificate for your LinkedIn.
Not sure where you stand? Take the free .NET Developer Level Test:
Find out your real level — Junior to Senior+
15 minutes across 13 areas of C#, .NET, ASP.NET Core and System Design
No credit card required. When completed you get a personalized report: your level, your strongest areas, and where to focus next — the perfect way to benchmark yourself before diving into the Playbook.