newsletter

Getting Started With .NET Aspire 13: Building and Deploying an App With PostgreSQL, Redis, and Docker Compose

Download source code
5 min read

Newsletter Sponsors

Copied

Turn your card into code with Klutchcard (Sponsored)

What if your credit card had an API?

With Klutchcard, developers create unlimited virtual cards, auto-pause subscriptions, cap spend per merchant, and stream real transaction data straight into their own tools.

Build dashboards, test payments safely, or automate budgets β€” without relying on third-party fintechs. Klutchcard provides clear docs, Postman collections, and real examples.

πŸ‘‰ Start building with the Klutchcard API

.NET Aspire is an application framework for building observable, production-ready, cloud-native applications with .NET. It provides a consistent way to manage your application's dependencies, configuration, and deployment.

Think of Aspire as a layer that sits on top of your application and orchestrates how everything works together. It handles service discovery, configuration, health checks, and telemetry out of the box.

Starting from version 13, .NET Aspire was rebranded to Aspire and is now a multi-language application platform.

While Aspire continues to provide best-in-class support for .NET applications, version 13.0 brings support for Python and JavaScript. It provides comprehensive support for running, debugging, and deploying applications written in these languages.

Today, I want to show you how to build and run a .NET application with Aspire 13 and .NET 10.

In this post, we will explore:

  • Getting Started with Aspire 13
  • Configuring PostgreSQL and Redis in Aspire
  • Exploring Aspire Dashboard
  • Configuring OpenTelemetry
  • Deploying Aspire Application to Docker Compose

Let's dive in.

Copied

Getting Started with Aspire 13

I have built a product API that has the following integrations:

  • PostgreSQL database
  • HybridCache with Redis

Screenshot_1

To add Aspire to your project, we need to do the following steps:

Step 1:

Install the Aspire project templates:

bash
dotnet new install Aspire.ProjectTemplates

Step 2:

Install the Aspire CLI:

bash
dotnet tool install --global aspire.cli

Step 3:

Add the Aspire support for the Products.Api project in Visual Studio or Rider:

Screenshot_2

Aspire introduces two new project types to your solution:

  • AppHost: The orchestrator that defines your application's architecture and dependencies.
  • ServiceDefaults: Shared configuration and observability setup applied to all services.

Screenshot_3

By default, the AppHost project has the entry file name AppHost.cs with the following content:

csharp
var builder = DistributedApplication.CreateBuilder(args); builder .AddProject<Projects.Products_Api>("products-api"); builder.Build().Run();

The only dependency declared in the AppHost project is Products.Api, which contains our Web API.

Step 4:

Install the following NuGet packages in the AppHost project:

bash
dotnet add package Aspire.Hosting.PostgreSQL dotnet add package Aspire.Hosting.Redis

Step 5:

Configure all the dependencies in the AppHost.cs:

csharp
var builder = DistributedApplication.CreateBuilder(args); var cache = builder.AddRedis("cache"); var postgres = builder.AddPostgres("postgres"); builder .AddProject<Projects.Products_Api>("products-api") .WithReference(cache) .WithReference(postgres); builder.Build().Run();

The WithReference(cache) and WithReference(postgres) methods inject connection strings for Redis and PostgreSQL into the API project. Aspire automatically sets environment variables that the API can read to connect to these resources.

Step 6:

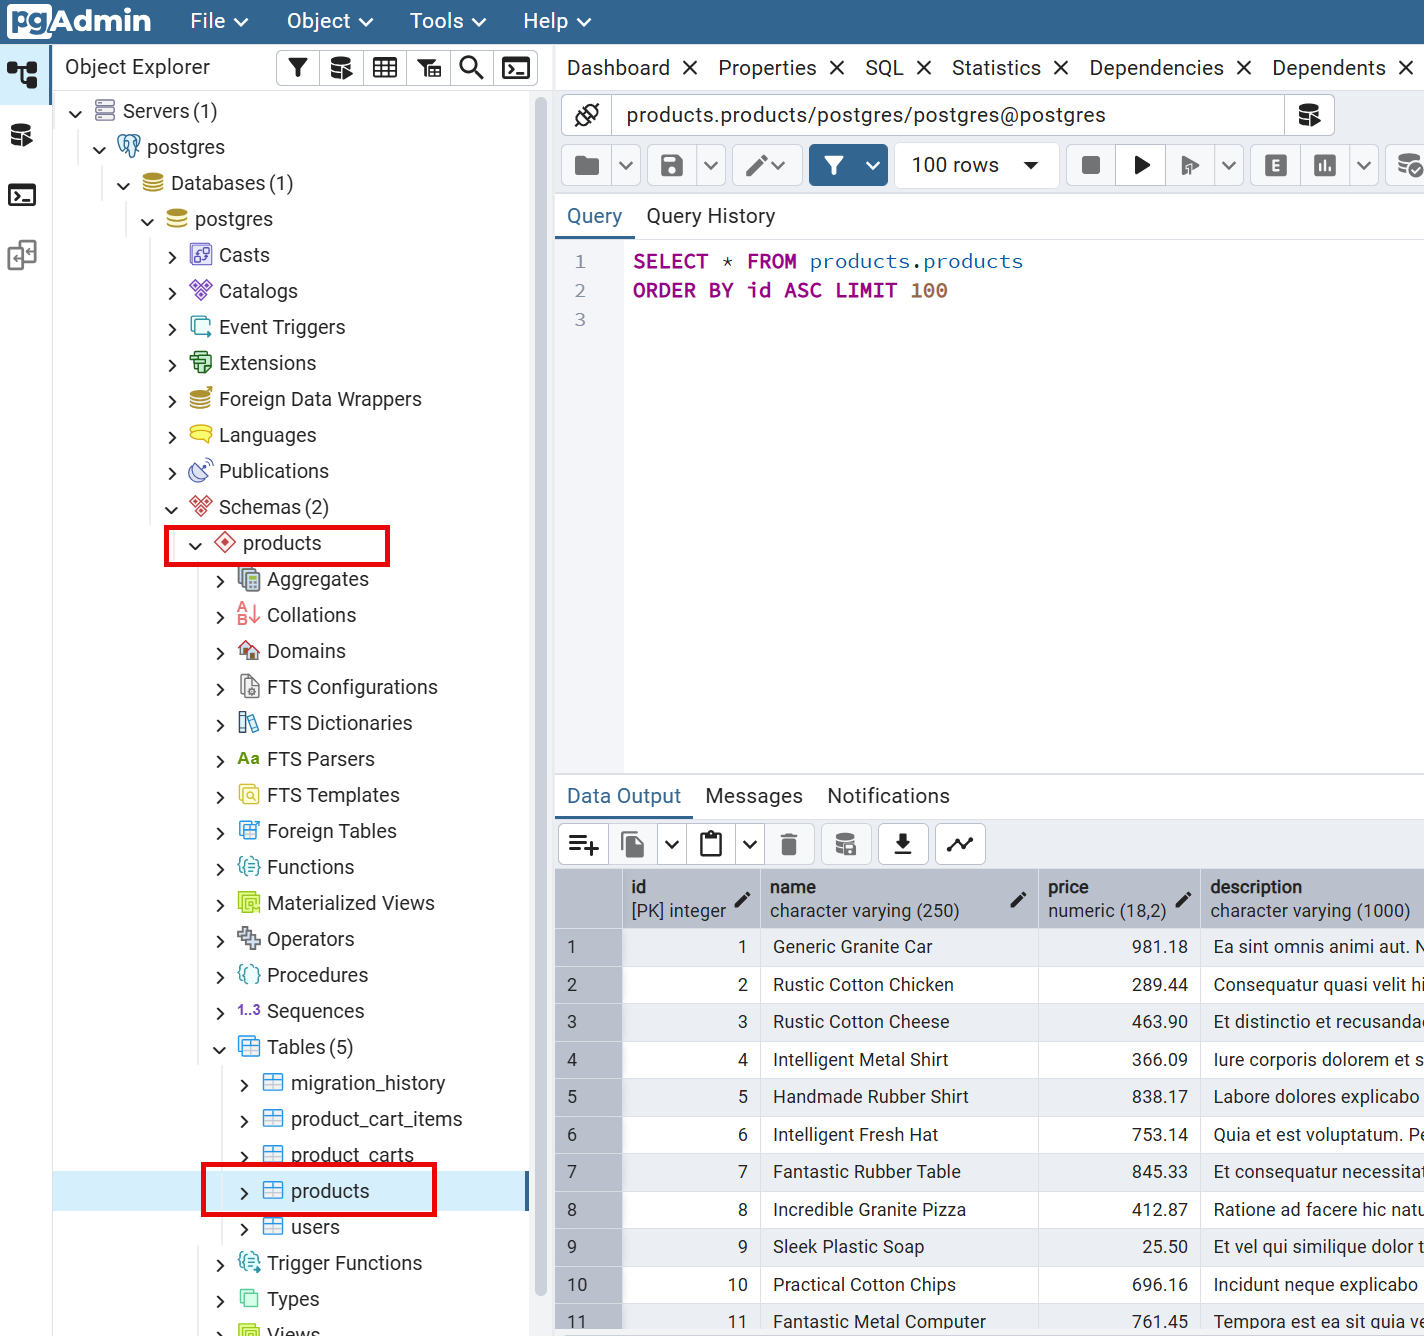
Configure the connection strings in the Products.Api project to connect to the PostgreSQL database:

csharp
using Microsoft.EntityFrameworkCore; using Products.Domain.Products; using Products.Infrastructure.Database; using Products.Infrastructure.Repositories; namespace Microsoft.Extensions.DependencyInjection; public static class HostDiExtensions { private static IServiceCollection AddEfCore( this IServiceCollection services, IConfiguration configuration) { var connectionString = configuration.GetConnectionString("postgres"); services.AddDbContext<ProductDbContext>((_, options) => { options.UseNpgsql(connectionString); }); return services; } }

The key part is configuration.GetConnectionString("postgres"). This reads the connection string that Aspire injected when we called WithReference(postgres) in AppHost.cs. Aspire automatically sets an environment variable with the PostgreSQL connection string, and the configuration system reads it.

This way, you don't need to hardcode connection strings in appsettings.json or your own environment variables.

In this project, I use the regular EF Core NuGet packages for Npgsql:

  • Microsoft.EntityFrameworkCore 10.0.0
  • Microsoft.EntityFrameworkCore.Design 10.0.0
  • Npgsql.EntityFrameworkCore.PostgreSQL 10.0.0

Step 7:

Configure the connection string in the Products.Api project to connect to the Redis cache:

csharp
public static IServiceCollection AddWebHostInfrastructure( this IServiceCollection services, IConfiguration configuration) { services.AddHybridCache(options => { options.DefaultEntryOptions = new HybridCacheEntryOptions { Expiration = TimeSpan.FromMinutes(10), LocalCacheExpiration = TimeSpan.FromMinutes(10) }; }); return services; } private static IServiceCollection AddRedis( this IServiceCollection services, IConfiguration configuration) { var redisConnectionString = configuration.GetConnectionString("cache")!; services.AddMemoryCache(); services .AddStackExchangeRedisCache(options => { options.Configuration = redisConnectionString; }); return services; }

The AddHybridCache method registers HybridCache with default expiration settings. The AddRedis method registers StackExchangeRedisCache as the L2 cache.

Just like with PostgreSQL, Aspire injects the Redis connection string via configuration.GetConnectionString("cache").

In this project, I use the following NuGet packages for Redis cache:

  • Microsoft.Extensions.Caching.Hybrid 10.1.0
  • Microsoft.Extensions.Caching.StackExchangeRedis 10.0.1

Step 8:

Let's run our application locally with Visual Studio or Rider:

Screenshot_4

Aspire dashboard

The Aspire dashboard opens automatically in your web browser (the port may vary). The dashboard shows:

  • Resources - All running services (postgres, cache, products-api)
  • Console logs - Real-time logs from each service
  • Structured logs - Filterable and searchable logs
  • Traces - Distributed traces across services
  • Metrics - Performance metrics and health checks

The first run may take a few minutes while Docker pulls the container images. Subsequent runs will be much faster.

The dashboard shows all running services, their health status, logs, and distributed traces.

Screenshot_5

Copied

Configuring PostgreSQL and Redis in Aspire

In Aspire, you can easily configure PostgreSQL and Redis resources with available options.

Redis resource with RedisInsight

csharp
var cache = builder.AddRedis("cache") .WithRedisInsight();

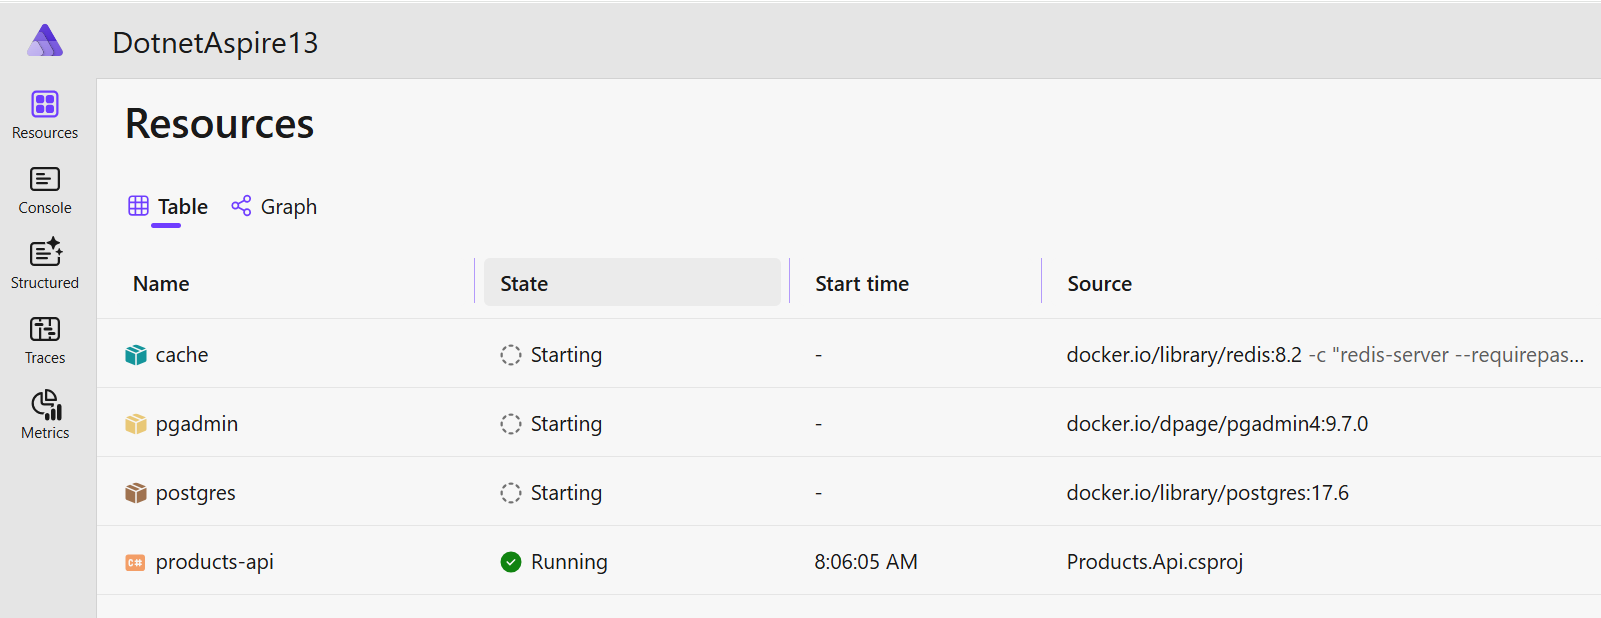
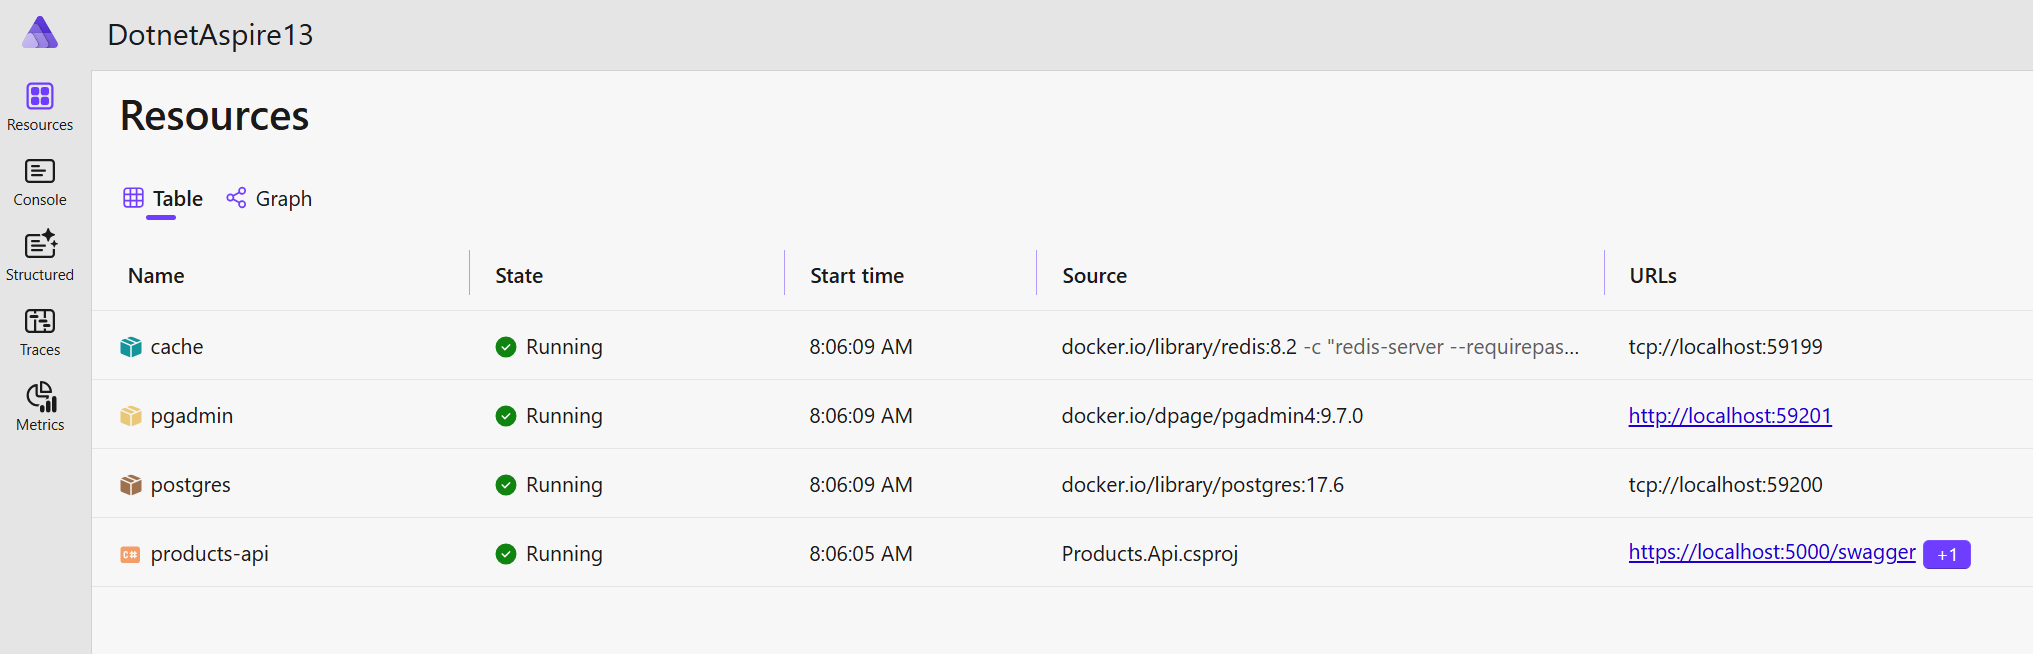
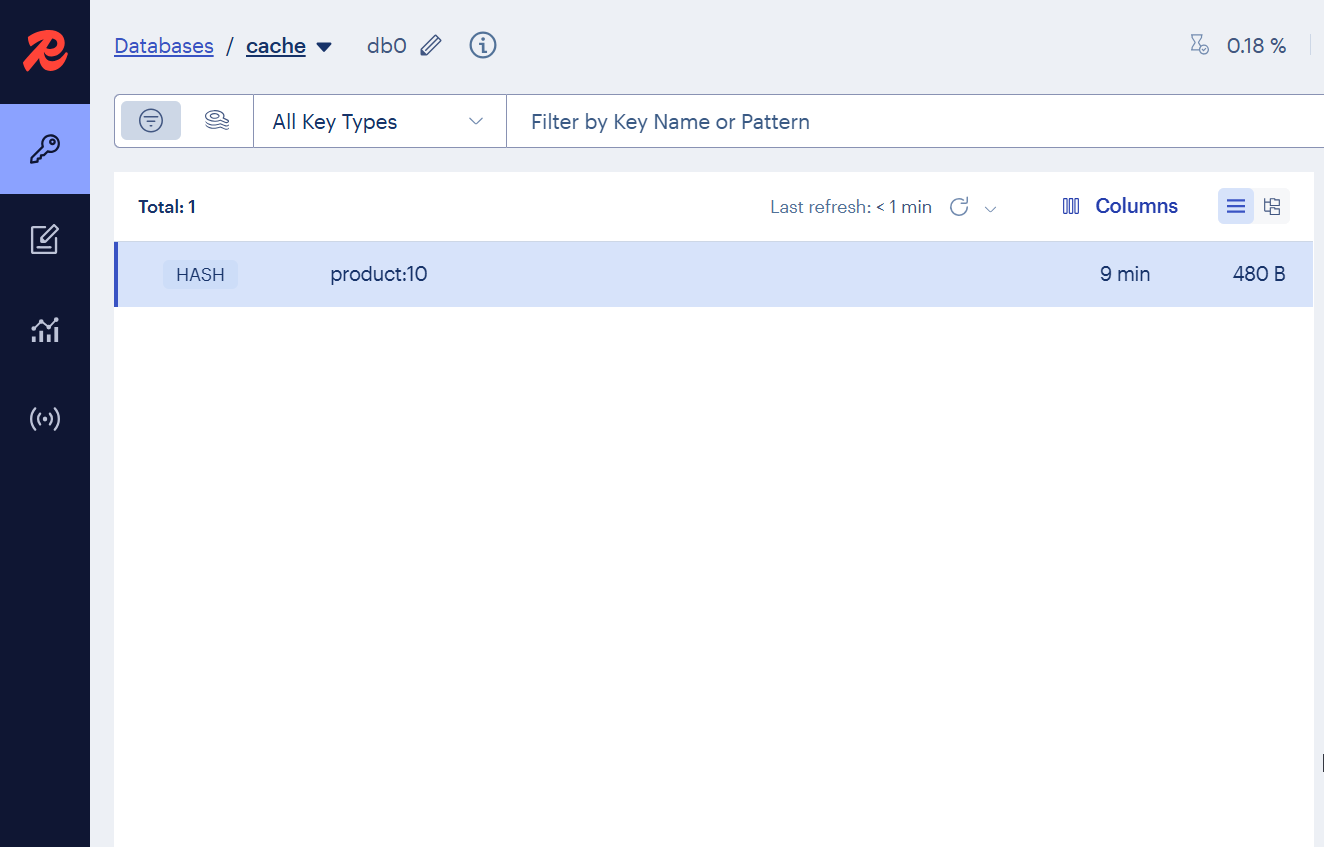
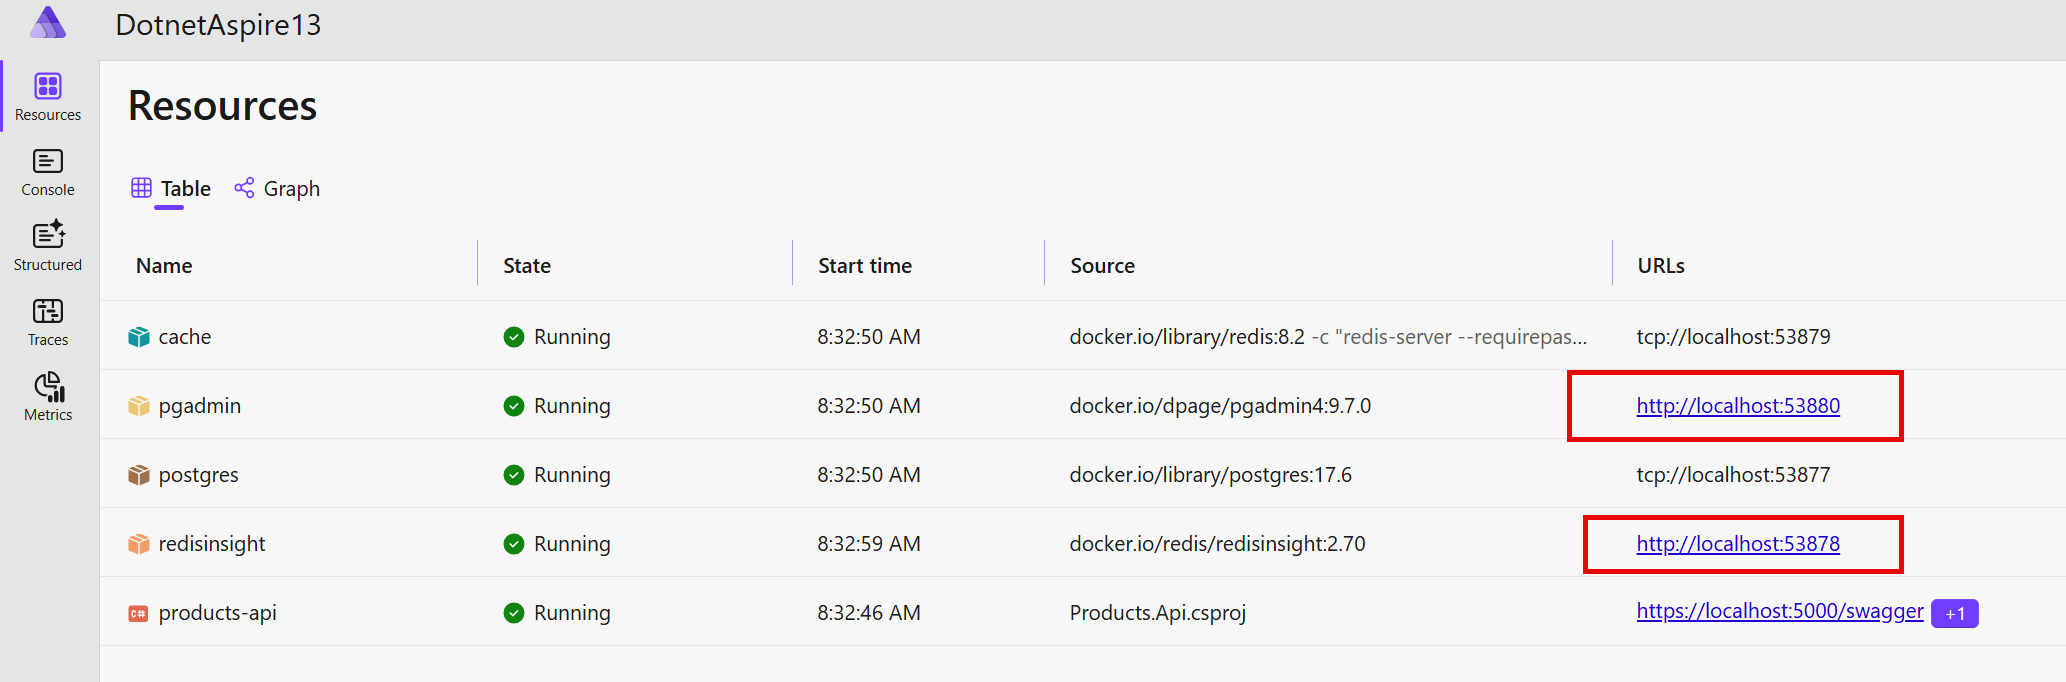
This declares a Redis resource named "cache". The WithRedisInsight() method adds RedisInsight, a web-based GUI for inspecting Redis data.

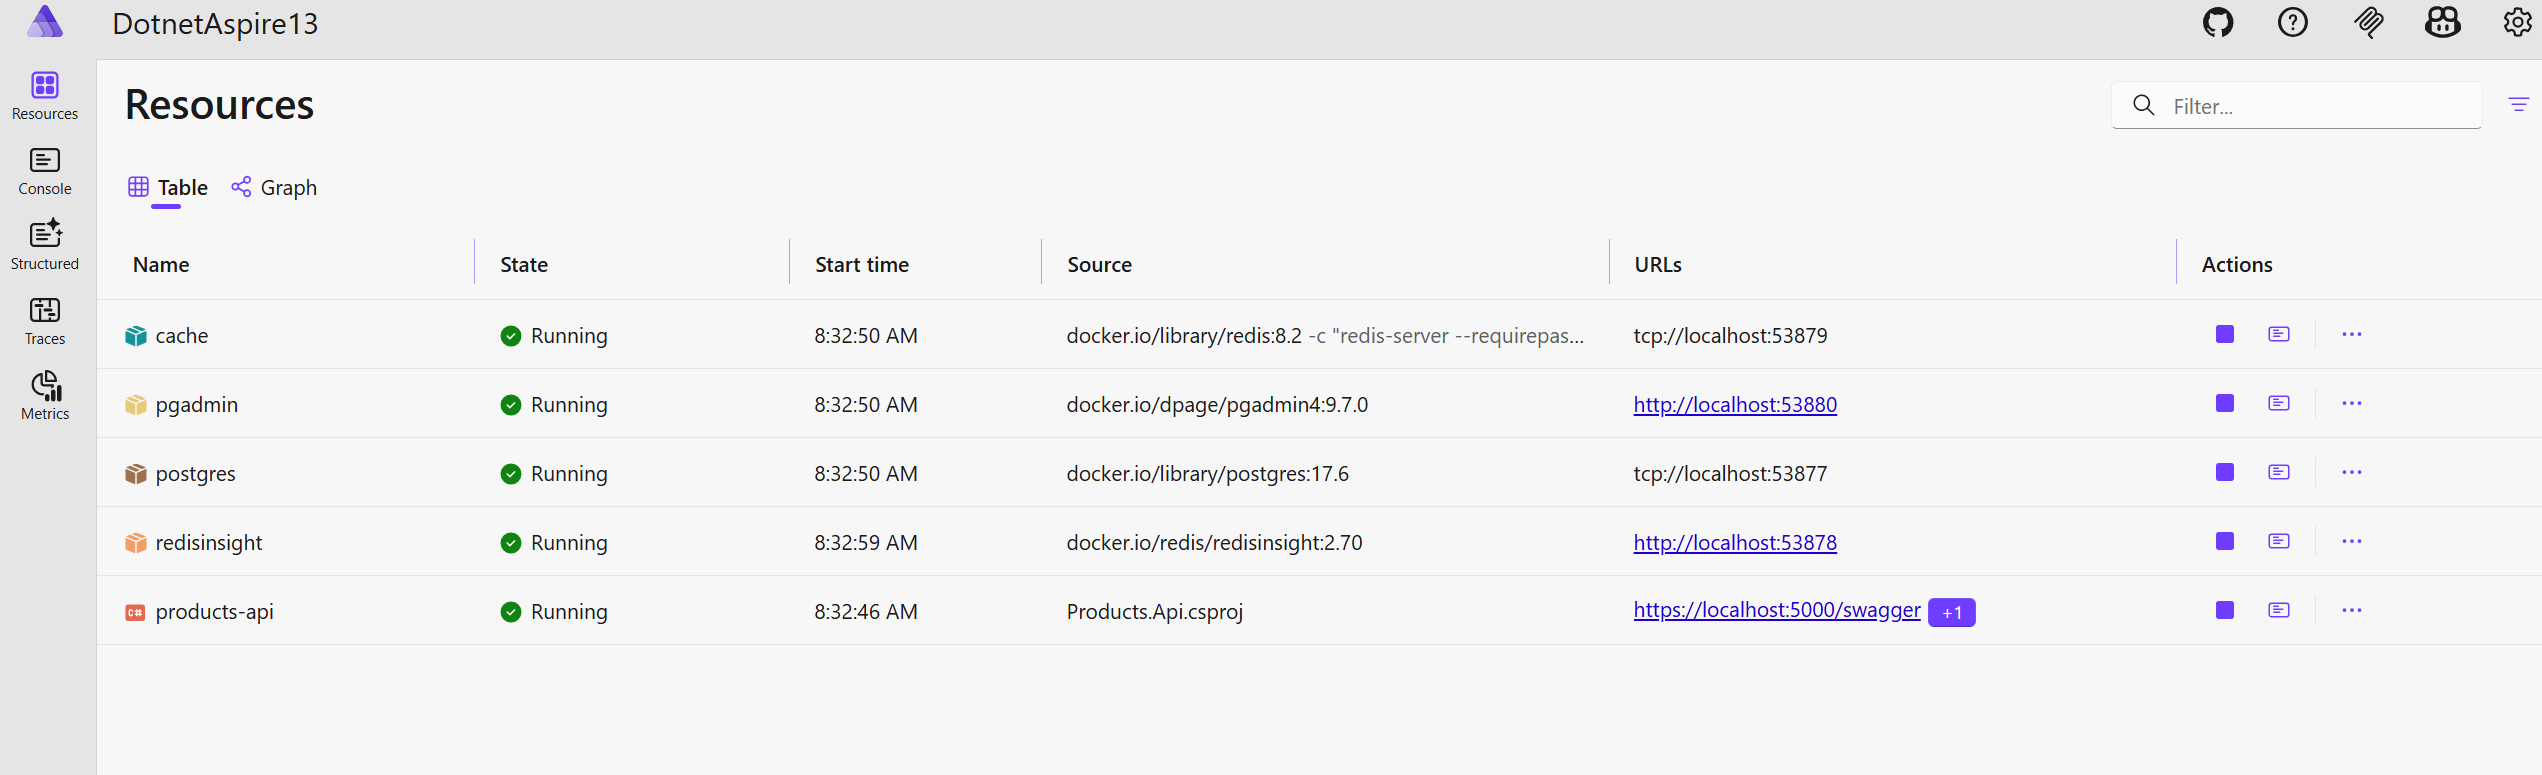
When you run the app, Aspire starts a Redis container and a RedisInsight container. You can browse to RedisInsight from the Aspire dashboard to view cached keys and values.

Screenshot_6

PostgreSQL resource with pgAdmin

csharp
var postgres = builder.AddPostgres("postgres") .WithPgAdmin() .WithDataVolume(isReadOnly: false);

This declares a PostgreSQL resource named "postgres". The WithPgAdmin() method adds pgAdmin, a web-based database management tool.

The WithDataVolume(isReadOnly: false) method creates a Docker volume to persist database data across container restarts.

We can use pgAdmin to explore the database and run queries:

Screenshot_7

To access RedisInsight and pgAdmin, you can click on the corresponding links in the Aspire dashboard:

Screenshot_8

Explore the official documentation for more customization options:

Copied

Exploring Aspire Dashboard

Here is what the Aspire dashboard looks like after running the application locally:

Screenshot_9

How Aspire wires everything together

When you run the AppHost, Aspire does the following:

  1. Starts the PostgreSQL container and pgAdmin container
  2. Starts the Redis container and RedisInsight container
  3. Waits for all containers to be healthy
  4. Injects connection strings into the Products.Api project via environment variables
  5. Starts the Products.Api project
  6. Opens the Aspire dashboard in your browser

Here you can manage containers: start, stop, and view their logs.

You can also switch to the Graph view to see the dependencies between services:

Screenshot_10

On the Console tab you can see the logs from each service. You can view all the console logs or select a specific service to filter them:

Screenshot_11

On the Structured Logs tab you can filter and search structured logs:

Screenshot_12

Before we explore the Traces tab, let's configure OpenTelemetry in our solution.

Copied

Configuring OpenTelemetry

The ServiceDefaults project defines the observability configuration for all services.

This project is automatically added to the Products.Api project when adding the Aspire support for the solution:

csharp
var builder = WebApplication.CreateBuilder(args); builder.AddServiceDefaults();

Here is how OpenTelemetry is configured in the ServiceDefaults project:

csharp
public static TBuilder ConfigureOpenTelemetry<TBuilder>(this TBuilder builder) where TBuilder : IHostApplicationBuilder { builder.Logging.AddOpenTelemetry(logging => { logging.IncludeFormattedMessage = true; logging.IncludeScopes = true; }); builder.Services.AddOpenTelemetry() .WithMetrics(metrics => { metrics.AddAspNetCoreInstrumentation() .AddHttpClientInstrumentation() .AddRuntimeInstrumentation(); }) .WithTracing(tracing => { tracing.AddSource(builder.Environment.ApplicationName) .AddAspNetCoreInstrumentation() .AddHttpClientInstrumentation(); }); builder.AddOpenTelemetryExporters(); return builder; }

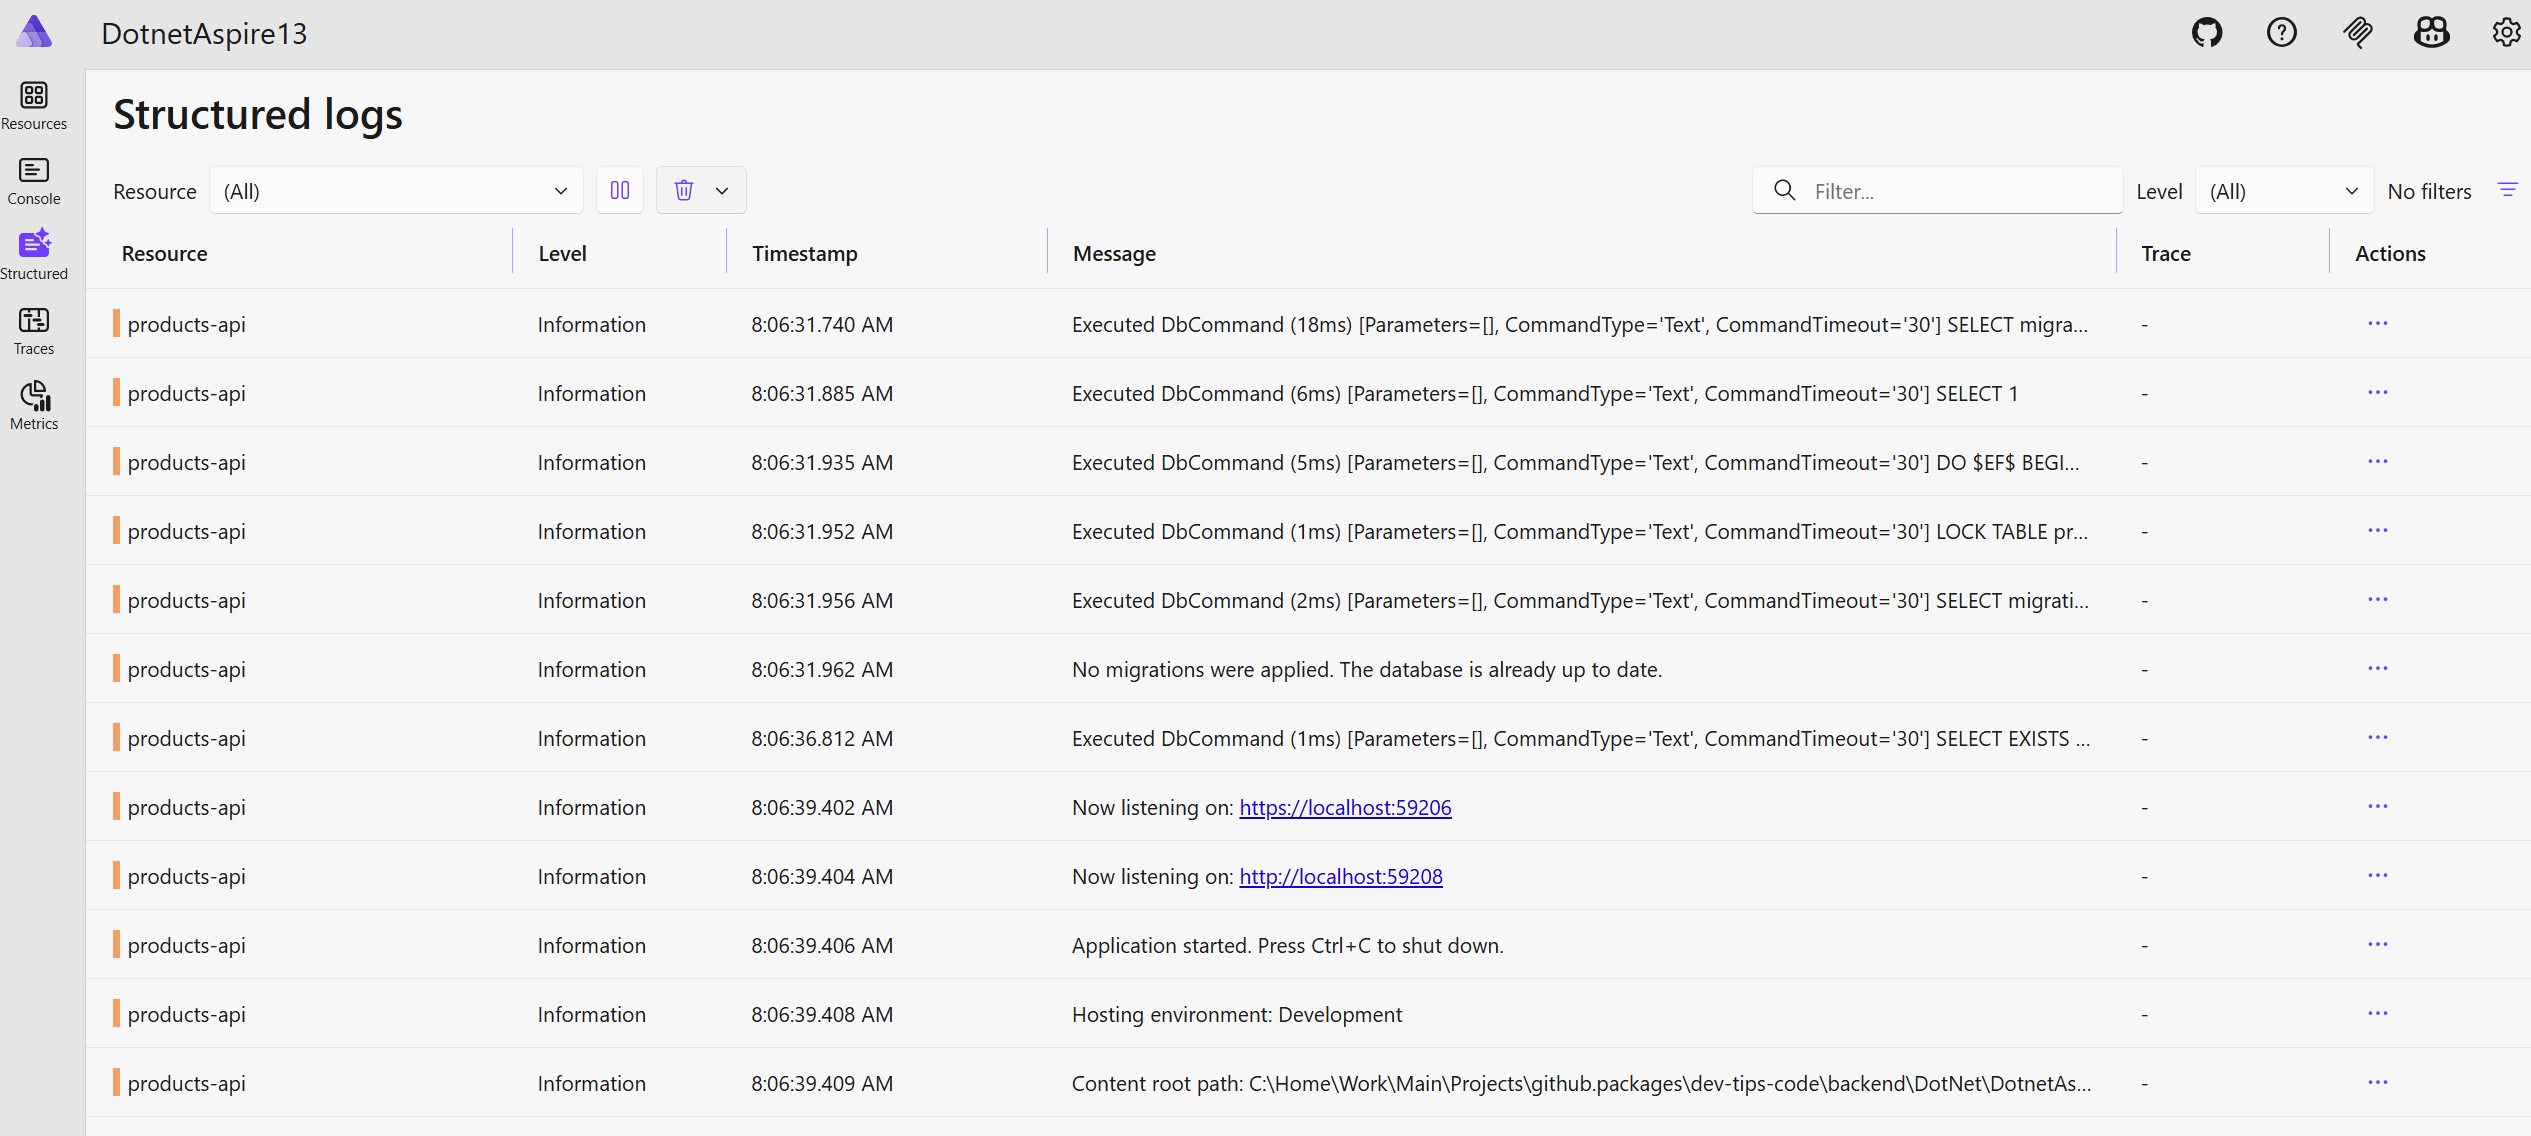
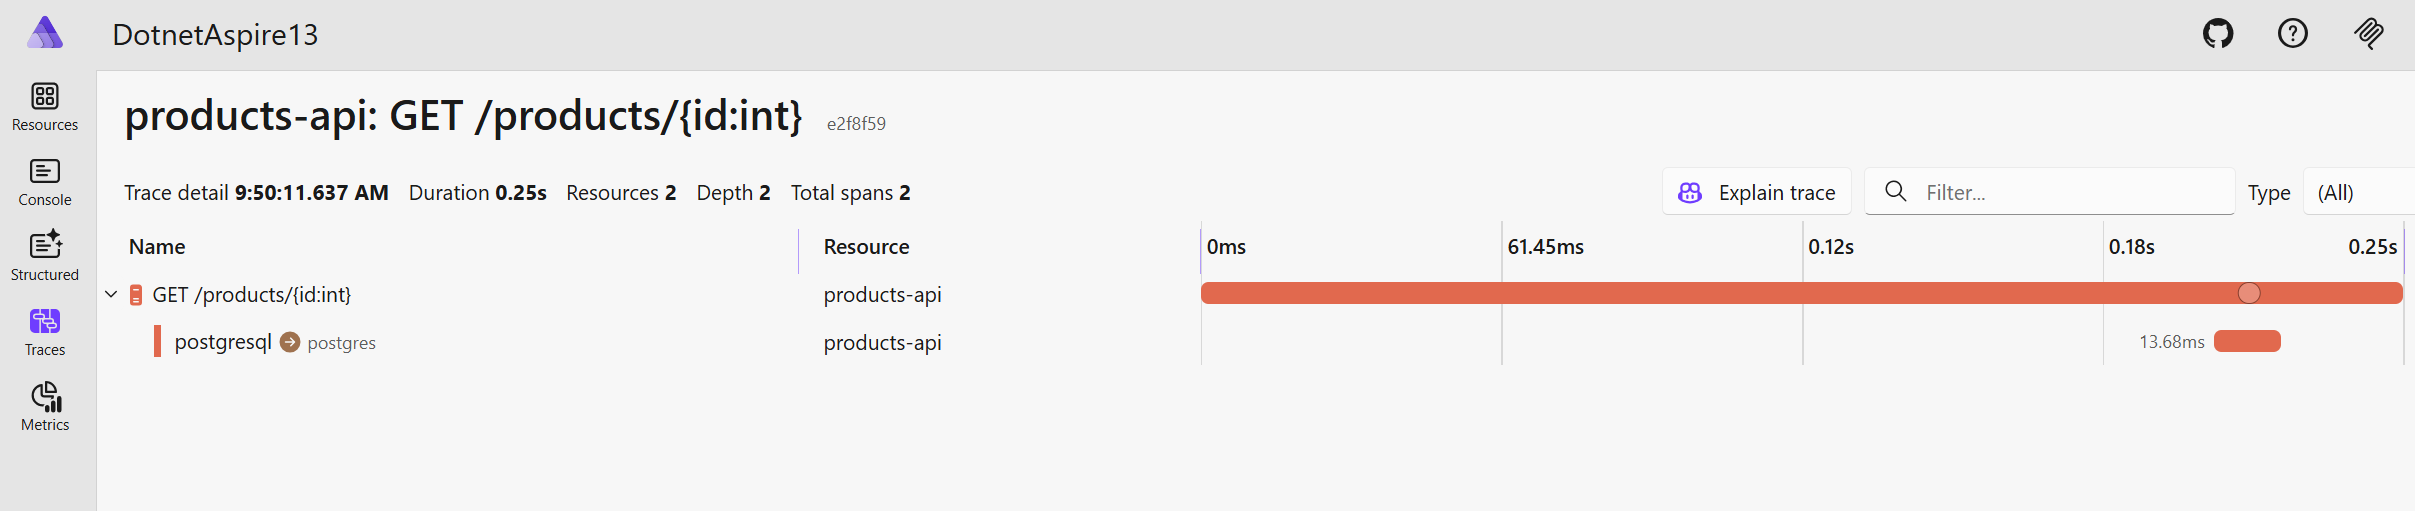
By default, Aspire configures OpenTelemetry to send logs and metrics to the dashboard. But you can configure to send logs and traces to any other destination, such as Jaeger, Seq, Grafana or any other observability tool.

By default, OpenTelemetry is configured with AspNetCore and HttpClient instrumentation.

For our project, we need to add instrumentation for the PostgreSQL and Redis integrations.

We need to install the following NuGet packages:

bash
dotnet add package Npgsql.OpenTelemetry dotnet add package OpenTelemetry.Instrumentation.StackExchangeRedis

Note: OpenTelemetry.Instrumentation.StackExchangeRedis package is still in the preview

Next, we need to register the instrumentation from the installed packages:

csharp
tracing.AddSource(builder.Environment.ApplicationName) .AddAspNetCoreInstrumentation() .AddHttpClientInstrumentation() .AddNpgsql() .AddRedisInstrumentation();

Here is what the Traces tab looks like in the Aspire dashboard:

Screenshot_13

Copied

Deploying Aspire Application to Docker Compose

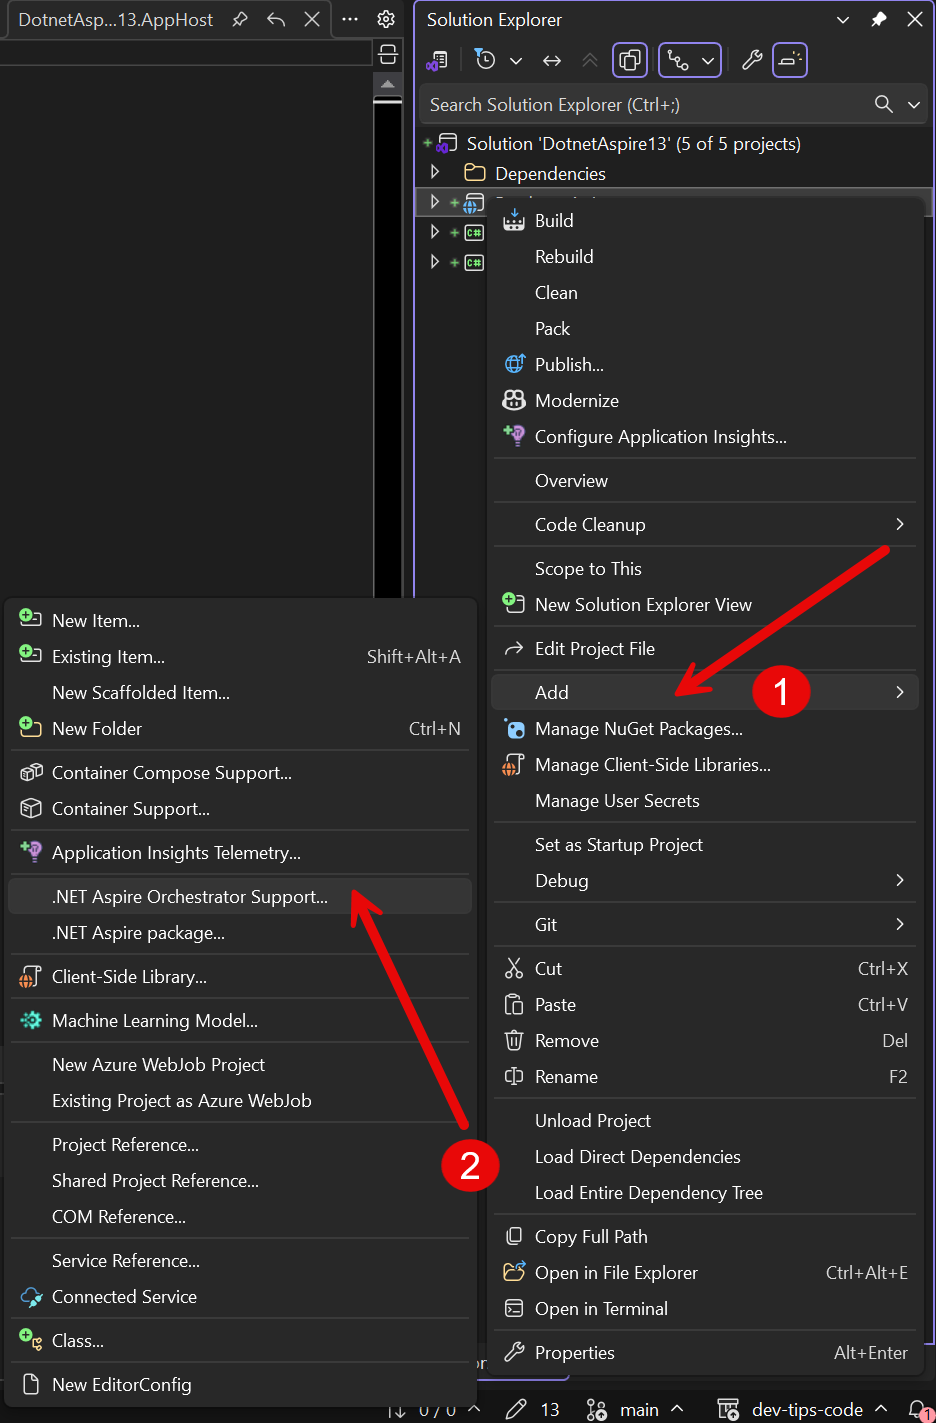
What I like about the Aspire is how easy it is to deploy your application to various locations. Let's explore how we can deploy our app to Docker Compose.

First, we need to install the following NuGet package into the AppHost project:

bash
dotnet add package Aspire.Hosting.Docker

Second, we need to add the following code to the AppHost.cs:

csharp
builder.AddDockerComposeEnvironment("env"); builder .AddProject<Projects.Products_Api>("products-api") .WithExternalHttpEndpoints() .WithReference(cache) .WithReference(postgres);

AddDockerComposeEnvironment tells Aspire to use a Docker Compose environment named "env".

The WithExternalHttpEndpoints() method makes the API accessible from outside the Aspire environment. This is needed to run the application in Docker from the created Docker Compose file.

With a single Aspire CLI command, we can deploy our application to a Docker Compose YAML file:

bash
aspire publish -o docker-compose-artifacts

As a result, Aspire will generate two files in the docker-compose-artifacts folder:

  • .env - Environment variables for the Docker Compose environment
  • docker-compose.yaml - Docker Compose file that defines the services and their dependencies

Here is what the generated docker-compose.yaml file looks like:

yml
services: env-dashboard: image: "mcr.microsoft.com/dotnet/nightly/aspire-dashboard:latest" expose: - "18888" - "18889" networks: - "aspire" restart: "always" cache: image: "docker.io/library/redis:8.2" command: - "-c" - "redis-server --requirepass $$REDIS_PASSWORD" entrypoint: - "/bin/sh" environment: REDIS_PASSWORD: "${CACHE_PASSWORD}" expose: - "6379" networks: - "aspire" postgres: image: "docker.io/library/postgres:17.6" environment: POSTGRES_HOST_AUTH_METHOD: "scram-sha-256" POSTGRES_INITDB_ARGS: "--auth-host=scram-sha-256 --auth-local=scram-sha-256" POSTGRES_USER: "postgres" POSTGRES_PASSWORD: "${POSTGRES_PASSWORD}" expose: - "5432" volumes: - type: "volume" target: "/var/lib/postgresql/data" source: "dotnetaspire13.apphost-878e181760-postgres-data" read_only: false networks: - "aspire" products-api: image: "${PRODUCTS_API_IMAGE}" environment: OTEL_DOTNET_EXPERIMENTAL_OTLP_EMIT_EXCEPTION_LOG_ATTRIBUTES: "true" OTEL_DOTNET_EXPERIMENTAL_OTLP_EMIT_EVENT_LOG_ATTRIBUTES: "true" OTEL_DOTNET_EXPERIMENTAL_OTLP_RETRY: "in_memory" ASPNETCORE_FORWARDEDHEADERS_ENABLED: "true" HTTP_PORTS: "${PRODUCTS_API_PORT}" ConnectionStrings__cache: "cache:6379,password=${CACHE_PASSWORD}" CACHE_HOST: "cache" CACHE_PORT: "6379" CACHE_PASSWORD: "${CACHE_PASSWORD}" CACHE_URI: "redis://:${CACHE_PASSWORD}@cache:6379" ConnectionStrings__postgres: "Host=postgres;Port=5432;Username=postgres;Password=${POSTGRES_PASSWORD}" POSTGRES_HOST: "postgres" POSTGRES_PORT: "5432" POSTGRES_USERNAME: "postgres" POSTGRES_PASSWORD: "${POSTGRES_PASSWORD}" POSTGRES_URI: "postgresql://postgres:${POSTGRES_PASSWORD}@postgres:5432" POSTGRES_JDBCCONNECTIONSTRING: "jdbc:postgresql://postgres:5432" OTEL_EXPORTER_OTLP_ENDPOINT: "http://env-dashboard:18889" OTEL_EXPORTER_OTLP_PROTOCOL: "grpc" OTEL_SERVICE_NAME: "products-api" ports: - "${PRODUCTS_API_PORT}" networks: - "aspire" networks: aspire: driver: "bridge" volumes: dotnetaspire13.apphost-878e181760-postgres-data: driver: "local"

So much work is done for us in a single command. This is really cool!

You can find more information on Aspire apps deployment in the Aspire documentation.

Copied

Summary

Here are the key benefits of using Aspire:

  • Simplified local development: Run all your services, databases, and dependencies with a single command.
  • Built-in observability: OpenTelemetry integration for logs, metrics, and traces comes preconfigured.
  • Service discovery: Services automatically discover each other without hardcoded URLs.
  • Configuration management: Centralized configuration that works locally and in the cloud.
  • Easy deployment to Docker Compose and Cloud: Deploy your entire application stack to Docker, Azure or AWS with minimal setup.
  • Consistent developer experience: New team members can get the entire application running in minutes.

Aspire 13 makes it easy to deploy your application to Azure. You can use the azd (Azure Developer CLI) tool to provision Azure resources and deploy your app to Azure Container Apps.

Aspire automatically generates the necessary infrastructure-as-code files (Bicep templates) based on your AppHost configuration.

Simply run azd init to initialize the Azure deployment configuration, then azd up to provision resources and deploy your application. Aspire will create Azure Container Apps for your API, Azure Database for PostgreSQL, and Azure Cache for Redis, all wired together with the same connection strings and service discovery you used locally.

If you want to learn more about how to deploy your .NET applications to Azure, I recommend reading this article.

Hope you find this newsletter useful. See you next time.

You can download source code for this newsletter for free
Download source code

Whenever you're ready, here's how I can help you:

The .NET Senior Playbook is built to:

  • Fast-track you from junior or mid-level to senior
  • Keep you growing as a senior
  • Help you beat any .NET interview

Covers everything: C#, ASP.NET Core, EF Core, system design β€” answer each question first, reveal the solution, and a test after every chapter proves it stuck. Finish, and you earn a verifiable certificate for your LinkedIn.

The .NET Senior Playbook
View the Playbook

Not sure where you stand? Take the free .NET Developer Level Test:

  • Find out your real level β€” Junior to Senior+
  • 15 minutes across 13 areas of C#, .NET, ASP.NET Core and System Design

No credit card required. When completed you get a personalized report: your level, your strongest areas, and where to focus next β€” the perfect way to benchmark yourself before diving into the Playbook.

Take the free test

Enjoyed this article? Share it with your network

Improve Your .NET and Architecture Skills

Join my community of 25,000+ developers and architects.

Each week you will get 1 practical tip with best practices and real-world examples.

Learn how to craft better software with source code available for my newsletter.

Join 25,000+ developers already reading
No spam. Unsubscribe any time.