EF Core is the most popular way to work with a database in .NET.
Azure SQL Database is the managed SQL Server you get in the cloud, with backups, patching, and high availability handled for you.
Putting the two together is straightforward, but the cloud adds a few things you never deal with on a local SQL Server.
Connections drop under load. The firewall blocks you by default. And a database password sitting in your connection string is a risk you want to remove before production.
Today I want to present you with a complete guide to getting started with Azure SQL Database in .NET.
In this post, we will explore:
- What Azure SQL Database is
- How to create an Azure SQL Database in the Azure Portal
- Connecting EF Core to Azure SQL
- Running EF Core migrations against Azure SQL
- Adding connection resilience for transient faults
- Setting up Azure SQL with .NET Aspire
- Passwordless authentication with Microsoft Entra ID
Let's dive in.
What Is Azure SQL Database
Azure SQL Database is a fully managed database service built on the SQL Server engine.
Because it is the same engine, EF Core talks to it through the exact provider you already use for SQL Server. You do not need a special "Azure" provider - only a connection string that points to the cloud.
Azure manages the parts you do not want to: the operating system, patching, backups, and failover. You manage your schema and your data.
You pick from two main purchasing models:
- Provisioned - a fixed amount of compute that is always on. Predictable cost for steady workloads.
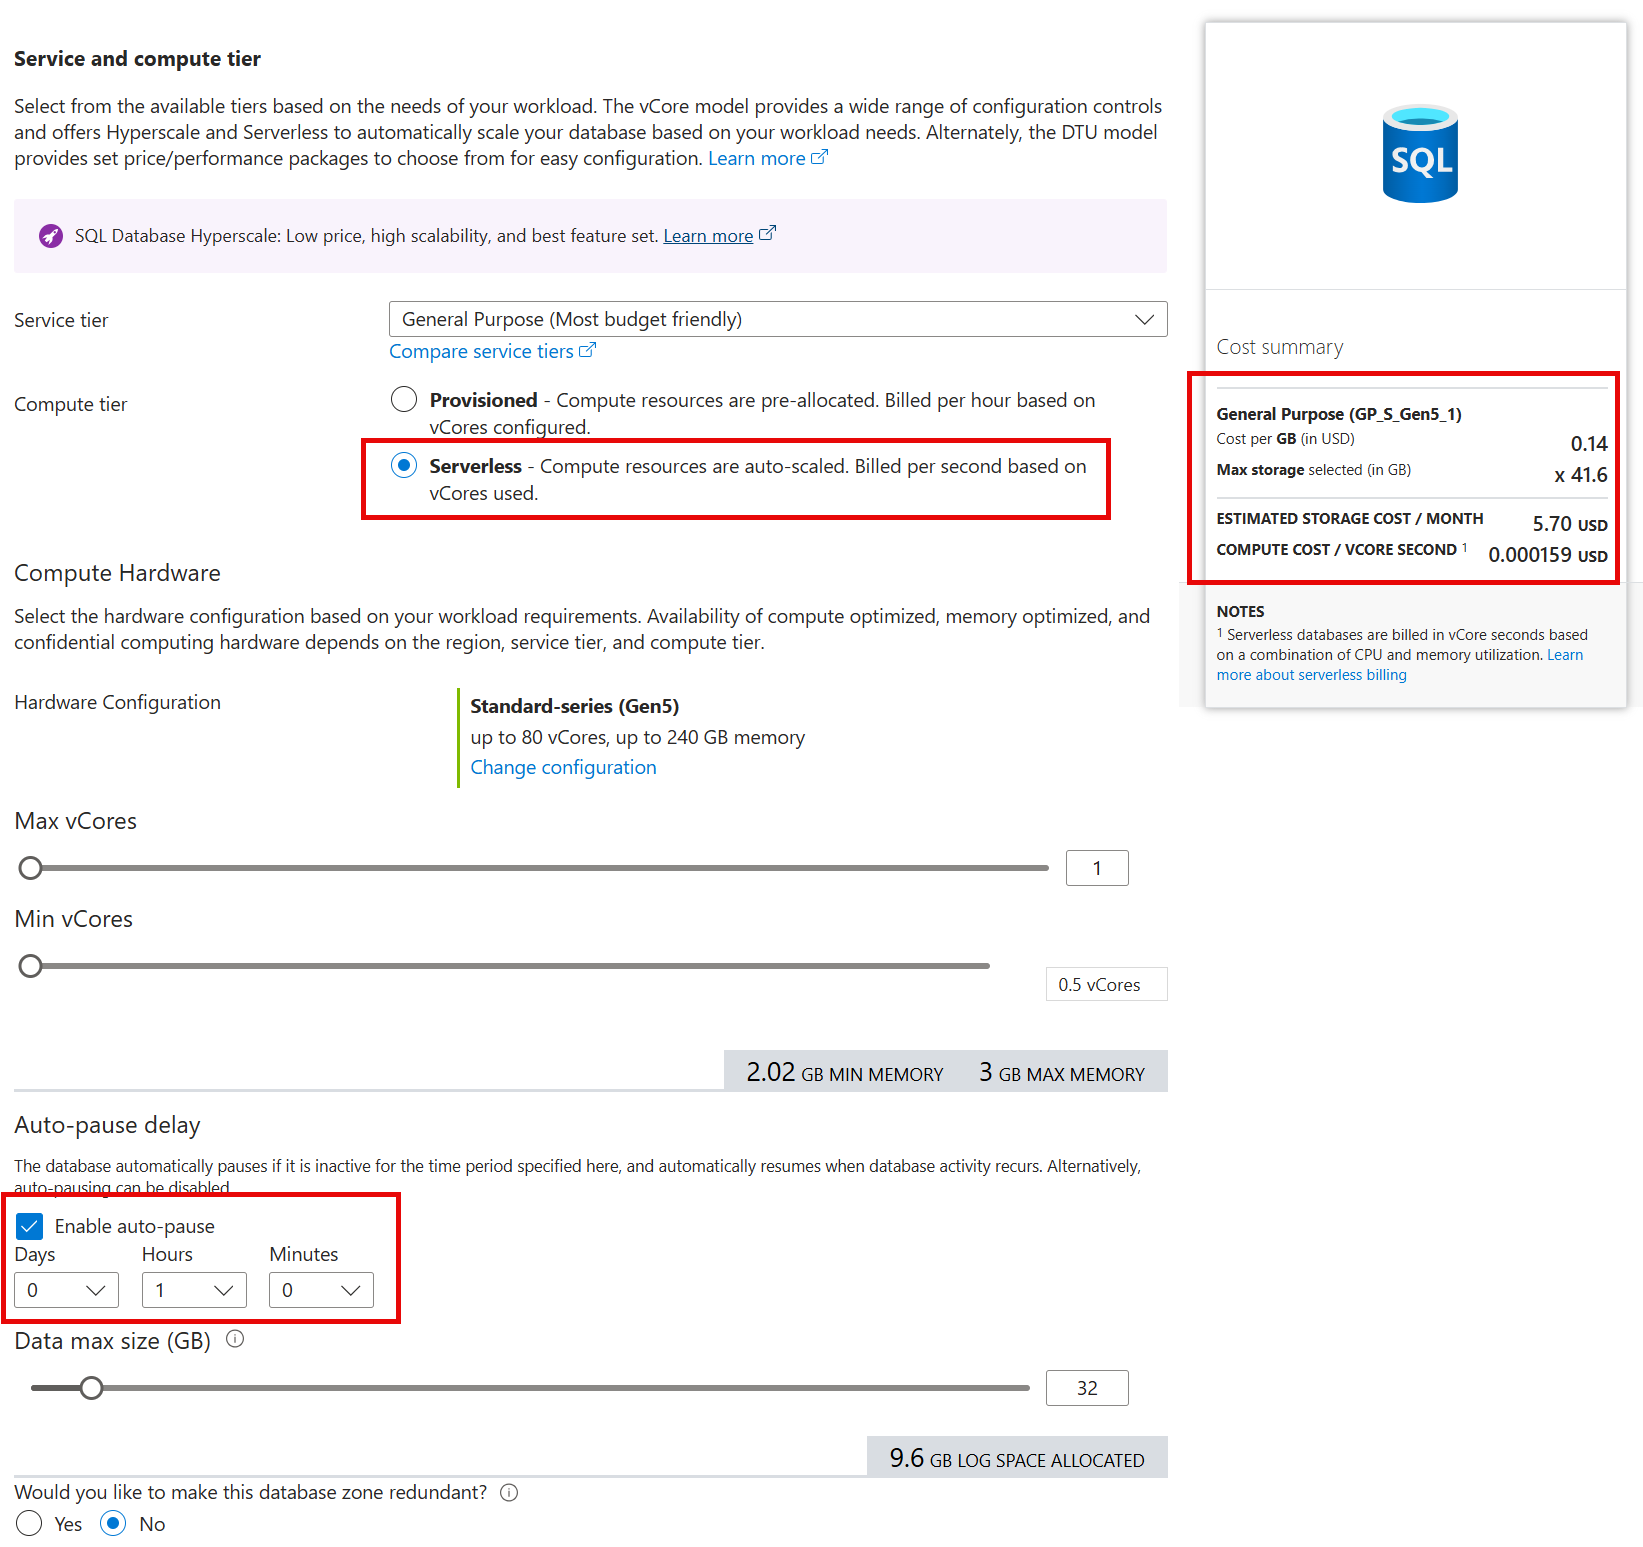
- Serverless - compute that scales automatically and pauses when idle. You pay per second of use, which is ideal for development and test environments.
First, let's create one.
Creating an Azure SQL Database in the Azure Portal
Follow these steps:
1. Open the Azure Portal, search for "SQL databases", and click Create.
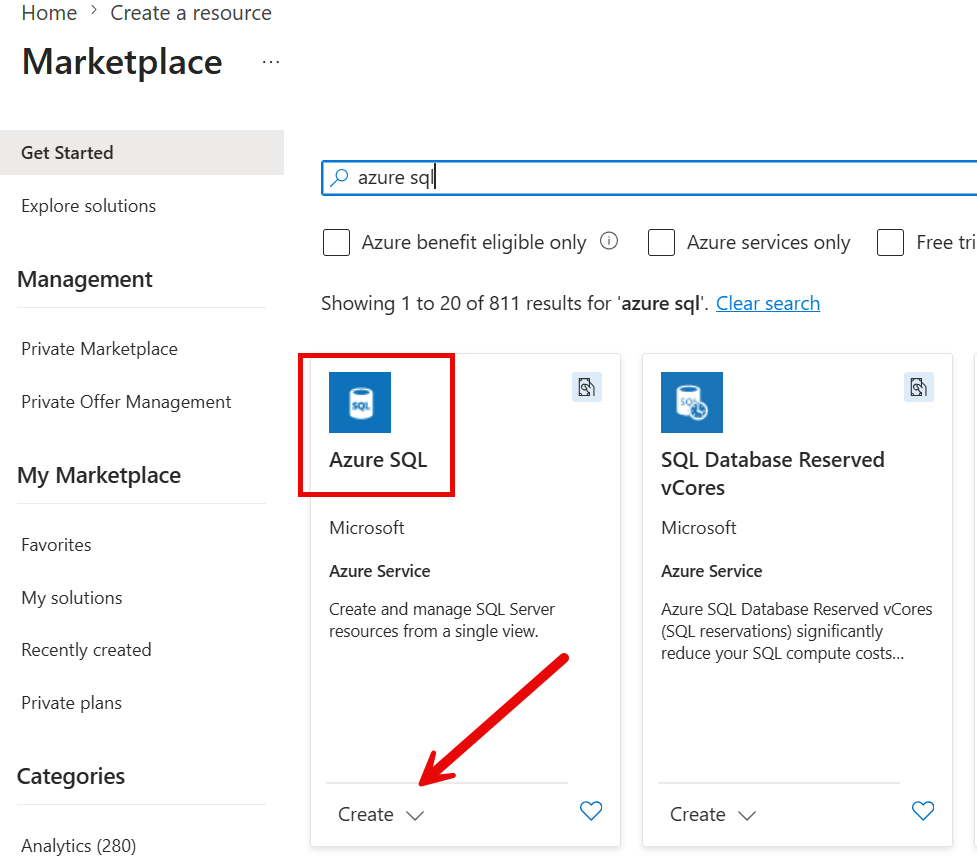
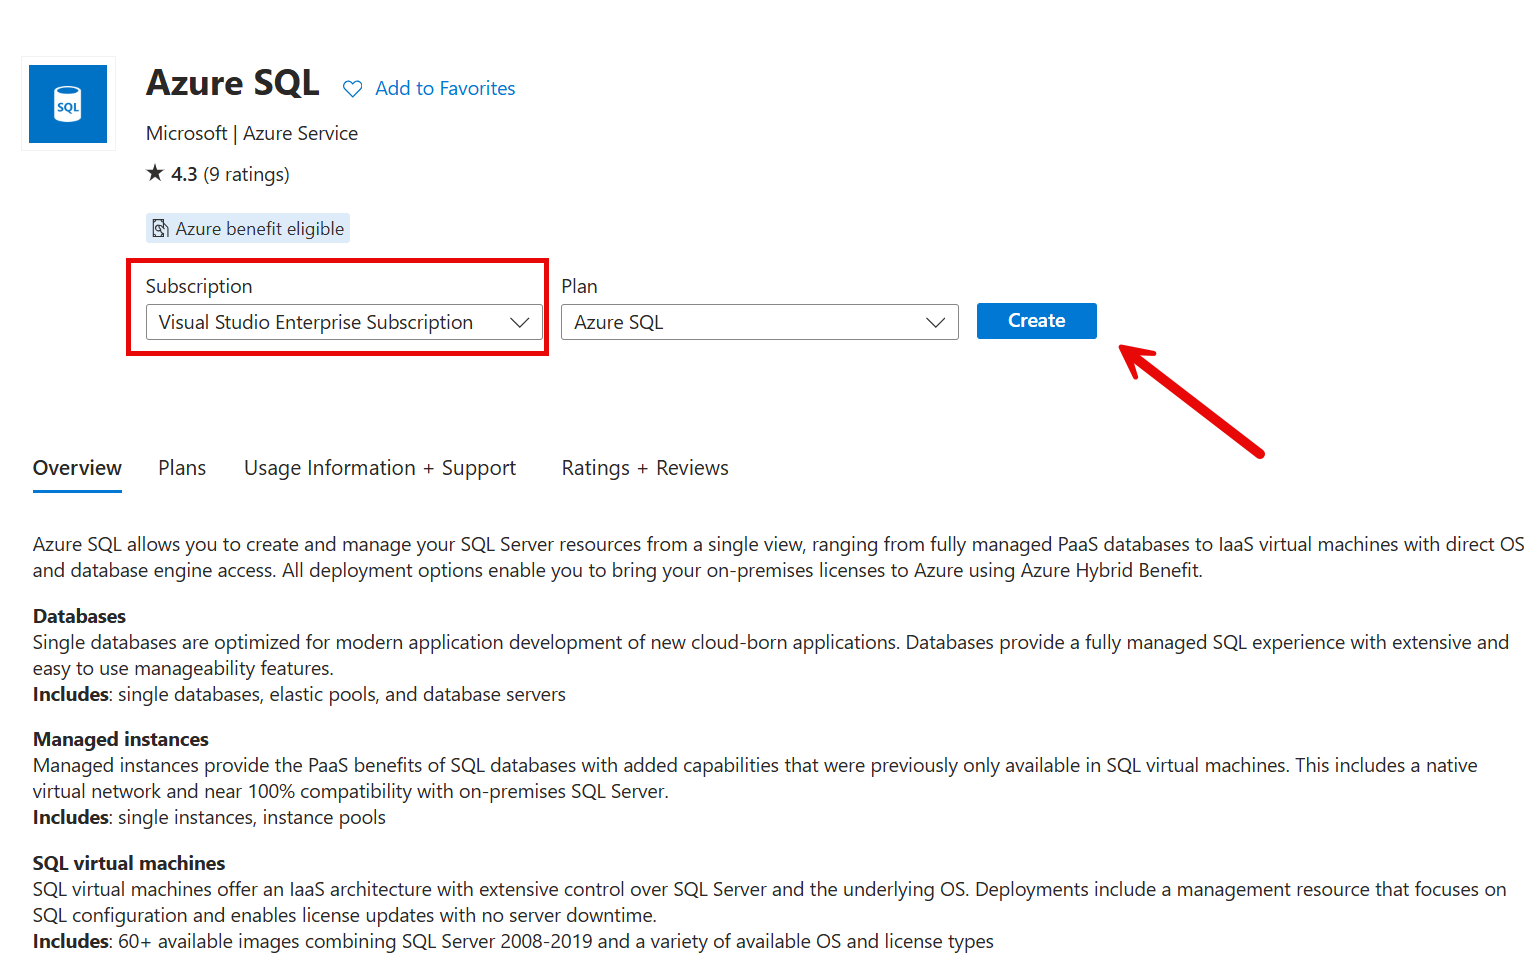
2. On the next page, select your Azure subscription and click Create:
3. Enter your database name and set up a logical SQL server to host the database:
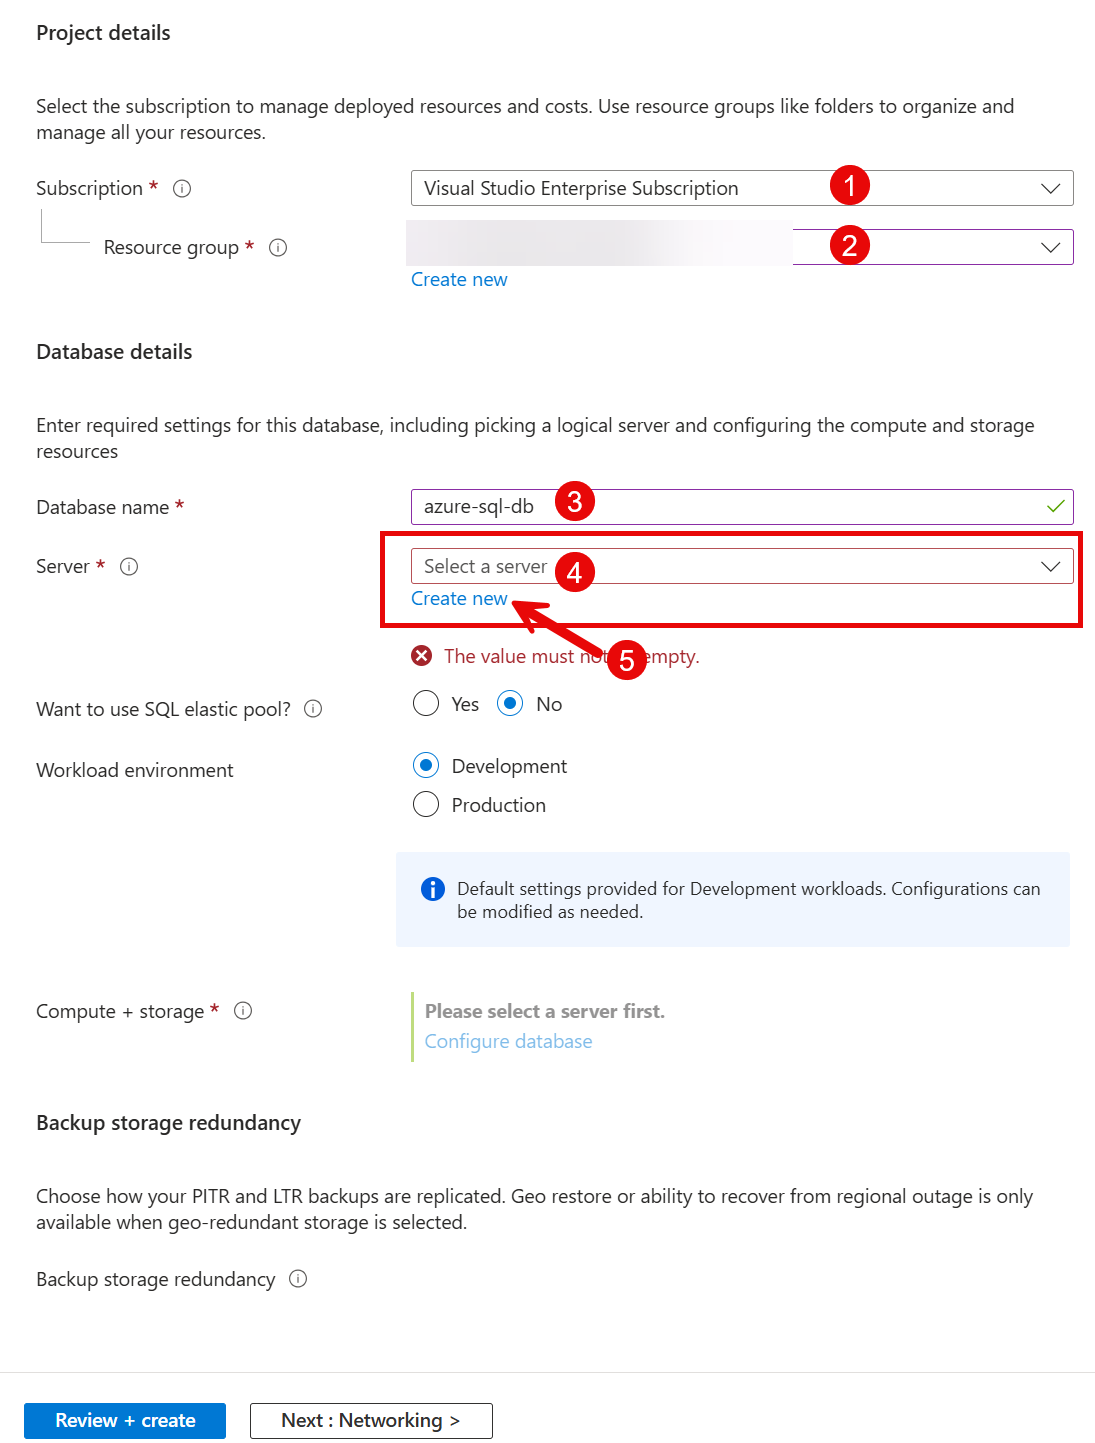
4. Create a new one, select a location, give it a unique name, set the identification method, and set an admin login and password.
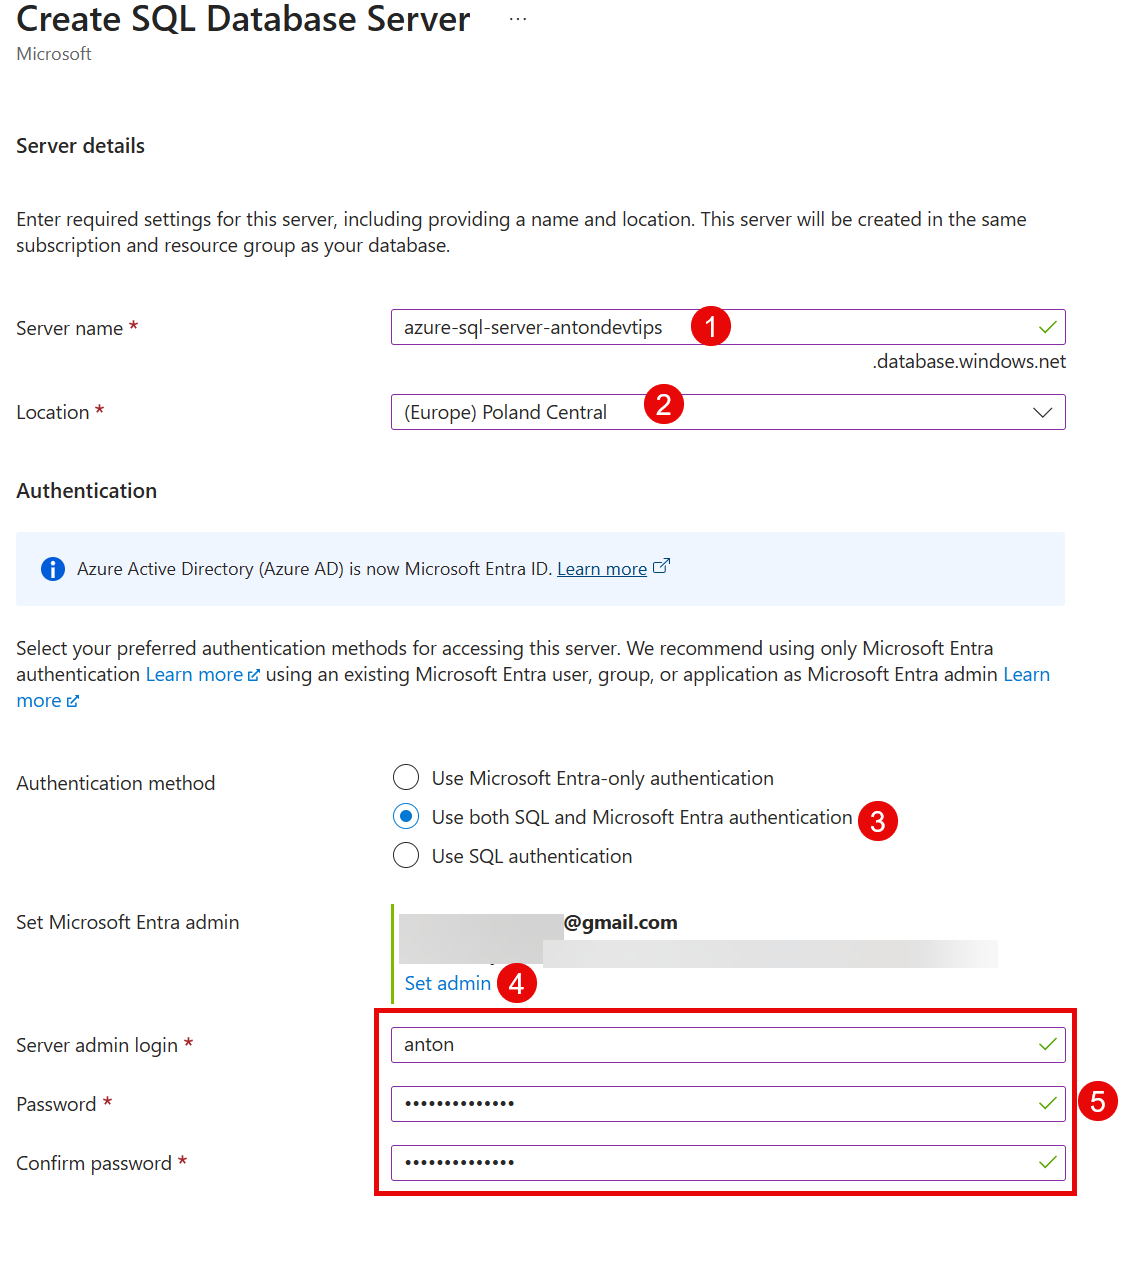
5. For the compute tier, choose Serverless while you are testing. It pauses when idle, so you only pay while you use it.
6. After the database is created, you need to open the firewall. By default, Azure SQL blocks every connection.
Go to the server's Networking settings, and add your client IP address so you can connect from your machine. Turn on "Allow Azure services and resources to access this server" so apps you deploy in Azure can connect to it.
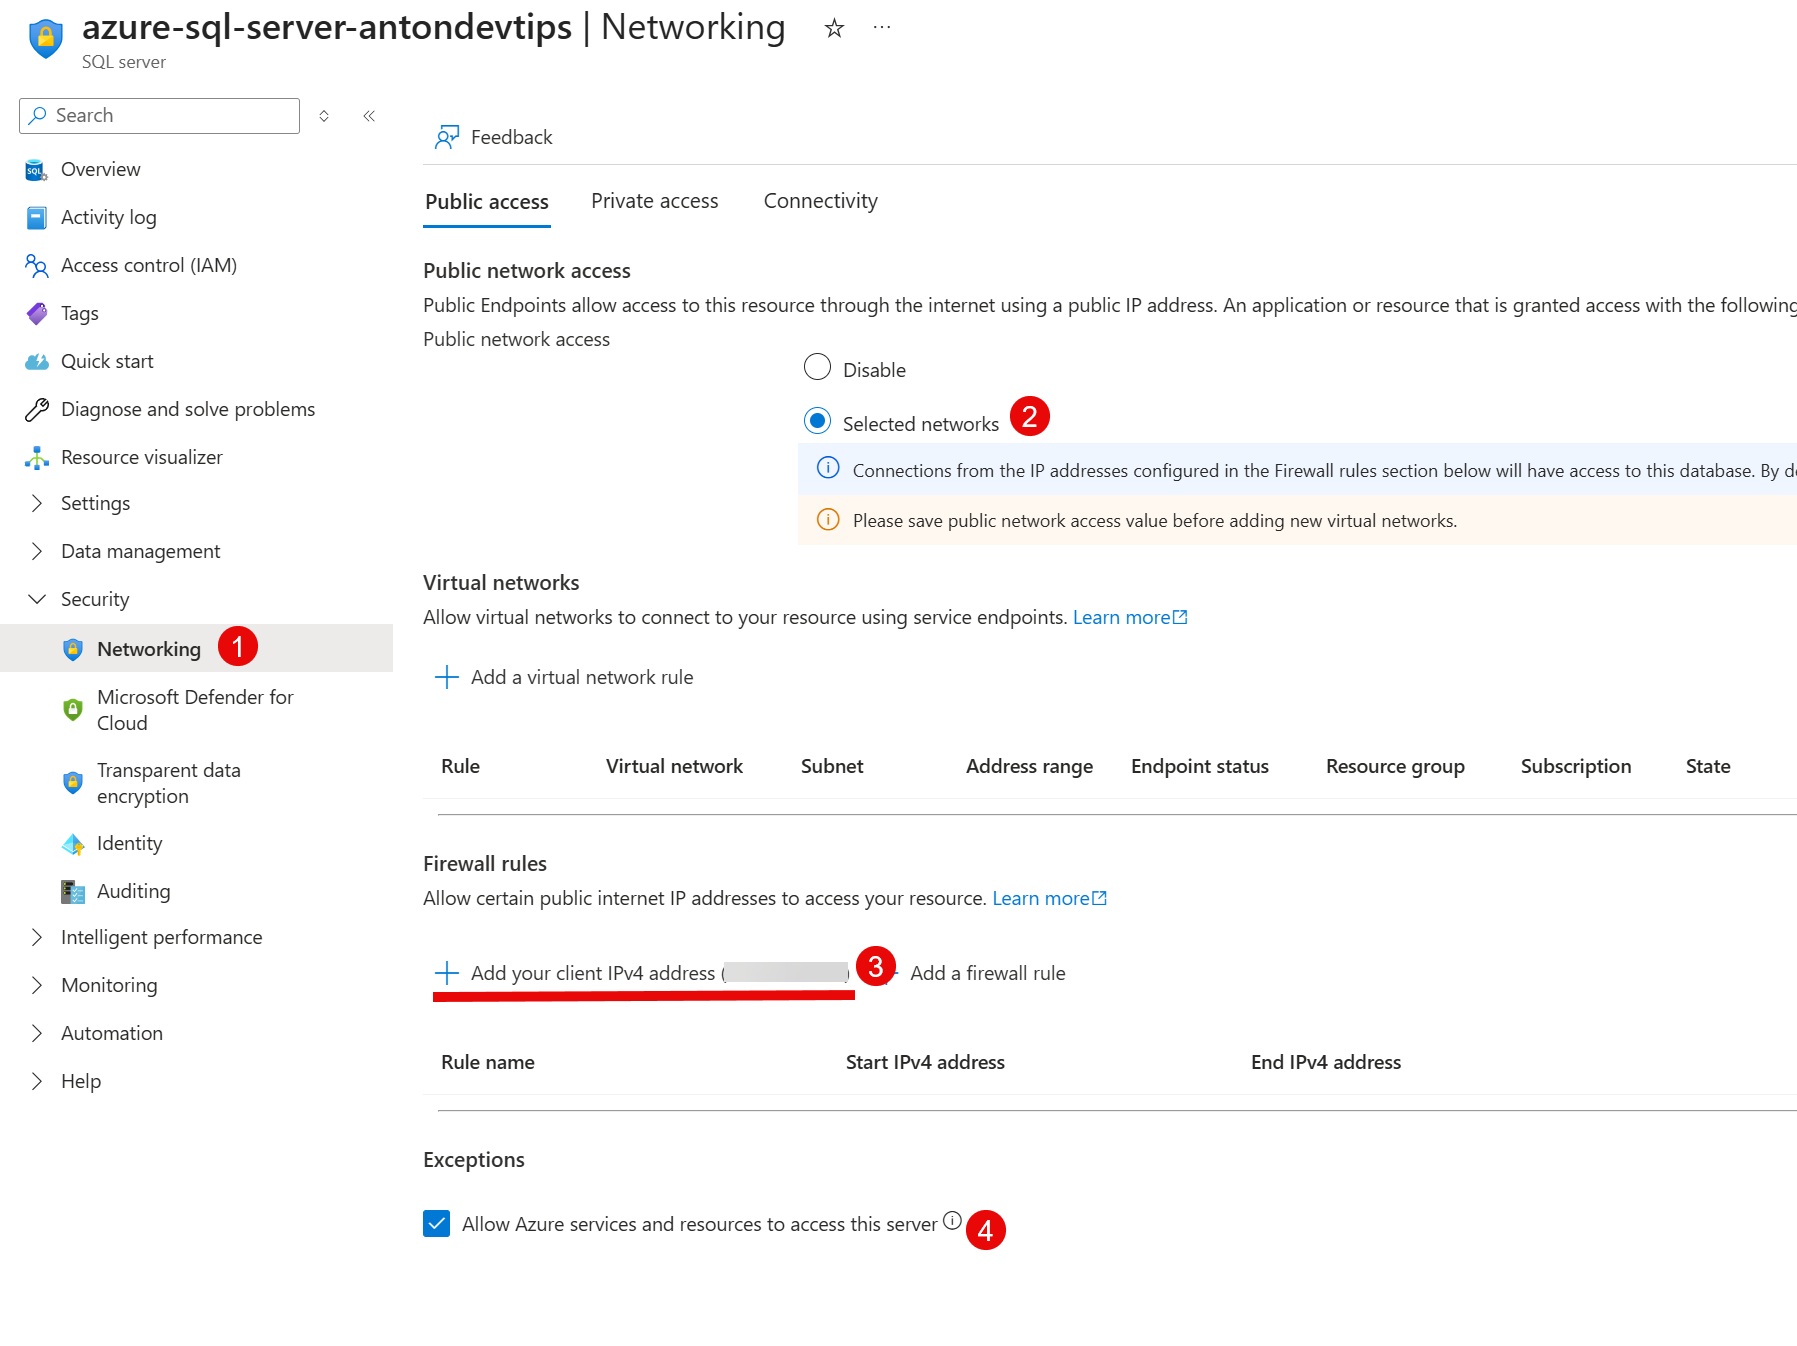
Note: The firewall is the most common reason a first connection fails. If you see a "Cannot open server" error, check that your current IP is in the firewall rules.
With the database ready, let's connect EF Core to it.
Connecting EF Core to Azure SQL
Install the usual SQL Server provider for EF Core:
bashdotnet add package Microsoft.EntityFrameworkCore.SqlServer
This is the same provider you would use for an on-premises SQL Server. Only the connection string changes.
Define the model for the Products and Orders application:
csharppublic class Product { public int Id { get; set; } public string Name { get; set; } = string.Empty; public string Sku { get; set; } = string.Empty; public decimal Price { get; set; } public List<Order> Orders { get; set; } = []; } public class Order { public int Id { get; set; } public string OrderNumber { get; set; } = string.Empty; public int Quantity { get; set; } public DateTime CreatedAtUtc { get; set; } public int ProductId { get; set; } public Product Product { get; set; } = null!; }
Create the DbContext:
csharppublic class ShopDbContext(DbContextOptions<ShopDbContext> options) : DbContext(options) { public DbSet<Product> Products => Set<Product>(); public DbSet<Order> Orders => Set<Order>(); }
Register it in Program.cs with UseSqlServer and read the connection string from the configuration:
csharpbuilder.Services.AddDbContext<ShopDbContext>(options => options.UseSqlServer(builder.Configuration.GetConnectionString("AzureSql")));
The connection string for Azure SQL looks like this:
json{ "ConnectionStrings": { "AzureSql": "Server=tcp:my-server.database.windows.net,1433;Initial Catalog=ShopDb;User ID=appadmin;Password=your-password;Encrypt=True;TrustServerCertificate=False;" } }
In the Azure Portal, open your database's Connection strings blade and copy the ADO.NET string - it already has the correct server name and options. You only replace the password placeholder with your own.
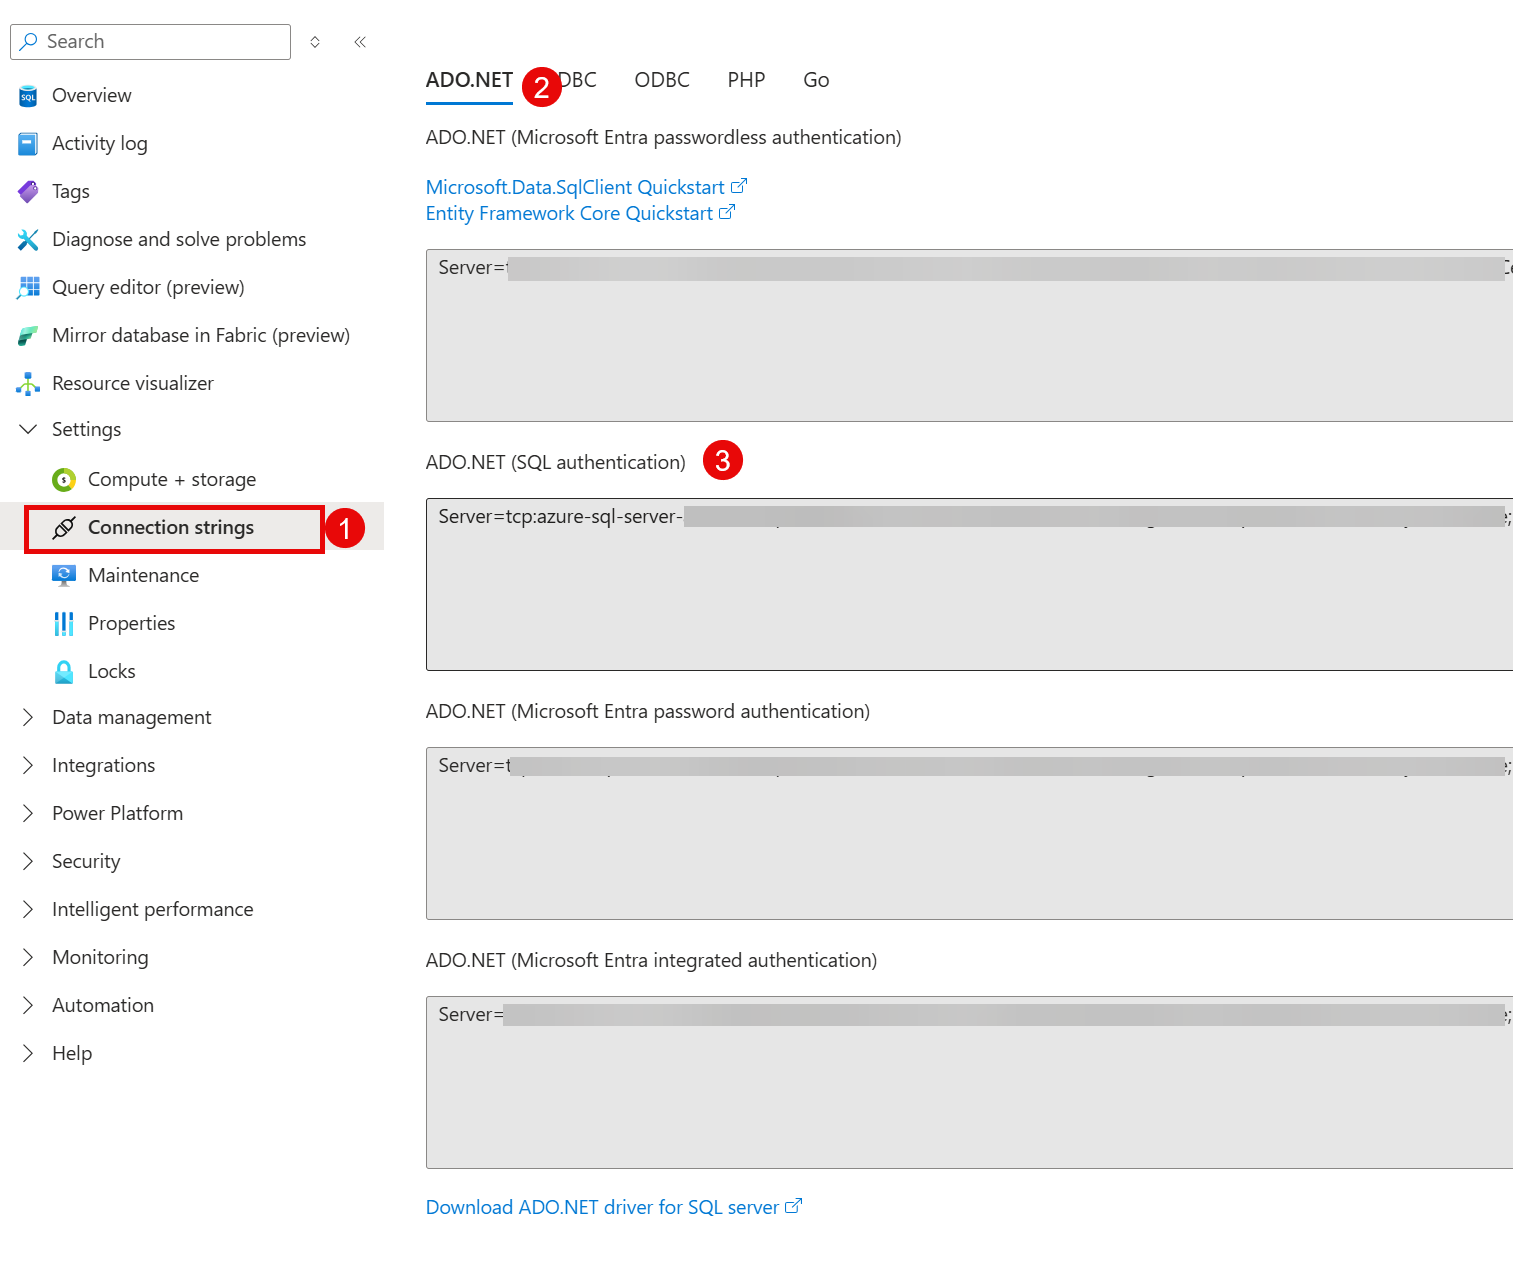
Two things matter here.
Encrypt=True is required - Azure SQL only accepts encrypted connections.
And the password is a secret, so keep it out of source control.
In development, store it with user-secrets (add it to disallow list to prevent AI agents from reading it):
bashdotnet user-secrets set "ConnectionStrings:AzureSql" "Server=tcp:my-server..."
We will remove the password entirely later with passwordless authentication. For now, this gets you connected.
The model is defined, and the app can connect. Next, create the schema with migrations.
Running EF Core Migrations Against Azure SQL
Migrations turn your C# model into database tables. Install the design package and the EF Core tools:
bashdotnet add package Microsoft.EntityFrameworkCore.Design dotnet tool install --global dotnet-ef
Create the first migration and apply it to Azure SQL:
bashdotnet ef migrations add InitialCreate dotnet ef database update
dotnet ef database update connects to Azure SQL using your connection string and creates the Products and Orders tables, along with the foreign key between them.
Because this runs against the real database, your client IP must be allowed through the firewall - the same rule you added earlier.
Note: Running
dotnet ef database updatefrom your machine is fine for development. For production, apply migrations from your CI/CD pipeline or generate a migration bundle to ensure deployments are repeatable and independent of a developer's laptop.
You can build that bundle as a single self-contained executable, then run it on deploy:
bashdotnet ef migrations bundle
A local SQL Server rarely drops a connection. Azure SQL does, so the next step is to handle that.
Adding Connection Resilience for Transient Faults
Azure SQL is a shared, multi-tenant service. It can briefly throttle or drop a connection during a failover, a scaling event, or a load spike.
These are called transient faults. They are temporary, and retrying a moment later almost always succeeds.
EF Core handles this for you with a retrying execution strategy. Turn it on with EnableRetryOnFailure:
csharpbuilder.Services.AddDbContext<ShopDbContext>(options => options.UseSqlServer( builder.Configuration.GetConnectionString("AzureSql"), sqlOptions => sqlOptions.EnableRetryOnFailure( maxRetryCount: 5, maxRetryDelay: TimeSpan.FromSeconds(10), errorNumbersToAdd: null)));
Now EF Core automatically retries a failed command up to 5 times, with increasing delays between attempts. It only retries transient errors, so it will not mask a real bug, such as a constraint violation.
Important note: With a retrying execution strategy, you cannot start a transaction with
BeginTransactiondirectly. Wrap the work in an execution strategy instead, so the whole block can be retried as a unit:var strategy = context.Database.CreateExecutionStrategy();await strategy.ExecuteAsync(async () => { ... });
This single line is one of the most important changes you can make for a cloud database.
You can wire it all up automatically with .NET Aspire.
Setting Up Azure SQL with .NET Aspire
.NET Aspire models your application and its dependencies in one place. It can provision Azure SQL and pass the connection string to your app.
Add the Azure SQL resource in the AppHost project:
csharpvar builder = DistributedApplication.CreateBuilder(args); var sql = builder.AddAzureSqlServer("sql") .RunAsContainer(); // run a local SQL Server container in development var shopDb = sql.AddDatabase("shopdb"); builder.AddProject<Projects.Shop_Api>("shop-api") .WithReference(shopDb) .WaitFor(shopDb); builder.Build().Run();
In the API project, register the DbContext with the Aspire integration:
csharpbuilder.AddSqlServerDbContext<ShopDbContext>("shopdb");
This replaces the manual AddDbContext and connection-string lookup.
Aspire injects the connection string for the shopdb resource, and its integration wires in sensible defaults, including connection retries.
In development, RunAsContainer spins up a local SQL Server container so you do not touch Azure at all.
When you publish, Aspire provisions a real Azure SQL Database.
One thing remains before production: removing the password.
Passwordless Authentication with Microsoft Entra ID
A password in your configuration is a secret you have to store, rotate, and protect. The better option is not to have one.
Azure SQL supports Microsoft Entra ID authentication. Your app connects with a short-lived token instead of a password.
Change the connection string to use Entra authentication, with no user or password:
json{ "ConnectionStrings": { "AzureSql": "Server=tcp:my-server.database.windows.net,1433;Initial Catalog=ShopDb;Authentication=Active Directory Default;Encrypt=True;" } }
The Authentication=Active Directory Default setting tells the SQL client to get a token through DefaultAzureCredential.
On your machine, it uses your Azure CLI or Visual Studio login.
In Azure, it uses your app's managed identity - an identity Azure manages so you never see a secret.
To make this work, enable a managed identity on your App Service or Container App, then create a matching user in the database and grant it permissions:
sqlCREATE USER [shop-api] FROM EXTERNAL PROVIDER; ALTER ROLE db_datareader ADD MEMBER [shop-api]; ALTER ROLE db_datawriter ADD MEMBER [shop-api];
Here, shop-api is the name of your app's managed identity. The database now trusts that identity directly.
The result is a connection with no password anywhere - not in your config, not in a key vault, not in your pipeline. There is nothing to leak or rotate.
Summary
Connecting EF Core to Azure SQL is mostly the EF Core you already know, plus a few cloud-specific steps.
Let's recap the key takeaways:
- The provider does not change. Use
Microsoft.EntityFrameworkCore.SqlServerand point the connection string at Azure SQL, withEncrypt=True. - Open the firewall. Azure SQL blocks all connections by default. Allow your IP for local work and Azure services for deployed apps.
- Run migrations against the cloud database. Use
dotnet efin development, and your CI/CD pipeline or a migration bundle for production. - Always enable retries.
EnableRetryOnFailurehandles the transient faults that are normal for a shared cloud database. - Go passwordless in production. Microsoft Entra authentication with a managed identity removes the database password entirely.
Azure SQL is a strong default when your data is relational, and you want a managed database without running SQL Server yourself. Start with a connection string to get moving, then add resilience and passwordless auth before you ship.
If you want to go deeper, read these related articles:
- How to Manage EF Core DbContext Lifetime
- How to Create Migrations for Multiple Databases in EF Core
- Getting Started with .NET Aspire
Hope you find this newsletter useful. See you next time.
Comments