
Maintaining data consistency and ensuring reliable message delivery in microservices architectures can be challenging. In monolithic applications, consistency is achieved by using database transactions. But they fall short in distributed environments.
In distributed systems, each microservice performs its action within a database transaction. This ensures that the changes made by the microservice are atomic and consistent. Once the transaction is committed, the microservice can then send a message to a message queue, indicating the action that was performed.
Other microservices that are interested in these actions can subscribe to the message queue and process the messages accordingly. This allows for loose coupling between microservices and enables them to react to events happening in other microservices.
But what if transaction in a microservice failed, but the event was sent to another microservice? Or the transaction succeeded, but the event didn't reach another microservice because of a network error when communicating with message queue?
The Outbox pattern is a robust solution to this problem, providing a way to maintain data consistency and integrity across multiple services in event-driven systems.
What is an Outbox Pattern?
The main idea of the Outbox pattern is to store event messages in an outbox table together with the main operation within the same transaction.
Instead of having two separate operations - saving data in the database and sending events directly to the message queue - you can have a single atomic operation. This ensures that the main operation is completed along with saving all events in the database, or neither of the operations is completed.
A background worker can then scan the database for outbox messages and send them to the message queue. This approach guarantees data consistency and reliable message delivery in distributed systems.
In this blog post, you will learn how to implement Outbox pattern using MassTransit library.
You will learn how to set up MassTransit Outbox pattern for:
- Postgres database using EF Core;
- MongoDb.
An Example We Will Be Exploring
Today we will be building two microservices: ShippingService and OrderTrackingService.
ShippingService will be responsible for creating and updating shipments for purchased products.
OrderTrackingService will be responsible for tracking shipment status and returning live-status to the users.
We will be using MassTransit for event-driven architecture with RabbitMQ between these two services.
ShippingService implements the following use cases:
1. Create Shipment: saves shipment details to the database, publishes ShipmentCreatedEvent to a RabbitMQ and returns a shipment number.
2. Update Shipment Status: updates the status of a shipment in the database and publishes ShipmentStatusUpdatedEvent to a RabbitMQ.
OrderTrackingService consumes both ShipmentCreatedEvent and ShipmentStatusUpdatedEvent events from a RabbitMQ.
If you want to learn how to observe microservices and their integration with each other, databases and other external services, you can check my blog post here.
Implementing the Outbox Pattern with MassTransit and EF Core
To implement the Outbox pattern with MassTransit and EF Core, you need to follow these steps:
1. Install the following Nuget packages:
csharp<PackageReference Include="MassTransit.EntityFrameworkCore" Version="8.2.3" /> <PackageReference Include="MassTransit.RabbitMQ" Version="8.2.3" /> <PackageReference Include="Microsoft.EntityFrameworkCore" Version="8.0.6" /> <PackageReference Include="Microsoft.EntityFrameworkCore.Design" Version="8.0.6"> <PrivateAssets>all</PrivateAssets> <IncludeAssets>runtime; build; native; contentfiles; analyzers; buildtransitive</IncludeAssets> </PackageReference> <PackageReference Include="Npgsql.EntityFrameworkCore.PostgreSQL" Version="8.0.4" /> <PackageReference Include="EFCore.NamingConventions" Version="8.0.3" />
2. Configure EF Core DbContext to include MassTransit OutBox entities configuration.
We will be using a Postgres database:
csharpvar postgresConnectionString = configuration.GetConnectionString("Postgres"); services.AddDbContext<EfCoreDbContext>(x => x .EnableSensitiveDataLogging() .UseNpgsql(postgresConnectionString, npgsqlOptions => npgsqlOptions .MigrationsHistoryTable("__MyMigrationsHistory", "shipping")) .UseSnakeCaseNamingConvention() ); public class EfCoreDbContext(DbContextOptions<EfCoreDbContext> options) : DbContext(options) { public DbSet<Shipment> Shipments { get; set; } public DbSet<ShipmentItem> ShipmentItems { get; set; } protected override void OnModelCreating(ModelBuilder modelBuilder) { base.OnModelCreating(modelBuilder); modelBuilder.HasDefaultSchema("shipping"); // Configure MassTransit OutBox Entities modelBuilder.AddInboxStateEntity(); modelBuilder.AddOutboxMessageEntity(); modelBuilder.AddOutboxStateEntity(); // The rest of mappings... } }
3. Configure MassTransit:
csharpvar rabbitMqConfiguration = configuration .GetSection(nameof(RabbitMQConfiguration)) .Get<RabbitMQConfiguration>()!; services.AddMassTransit(busConfig => { busConfig.AddEntityFrameworkOutbox<EfCoreDbContext>(o => { o.QueryDelay = TimeSpan.FromSeconds(30); o.UsePostgres().UseBusOutbox(); }); busConfig.SetKebabCaseEndpointNameFormatter(); busConfig.UsingRabbitMq((context, cfg) => { cfg.Host(new Uri(rabbitMqConfiguration.Host), h => { h.Username(rabbitMqConfiguration.Username); h.Password(rabbitMqConfiguration.Password); }); cfg.UseMessageRetry(r => r.Exponential(10, TimeSpan.FromSeconds(5), TimeSpan.FromSeconds(60), TimeSpan.FromSeconds(5))); cfg.ConfigureEndpoints(context); }); });
The most important part here is to call AddEntityFrameworkOutbox method and specify the EF Core DbContext that configures the MassTransit Entities.
You need to specify the database used for outbox, in our case this will be o.UsePostgres().UseBusOutbox();.
4. Implement the event publisher.
Let's explore an example with a "create shipment" use case which is defined by minimal API POST endpoint.
In this endpoint, we're calling a MediatR command to store the shipment in the database and send ShipmentCreatedEvent to the RabbitMQ.
Let's explore the command handler Handle method:
csharppublic async Task<ErrorOr<CreateShipmentResponse>> Handle( CreateShipmentCommand request, CancellationToken cancellationToken) { var shipmentAlreadyExists = await context.Shipments .Where(s => s.OrderId == request.OrderId) .AnyAsync(cancellationToken); if (shipmentAlreadyExists) { logger.LogInformation("Shipment for order '{OrderId}' is already created", request.OrderId); return Error.Failure($"Shipment for order '{request.OrderId}' is already created"); } var shipmentNumber = new Faker().Commerce.Ean8(); var shipment = CreateShipment(request, shipmentNumber); context.Shipments.Add(shipment); var shipmentCreatedEvent = CreateShipmentCreatedEvent(shipment); await publishEndpoint.Publish(shipmentCreatedEvent, cancellationToken); await context.SaveChangesAsync(cancellationToken); logger.LogInformation("Created shipment: {@Shipment}", shipment); return new CreateShipmentResponse(shipment.Number); }
Here we're calling MassTransit IPublishEndpoint.Publish before the DbContext.SaveChangesAsync.
When we configured OutBox in MassTransit, instead of directly sending an event to the RabbitMQ, the corresponding event is stored in the outbox table in a database, created by MassTransit.
All we need to do is to call a Publish call before saving changes to the database. And all the "heavy lifting" is done by MassTransit.
This way we ensure that shipment is saved in the database together with an outbox message or neither of them are saved. Later, MassTransit will pick our message from the Outbox table and send them to the RabbitMQ.
If RabbitMQ is unavailable or a network issue occurs, MassTransit will hold the message in the Outbox table and retry again until this message is successfully delivered to the message queue. MassTransit ensures that the message is delivered at least once.
It is important to use the
IPublishEndpointinterface for publishing events, to make sure they are stored in the Outbox. When using high-levelIBusinterface - messages won't be stored in the Outbox.
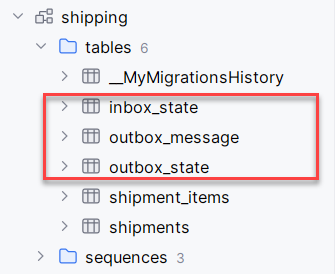
5. Create and run EF Core Migrations.
Here you can see OutBox tables in the Postgres database:
Now let's explore the Consumer side - OrderTrackingService.
How To Configure MassTransit Consumer with Inbox and EF Core
In the following way, you can configure MassTransit for message consumption in OrderTrackingService:
csharpservices.AddMassTransit(busConfig => { busConfig.AddEntityFrameworkOutbox<EfCoreDbContext>(o => { o.QueryDelay = TimeSpan.FromSeconds(30); o.DuplicateDetectionWindow = TimeSpan.FromSeconds(30); o.UsePostgres(); }); busConfig.SetKebabCaseEndpointNameFormatter(); busConfig.AddConsumer<ShipmentCreatedConsumer>() .Endpoint(c => c.InstanceId = ServiceName); busConfig.AddConfigureEndpointsCallback((context, name, cfg) => { cfg.UseEntityFrameworkOutbox<EfCoreDbContext>(context); }); busConfig.UsingRabbitMq((context, cfg) => { //... }); });
Notice that we're calling AddEntityFrameworkOutbox in the consumer too but without UseBusOutbox.
This instructs MassTransit to use Inbox for all the consumers.
This is a light-weight implementation of Inbox pattern that ensures that all messages after consumption should be saved in the database.
And later on handled.
This pattern is particularly useful if you need to handle an event exactly once. For example, you can consume an event and perform payment, and you need to make sure that you won't double-charge the bank's account.
MassTransit uses a DuplicateDetectionWindow setting to check if a message with the same id is already present in the inbox table.
It is a useful option if you can make sure that duplicate events can be discovered during a short-period of time.
Otherwise, you need to implement more robust Inbox yourself.
Now let's explore the ShipmentCreatedConsumer that inherits from MassTransit IConsumer interface:
csharppublic class ShipmentCreatedConsumer( IMediator mediator, ILogger<ShipmentCreatedConsumer> logger) : IConsumer<ShipmentCreatedEvent> { public async Task Consume(ConsumeContext<ShipmentCreatedEvent> context) { var message = context.Message; logger.LogInformation("Received shipment created event: {@Event}", message); var shipment = CreateShipment(message); var command = new CreateTracking.CreateTrackingCommand(shipment); await mediator.Send(command, context.CancellationToken); } }
That's it with EF Core. Now let's explore how to configure OutBox in MassTransit for MongoDB, both for publisher and consumer.
Implementing the Outbox Pattern with MassTransit and MongoDB
To implement the Outbox pattern with MassTransit and MongoDB, you need to follow these steps:
1. Install the following Nuget packages:
csharp<PackageReference Include="MassTransit.MongoDb" Version="8.2.3" /> <PackageReference Include="MassTransit.RabbitMQ" Version="8.2.3" /> <PackageReference Include="MongoDB.Driver" Version="2.27.0"/>
2. Configure MongoDB:
csharpvar mongoConnectionString = configuration.GetConnectionString("MongoDb"); var mongoClientSettings = MongoClientSettings.FromConnectionString(mongoConnectionString); var pack = new ConventionPack { new EnumRepresentationConvention(BsonType.String) }; ConventionRegistry.Register("EnumStringConvention", pack, _ => true); services.AddSingleton<IMongoClient>(new MongoClient(mongoClientSettings)); services.AddSingleton<IMongoDatabase>(provider => provider .GetRequiredService<IMongoClient>() .GetDatabase(MongoDbContext.DatabaseName) ); services.AddSingleton<MongoDbContext>();
When working with MongoDB I like creating a MongoDbContext class that encapsulates all IMongoCollections:
csharppublic class MongoDbContext(IMongoClient mongoClient) { public const string DatabaseName = "shipping"; private readonly IMongoDatabase _database = mongoClient.GetDatabase(DatabaseName); public IMongoCollection<Shipment> Shipments => _database.GetCollection<Shipment>("shipments"); }
3. Configure MassTransit:
csharpvar rabbitMqConfiguration = configuration .GetSection(nameof(RabbitMQConfiguration)) .Get<RabbitMQConfiguration>()!; services.AddMassTransit(busConfig => { busConfig.AddMongoDbOutbox(o => { o.QueryDelay = TimeSpan.FromSeconds(5); o.UseBusOutbox(); o.ClientFactory(provider => provider.GetRequiredService<IMongoClient>()); o.DatabaseFactory(provider => provider.GetRequiredService<IMongoDatabase>()); }); busConfig.SetKebabCaseEndpointNameFormatter(); busConfig.UsingRabbitMq((context, cfg) => { // ... }); });
The most important part here is to call AddMongoDbOutbox method and specify the IMongoClient and IMongoDatabase.
4. Implement the event publisher.
Let's explore a "create shipment" use case Handle method that saves shipment in the MongoDB and sends ShipmentCreatedEvent to the RabbitMQ:
csharppublic async Task<ErrorOr<CreateShipmentResponse>> Handle( CreateShipmentCommand request, CancellationToken cancellationToken) { // Same code as in the EF Core example var session = await massTransitMongoDbContext.StartSession(cancellationToken: cancellationToken); await massTransitMongoDbContext.BeginTransaction(cancellationToken); try { await context.Shipments.InsertOneAsync(session, shipment, cancellationToken: cancellationToken); logger.LogInformation("Created shipment: {@Shipment}", shipment); var shipmentCreatedEvent = CreateShipmentCreatedEvent(shipment); await publishEndpoint.Publish(shipmentCreatedEvent, cancellationToken); await session.CommitTransactionAsync(cancellationToken); } catch (Exception e) { logger.LogError(e, "Error occured while creating shipment: {ErrorMessage}", e.Message); await session.AbortTransactionAsync(cancellationToken); } return new CreateShipmentResponse(shipment.Number); }
Alongside with our MongoDbContext (context) we are using MassTransit.MongoDbIntegration.MongoDbContext (massTransitMongoDbContext) that is used to create a transaction.
We need to create and commit a transaction in MongoDb to be able to atomically save the shipment and the outbox together in the corresponding database collections.
This works similar to DbContext in EF Core: either all operations are completed or neither of them.
Make sure to pass the created session to all MongoDb methods that change the data in the database:
csharpvar session = await massTransitMongoDbContext.StartSession(cancellationToken: cancellationToken); await context.Shipments.InsertOneAsync(session, shipment, cancellationToken: cancellationToken);
And make sure to call MassTransit IPublishEndpoint.Publish before the session.CommitTransactionAsync.
5. Configure MongoDb replica set.
To use transactions in MongoDB, you need to configure a replica set. If you don't plan to use any additional nodes, you still need to configure one primary node.
If you use MongoDB inside docker container, you can create a container with a replica set in docker compose:
yamlmongodb: image: mongo:latest container_name: mongodb volumes: - ./docker_data/mongodb:/data/db - ./docker_data/mongodb-config:/data/configdb ports: - "27017:27017" restart: always networks: - docker-web command: ["--replSet", "rs0"]
Next, you need to connect to the running MongoDB docker container:
bashdocker exec -it mongodb mongosh --port 27017
In the opened terminal, enter the following command to initialize the replica set:
bashrs.initiate()
You need to execute this once. After that, you can create a default MongoDB user. MongoDB doesn't allow specifying a user in docker compose when creating a replica set.
bashdb.createUser( { user: "admin", pwd: "admin", roles: [ { role: "root", db: "admin" } ] } )
You can also convert your standalone MongoDB instance to a replica set, for more information, read here.
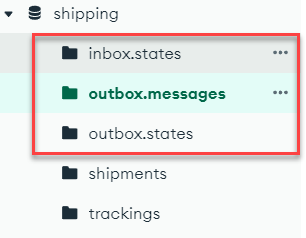
Here you can see OutBox collections in the MongoDB:
How To Configure MassTransit Consumer with Inbox and MongoDB
In the following way, you can configure MassTransit for message consumption in OrderTrackingService:
csharpservices.AddMassTransit(busConfig => { busConfig.AddMongoDbOutbox(o => { o.QueryDelay = TimeSpan.FromSeconds(5); o.DuplicateDetectionWindow = TimeSpan.FromSeconds(30); o.ClientFactory(provider => provider.GetRequiredService<IMongoClient>()); o.DatabaseFactory(provider => provider.GetRequiredService<IMongoDatabase>()); }); busConfig.SetKebabCaseEndpointNameFormatter(); busConfig.AddConsumer<ShipmentCreatedConsumer>() .Endpoint(c => c.InstanceId = ServiceName); busConfig.AddConfigureEndpointsCallback((context, name, cfg) => { cfg.UseMongoDbOutbox(context); }); busConfig.UsingRabbitMq((context, cfg) => { //... }); });
This code configures Inbox message consumption with MassTransit and MongoDB.
MongoDB replica set is required for both publisher and consumer when configuring MassTransit with Outbox and MongoDB.
If you omit AddMongoDbOutbox in the consumer side - you won't need a replica set.
Summary
The Transactional Outbox pattern is a powerful technique for maintaining data consistency and reliability in distributed systems. By combining business operations and message writing into a single transaction, this pattern ensures atomicity.
You learned how easy it is to implement an Outbox pattern with MassTransit in a SQL Postgres database with EF Core and a document database - MongoDB. You also learned about an Inbox pattern. That way you can build a robust and reliable event-driven systems.
If you want to learn how to observe microservices and their integration with each other, databases and other external services, you can check my blog post here.
Hope you find this newsletter useful. See you next time.
