In Microservices Architecture, services need to communicate with each other. The simplest approach is synchronous HTTP calls, but it creates tight coupling between services. If one service is slow or unavailable, it affects all dependent services.
Message brokers solve this problem by enabling asynchronous, message-based communication between your services. Services publish events to the broker, and other services consume them independently.
When you are working in Azure, you can use Azure Service Bus to implement a message broker. It supports both point-to-point and publish-subscribe messaging patterns.
In this post, we will explore:
- Azure Service Bus: Core Concepts
- How To Create Azure Service Bus in Azure Portal
- Setting Up Azure Service Bus with .NET Aspire
- How to Publish and Consume Messages with Azure Service Bus
- The Event-Driven Pipeline: Payments, Fraud Detection, and Notifications
- Running the Application Locally with Azure Service Bus Emulator
- Deploying Microservices to Azure with Aspire
- Azure Service Bus vs Other Azure Messaging Services
Let's dive in.
Azure Service Bus: Core Concepts
Azure Service Bus is a fully managed enterprise message broker in the Azure Cloud. It supports two messaging patterns: Queues and Topics with Subscriptions.
Queues
Queues implement point-to-point communication. One sender sends a message, and one receiver processes it. Each message is consumed by exactly one consumer.
Use queues when a message should be processed by a single service. For example, sending a stock update command to the Stocks service.
Topics with Subscriptions
Topics with Subscriptions implement publish-subscribe communication. One sender publishes a message to a topic, and multiple subscribers can each receive a copy of that message. Each subscription acts as its own virtual queue.
Use topics when multiple services need to react to the same event. For example, when a payment is processed, both the Fraud Detection service and the Notifications service may need to be notified.
Our solution has five microservices that communicate through Azure Service Bus:
- Product-Service - manages products and handles purchases
- Stock-Service - manages product stock levels
- Payment-Service - processes payments and tracks their status
- FraudDetection-Service - analyzes payments for fraud risk
- Notification-Service - sends email notifications
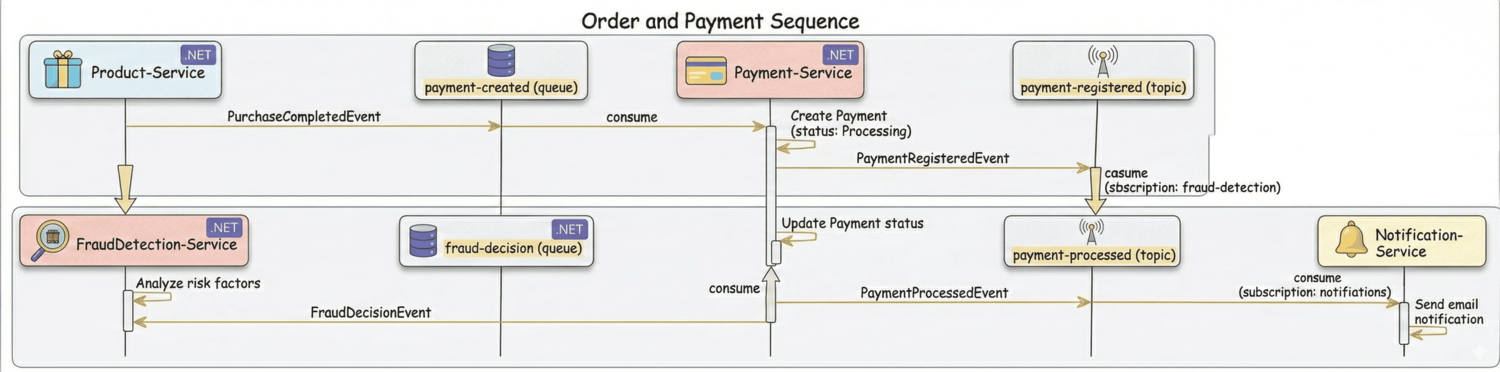
Here is the message flow:
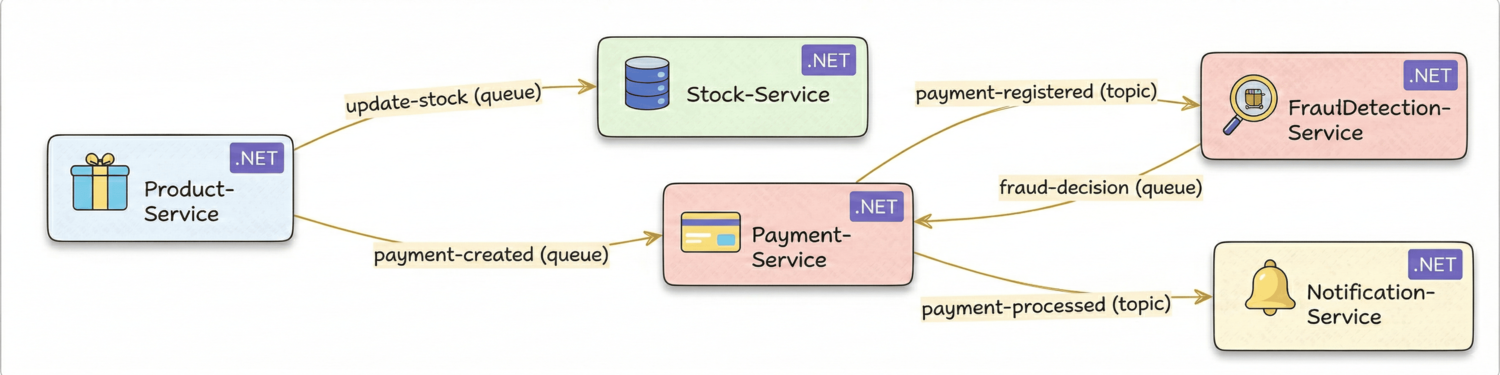
When a user purchases a product:
- Product-Service publishes
UpdateStockEventto theupdate-stockqueue andPurchaseCompletedEventto thepayment-createdqueue - Stock-Service consumes from
update-stockand updates the stock count - Payment-Service consumes from
payment-created, creates a payment record, and publishesPaymentRegisteredEventto thepayment-registeredtopic - FraudDetection-Service subscribes to the
payment-registeredtopic, analyzes the payment, and publishesFraudDecisionEventto thefraud-decisionqueue - Payment-Service consumes from
fraud-decision, updates the payment status, and publishesPaymentProcessedEventto thepayment-processedtopic - Notification-Service subscribes to the
payment-processedtopic and sends a notification
In our project, we use both:
- Queues for
update-stock,payment-created, andfraud-decision(one sender, one receiver) - Topics for
payment-registeredandpayment-processed(one sender, multiple receivers)
How Messages Flow Through Service Bus
When a consumer receives a message, Service Bus does not delete it immediately. It locks the message and hides it from other consumers for a configurable lock duration.
The consumer has that time to process the message and complete the call. If it completes successfully, Service Bus deletes the message. If the handler throws or the lock expires, Service Bus releases the message and makes it available for retry.
Service Bus tracks how many times a message has been delivered using the delivery count.
When the delivery count exceeds MaxDeliveryCount (default: 10), Service Bus automatically moves the message to the dead-letter queue.
At-least-once delivery is the core guarantee Service Bus provides. A message will be delivered at least once, but in rare cases it may be delivered more than once — for example, if a network failure prevents the completion acknowledgement from reaching the Service Bus. Your consumers must be idempotent: processing the same message twice must produce the same result.
Dead-Letter Queue
Every queue and every topic subscription has a built-in dead-letter sub-queue (DLQ). Messages end up in the DLQ when:
- The delivery count exceeds
MaxDeliveryCount - Your code explicitly calls
DeadLetterMessageAsync— for example, when a message is malformed, and retrying is pointless - The message TTL (time-to-live) expires before it is consumed
The DLQ is permanent — messages do not expire there. You can inspect, replay, or archive them using the Azure Portal.
In production, monitor the DLQ message count and set up alerts. A growing DLQ means something in your pipeline is consistently failing.
Duplicate Detection
Service Bus can automatically discard duplicate messages within a configurable time window. Enable it on a queue or topic at creation time.
Service Bus tracks messages by their MessageId.
If a message with the same MessageId arrives within the duplicate detection window (default: 10 minutes), Service Bus silently drops it.
Use duplicate detection when your producer may retry sending — for example, after a timeout or a transient network failure.
Message Sessions
Sessions enable ordered, grouped processing of related messages.
Set a SessionId on each message to group them together.
Service Bus guarantees that all messages with the same SessionId are processed in order by a single consumer at a time.
No two consumers can process messages from the same session simultaneously.
Use sessions when order matters — for example, processing all state transitions for the same payment in sequence.
Sessions require RequiresSession = true on the queue or subscription.
How To Create Azure Service Bus in Azure Portal
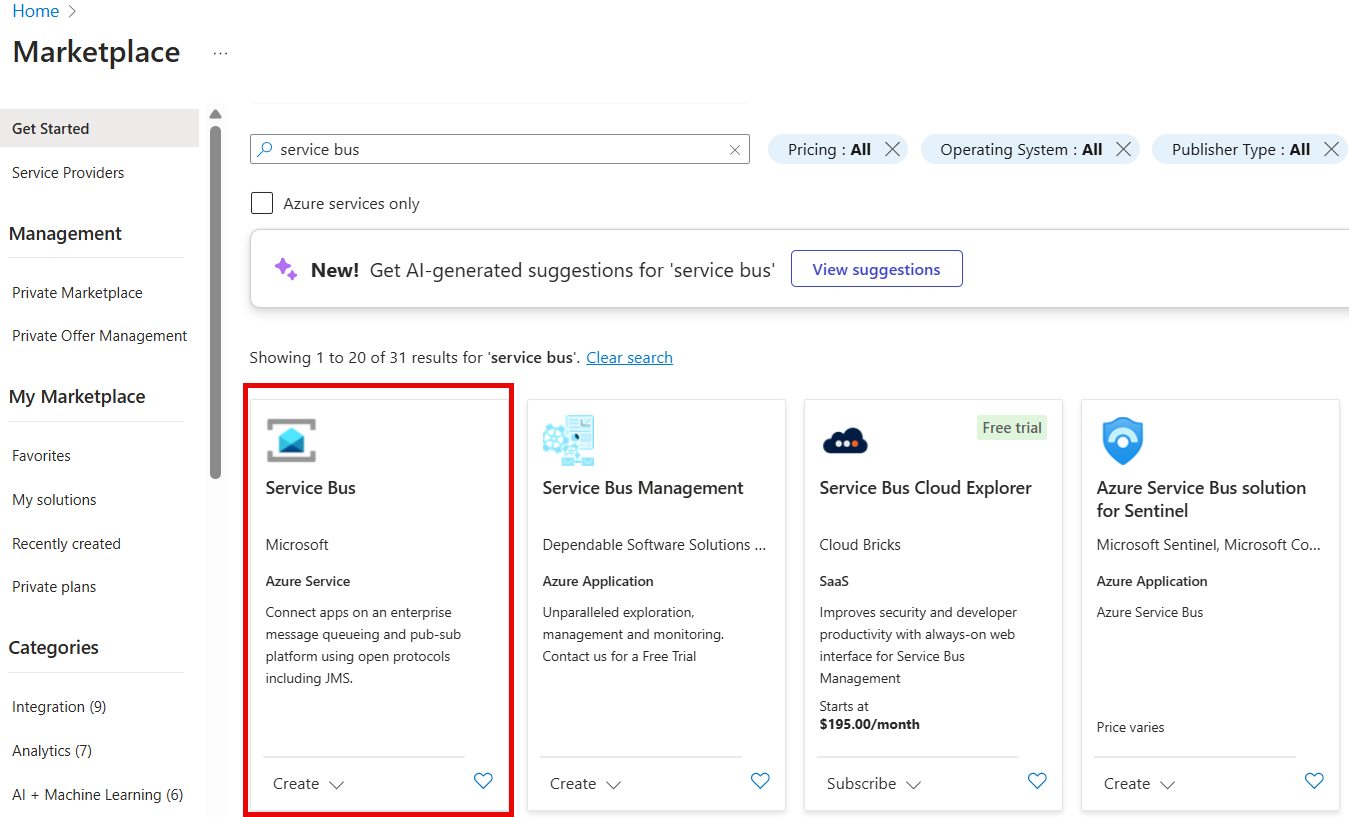
First, create a new Azure Service Bus namespace in the Azure Portal.
Go to the Azure Portal and search for "Service Bus":
Create a new Service Bus namespace with the following settings:
- Resource group: Choose your resource group or create a new one
- Namespace name: Choose a globally unique name
- Location: Select the region closest to your services
- Pricing tier: Select Standard
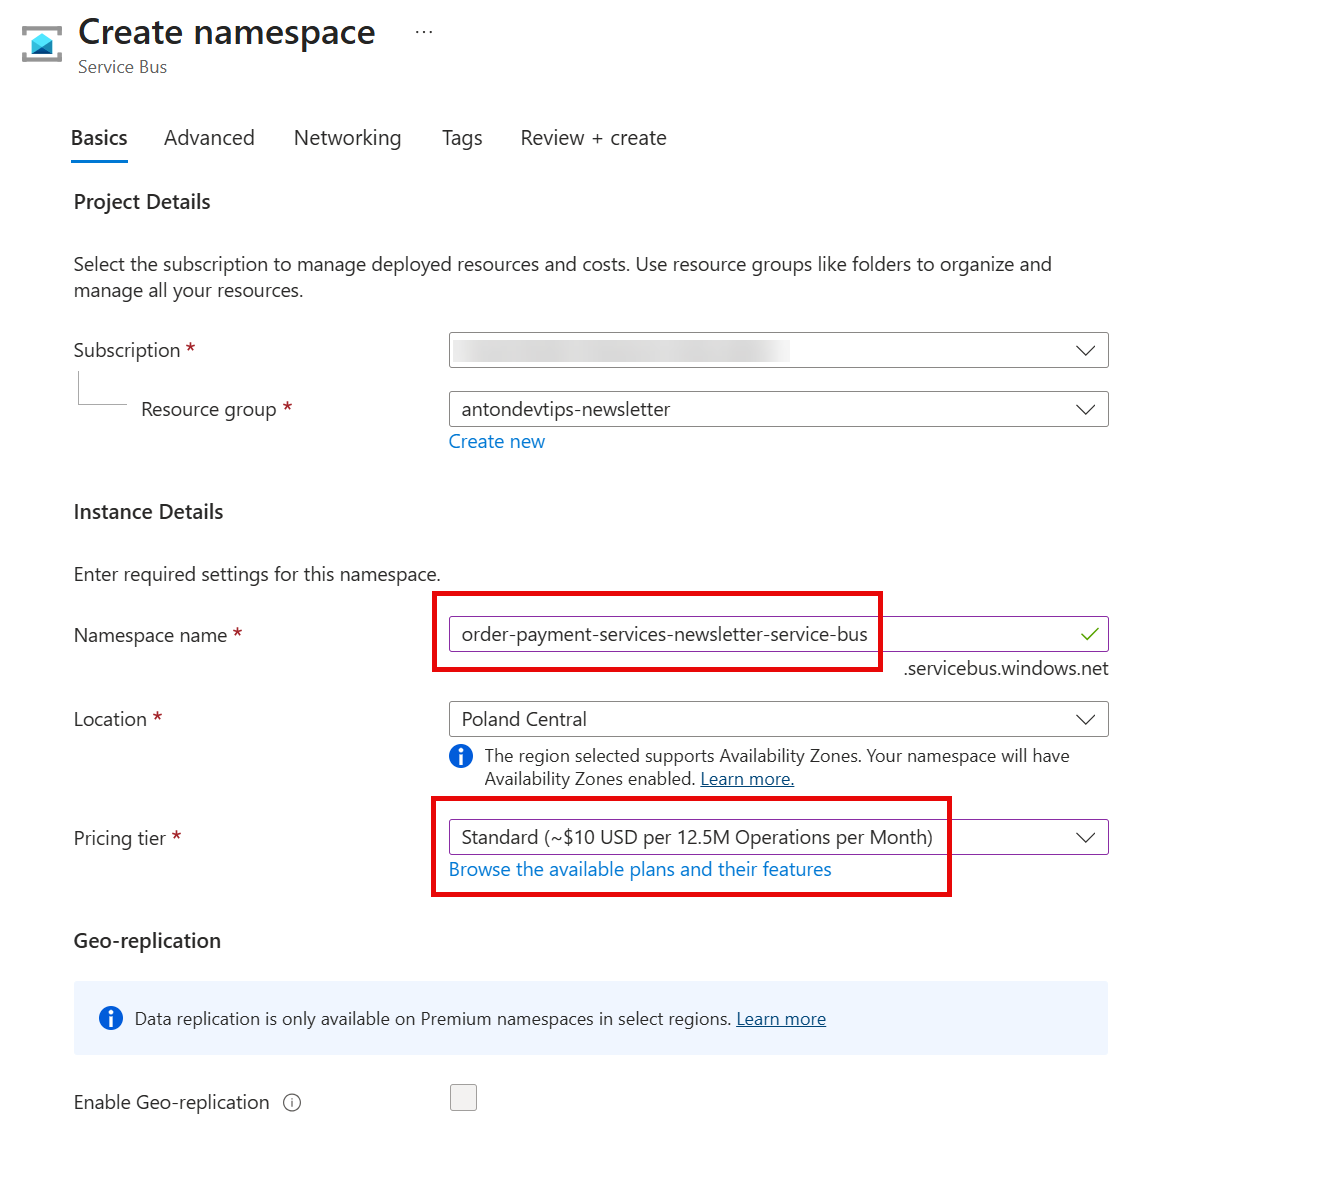
The pricing tier is important. The Basic tier only supports queues. If you need topics and subscriptions (which we do), you must use at least the Standard tier.
For most development and production workloads, Standard is sufficient. Choose Premium only if you need dedicated resources, virtual network integration, or messages larger than 256 KB.
Setting Up Azure Service Bus with .NET Aspire
We use .NET Aspire to orchestrate all services and their dependencies.
To get started with Aspire, read this article
Install the following NuGet packages in the Aspire AppHost project:
bashdotnet add package Aspire.Hosting.Azure.ServiceBus dotnet add package Aspire.Hosting.PostgreSQL dotnet add package Aspire.Hosting.Redis
Here is the full AppHost.cs that wires everything together:
csharpvar builder = DistributedApplication.CreateBuilder(args); var postgres = builder.AddPostgres("postgres"); var redis = builder.AddRedis("cache"); var serviceBus = builder.AddAzureServiceBus("service-bus") .RunAsEmulator(); serviceBus.AddServiceBusQueue("update-stock"); serviceBus.AddServiceBusQueue("payment-created"); serviceBus.AddServiceBusQueue("fraud-decision"); var paymentRegisteredTopic = serviceBus.AddServiceBusTopic("payment-registered"); paymentRegisteredTopic.AddServiceBusSubscription("fraud-detection"); var paymentProcessedTopic = serviceBus.AddServiceBusTopic("payment-processed"); paymentProcessedTopic.AddServiceBusSubscription("notifications"); var stocksApi = builder.AddProject<Projects.Stocks_Api>("stocks-api") .WithReference(postgres) .WithReference(serviceBus) .WithExternalHttpEndpoints(); builder.AddProject<Projects.Products_Api>("products-api") .WithReference(stocksApi) .WithReference(postgres) .WithReference(redis) .WithReference(serviceBus) .WithExternalHttpEndpoints(); builder.AddProject<Projects.Payments_Api>("payments-api") .WithReference(postgres) .WithReference(serviceBus) .WithExternalHttpEndpoints(); builder.AddProject<Projects.FraudDetection_Api>("fraud-detection-api") .WithReference(serviceBus) .WithExternalHttpEndpoints(); builder.AddProject<Projects.Notifications_Api>("notifications-api") .WithReference(serviceBus) .WithExternalHttpEndpoints(); builder.Build().Run();
The RunAsEmulator() method tells Aspire to run a local Azure Service Bus emulator in Docker.
This means you do not need an Azure subscription to develop locally.
Aspire automatically injects the Service Bus connection string into each service via WithReference(serviceBus).
For queues, we use AddServiceBusQueue.
For topics, we use AddServiceBusTopic followed by AddServiceBusSubscription to create subscriptions on that topic.
Each service project needs the Aspire Azure Service Bus client package:
bashdotnet add package Aspire.Azure.Messaging.ServiceBus
And register the client in Program.cs:
csharpbuilder.AddAzureServiceBusClient("service-bus");
The "service-bus" string must match the name used in the AppHost.
To enable distributed traces for Azure Service Bus, add the following line in Program.cs of every service that uses Service Bus:
csharpAppContext.SetSwitch("Azure.Experimental.EnableActivitySource", true);
This opt-in switch activates the Azure SDK's built-in ActivitySource, which emits OpenTelemetry spans for every send and receive operation.
Without it, the Aspire dashboard Traces tab will not show Service Bus activity, and you will not be able to see distributed traces across your services.
You also need to register the Azure Service Bus activity source in the Aspire ServiceDefaults project.
Open Extensions.cs and add .AddSource("Azure.Messaging.ServiceBus") to the OpenTelemetry tracing configuration:
csharp.WithTracing(tracing => tracing .AddAspNetCoreInstrumentation() // ... other sources .AddSource("Azure.Messaging.ServiceBus"));
This tells OpenTelemetry to collect and export spans produced by the Azure SDK. After both changes, the Aspire dashboard will show end-to-end distributed traces across all five services.
All events are defined as C# records in a shared Shared.Contracts project.
This project has no dependencies and is referenced by all services.
Here are a few event contracts:
csharppublic record UpdateStockEvent( int ProductId, int CountChange); public record PurchaseCompletedEvent( string TransactionId, int ProductId, string ProductName, int Quantity, decimal TotalPrice, string UserId, DateTime Timestamp);
UpdateStockEvent carries the product ID and the quantity change (negative for purchases).
PurchaseCompletedEvent carries the full purchase details needed to create a payment.
Other events in the project follow the same pattern: PaymentRegisteredEvent, FraudDecisionEvent, and PaymentProcessedEvent.
How to Publish and Consume Messages with Azure Service Bus
To avoid duplicating Service Bus code across services, we create reusable abstractions in a Shared.ServiceBus project.
This project depends on the Azure.Messaging.ServiceBus NuGet package:
bashdotnet add package Azure.Messaging.ServiceBus
Publishing Messages
We define a simple interface:
csharppublic interface IServiceBusPublisher { Task PublishAsync<T>(string queueOrTopic, T message, CancellationToken cancellationToken = default); }
The publisher accepts a queue or topic name and any message type. Here is the implementation:
csharppublic class ServiceBusPublisher(ServiceBusClient client) : IServiceBusPublisher, IAsyncDisposable { private readonly ConcurrentDictionary<string, ServiceBusSender> _senders = new(); public async Task PublishAsync<T>(string queueOrTopic, T message, CancellationToken cancellationToken = default) { var sender = _senders.GetOrAdd(queueOrTopic, client.CreateSender); var json = JsonSerializer.Serialize(message); var serviceBusMessage = new ServiceBusMessage(json) { ContentType = "application/json", MessageId = Guid.NewGuid().ToString() }; await sender.SendMessageAsync(serviceBusMessage, cancellationToken); } public async ValueTask DisposeAsync() { foreach (var sender in _senders.Values) { await sender.DisposeAsync(); } _senders.Clear(); } }
Creating a ServiceBusSender for every message is expensive.
We cache senders by queue/topic name so that each destination gets one reusable sender.
ConcurrentDictionary.GetOrAdd ensures thread safety when multiple threads publish to the same destination.
We set a unique MessageId on each message.
Service Bus uses this for duplicate detection — if a message with the same MessageId arrives within the duplicate detection window, Service Bus silently drops it.
The publisher is registered as a singleton because ServiceBusSender is thread-safe and designed for reuse:
csharpservices.AddSingleton<IServiceBusPublisher, ServiceBusPublisher>();
Here is how Product-Service publishes events when a user purchases a product:
csharpapp.MapPost("/products/{id:int}/purchase", async ( int id, PurchaseProductRequest request, ProductService productService, IStocksApiClient stocksApiClient, IServiceBusPublisher serviceBusPublisher) => { var product = await productService.GetByIdAsync(id); if (product is null) { return Results.NotFound($"Product with ID {id} not found."); } var hasEnoughStock = await stocksApiClient.HasEnoughStockAsync(id, request.Quantity); if (!hasEnoughStock) { return Results.Conflict("Not enough stock for this purchase."); } var totalPrice = product.Price * request.Quantity; // Publish stock update event (async via Service Bus) await serviceBusPublisher.PublishAsync("update-stock", new UpdateStockEvent(id, -request.Quantity)); // Publish purchase completed event for payment processing await serviceBusPublisher.PublishAsync("payment-created", new PurchaseCompletedEvent( TransactionId: Guid.NewGuid().ToString(), ProductId: product.Id, ProductName: product.Name, Quantity: request.Quantity, TotalPrice: totalPrice, UserId: "user-1", Timestamp: DateTime.UtcNow)); return Results.Ok(new PurchaseProductResponse( ProductId: product.Id, Quantity: request.Quantity, TotalPrice: totalPrice)); });
Notice that the stock check is still synchronous via HTTP. We need an immediate answer to know if the purchase can proceed.
But the stock update is now asynchronous.
We publish an UpdateStockEvent to the update-stock queue and return immediately.
The Stocks service will process it in the background.
Consuming Messages
First, we define a handler interface that all message handlers implement:
csharppublic interface IServiceBusMessageHandler<in TMessage> { Task HandleAsync(TMessage message, CancellationToken cancellationToken); }
Next, we create a generic consumer BackgroundService that wraps ServiceBusProcessor from the Azure SDK.
It deserializes incoming messages and dispatches them to the corresponding IServiceBusMessageHandler<T>:
csharppublic class ServiceBusQueueConsumerService<TMessage>( ServiceBusClient client, IServiceScopeFactory scopeFactory, ILogger<ServiceBusQueueConsumerService<TMessage>> logger, string queueName) : BackgroundService { protected override async Task ExecuteAsync(CancellationToken stoppingToken) { var processor = client.CreateProcessor(queueName, new ServiceBusProcessorOptions { AutoCompleteMessages = true, MaxConcurrentCalls = 10 }); processor.ProcessMessageAsync += async args => { try { var message = JsonSerializer.Deserialize<TMessage>(args.Message.Body.ToString()); if (message is not null) { using var scope = scopeFactory.CreateScope(); var handler = scope.ServiceProvider.GetRequiredService<IServiceBusMessageHandler<TMessage>>(); await handler.HandleAsync(message, stoppingToken); } } catch (Exception ex) { logger.LogError(ex, "Error processing message from queue {QueueName}", queueName); throw; } }; processor.ProcessErrorAsync += args => { logger.LogError(args.Exception, "Error in Service Bus processor for queue {QueueName}", queueName); return Task.CompletedTask; }; await processor.StartProcessingAsync(stoppingToken); // Keep the service alive while the processor is running. while (!stoppingToken.IsCancellationRequested) {} await processor.StopProcessingAsync(stoppingToken); await processor.DisposeAsync(); } }
ServiceBusProcessor** is the Azure SDK's built-in message pump. It pulls messages from the queue and calls your handler.
We use the following options:
AutoCompleteMessages = true- tells SDK to automatically mark messages as completed after your handler finishes without throwing. If your handler throws an exception, the message becomes available for retry.MaxConcurrentCalls = 10- allows processing up to 10 messages in parallel for better throughput.
The while loop at the end keeps the BackgroundService alive while the processor runs.
We register the handler and the consumer service in the DI container:
csharpservices.AddSingleton<IServiceBusPublisher, ServiceBusPublisher>(); services.AddScoped<IServiceBusMessageHandler<UpdateStockEvent>, UpdateStockMessageHandler>(); services.AddHostedService(sp => new ServiceBusQueueConsumerService<UpdateStockEvent>( sp.GetRequiredService<ServiceBusClient>(), sp.GetRequiredService<IServiceScopeFactory>(), sp.GetRequiredService<ILogger<ServiceBusQueueConsumerService<UpdateStockEvent>>>(), "update-stock"));
The handler is registered as scoped, so it gets a fresh DbContext and other scoped dependencies per message.
The consumer service is registered via a factory lambda that passes the queue name.
For consuming messages from a topic, we use a different consumer class, which is identical to this one, except for how it creates a processor:
csharpvar processor = client.CreateProcessor(topicName, subscriptionName, new ServiceBusProcessorOptions { AutoCompleteMessages = true, MaxConcurrentCalls = 10 });
The Event-Driven Pipeline: Payments, Fraud Detection, and Notifications
Now let's explore the most interesting part of our architecture: the payment processing pipeline that flows through four services.
Here is the complete message flow:
Payment-Service - Creating Payments
When a purchase happens, Payment-Service consumes the PurchaseCompletedEvent from the payment-created queue:
csharppublic class PurchaseCompletedMessageHandler( IPaymentRepository paymentRepository, IServiceBusPublisher serviceBusPublisher, ILogger<PurchaseCompletedMessageHandler> logger) : IServiceBusMessageHandler<PurchaseCompletedEvent> { public async Task HandleAsync(PurchaseCompletedEvent message, CancellationToken cancellationToken) { var payment = new Payment(...); await paymentRepository.AddAsync(payment); var paymentRegisteredEvent = new PaymentRegisteredEvent(...); await serviceBusPublisher.PublishAsync("payment-registered", paymentRegisteredEvent, cancellationToken); logger.LogInformation("Payment {TransactionId} created and registered", payment.TransactionId); } }
This handler does two things:
- Creates a
Paymententity in the database with statusProcessing - Publishes a
PaymentRegisteredEventto thepayment-registeredtopic
We publish to a topic here and the Fraud Detection service subscribes to it. In the future, you could add more subscribers (analytics, audit logging) without changing the Payments service.
FraudDetection-Service - Analyzing Payments
The Fraud Detection service subscribes to the payment-registered topic:
csharppublic class PaymentRegisteredMessageHandler( IFraudDetectionEngine fraudDetectionEngine, IServiceBusPublisher serviceBusPublisher, ILogger<PaymentRegisteredMessageHandler> logger) : IServiceBusMessageHandler<PaymentRegisteredEvent> { public async Task HandleAsync(PaymentRegisteredEvent message, CancellationToken cancellationToken) { var fraudDecision = await fraudDetectionEngine.AnalyzePaymentAsync(message, cancellationToken); await serviceBusPublisher.PublishAsync("fraud-decision", fraudDecision, cancellationToken); logger.LogInformation( "Fraud analysis completed for transaction {TransactionId}: Decision={Decision}", message.TransactionId, fraudDecision.Decision); } }
This handler subscribes to the payment-registered topic via ServiceBusTopicConsumerService (registered in DI).
The topic name and subscription name are specified during DI registration.
The fraud detection engine evaluates risk factors like high-risk countries, suspicious amounts, late-night transactions, and high-risk card BINs. Each factor contributes a weighted score, and the total determines the decision:
- Allow (score below 100): Payment is safe
- Review (score 100-699): Payment needs manual review
- Block (score 700+): Payment is rejected
The fraud decision is published to the fraud-decision queue, which goes back to Payment-Service.
Payment-Service - Processing Fraud Decisions
When the fraud decision arrives, Payment-Service updates the payment status:
csharppublic class FraudDecisionMessageHandler( IPaymentRepository paymentRepository, IServiceBusPublisher serviceBusPublisher, ILogger<FraudDecisionMessageHandler> logger) : IServiceBusMessageHandler<FraudDecisionEvent> { public async Task HandleAsync(FraudDecisionEvent message, CancellationToken cancellationToken) { var paymentStatus = message.Decision switch { "Allow" => PaymentStatus.Confirmed, "Review" => PaymentStatus.Reviewing, "Block" => PaymentStatus.Rejected, _ => PaymentStatus.Reviewing }; var payment = await paymentRepository.GetByTransactionIdAsync(message.TransactionId); if (payment is null) { logger.LogWarning("Payment {TransactionId} not found for fraud decision", message.TransactionId); return; } payment.Status = paymentStatus; await paymentRepository.UpdateAsync(payment); var paymentProcessedEvent = new PaymentProcessedEvent( payment.TransactionId, payment.Status.ToString(), DateTime.UtcNow); await serviceBusPublisher.PublishAsync("payment-processed", paymentProcessedEvent, cancellationToken); logger.LogInformation( "Payment {TransactionId} processed with status {Status}", payment.TransactionId, payment.Status); } }
The handler maps the fraud decision to a payment status using a switch expression.
After updating the database, it publishes a PaymentProcessedEvent to the payment-processed topic.
The final step in the pipeline:
Notification-Service subscribes to the payment-processed topic and sends an email notification.
Running the Application Locally with the Emulator
The Azure Service Bus emulator is a Docker container that runs a local instance of Service Bus. This means you do not need an Azure subscription to develop and test locally.
To run the application, set the AppHost project as the startup project and press F5.
Aspire will:
- Start the PostgreSQL container
- Start the Redis container
- Start the Azure Service Bus emulator container
- Create all queues, topics, and subscriptions defined in
AppHost.cs - Start all five API services with injected connection strings
- Open the Aspire dashboard in your browser
The first run may take a few minutes while Docker pulls the container images. Subsequent runs will be much faster.
In the Aspire dashboard, you can view:
- Resources - All running services and their health status
- Console logs - Real-time logs from each service
- Structured logs - Filterable and searchable logs
- Traces - Distributed traces across services
Here is what our Aspire dashboard looks like:
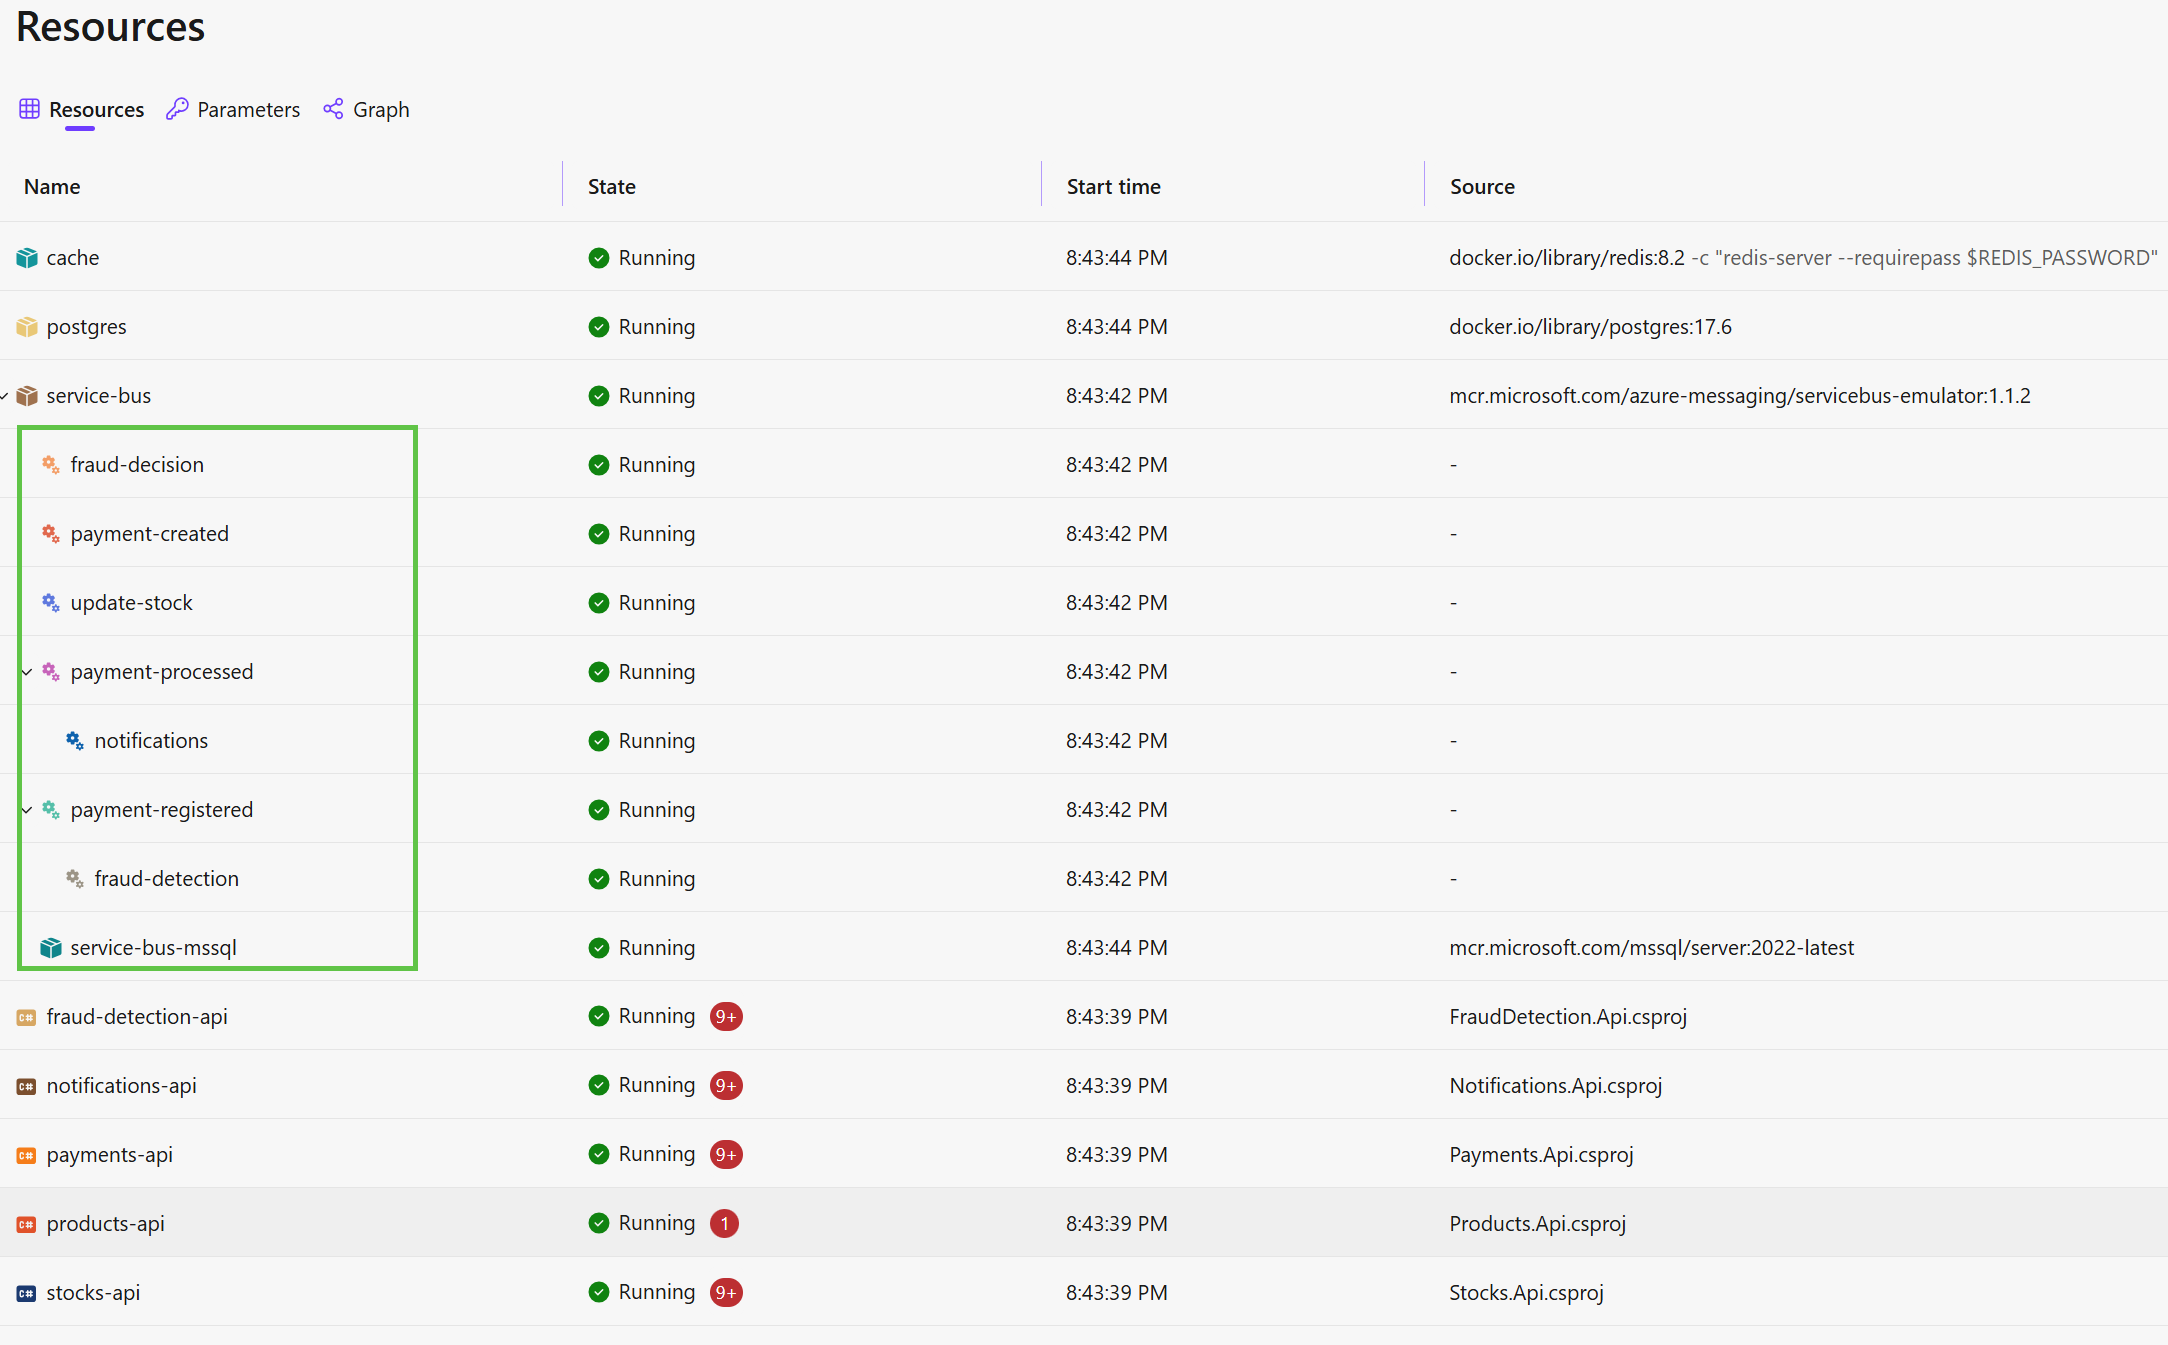
Here, you can see all the queues and topics created by the AppHost.
To test the full pipeline, call the purchase endpoint on Product-Service:
bashPOST /products/{id}/purchase { "quantity": 1 }
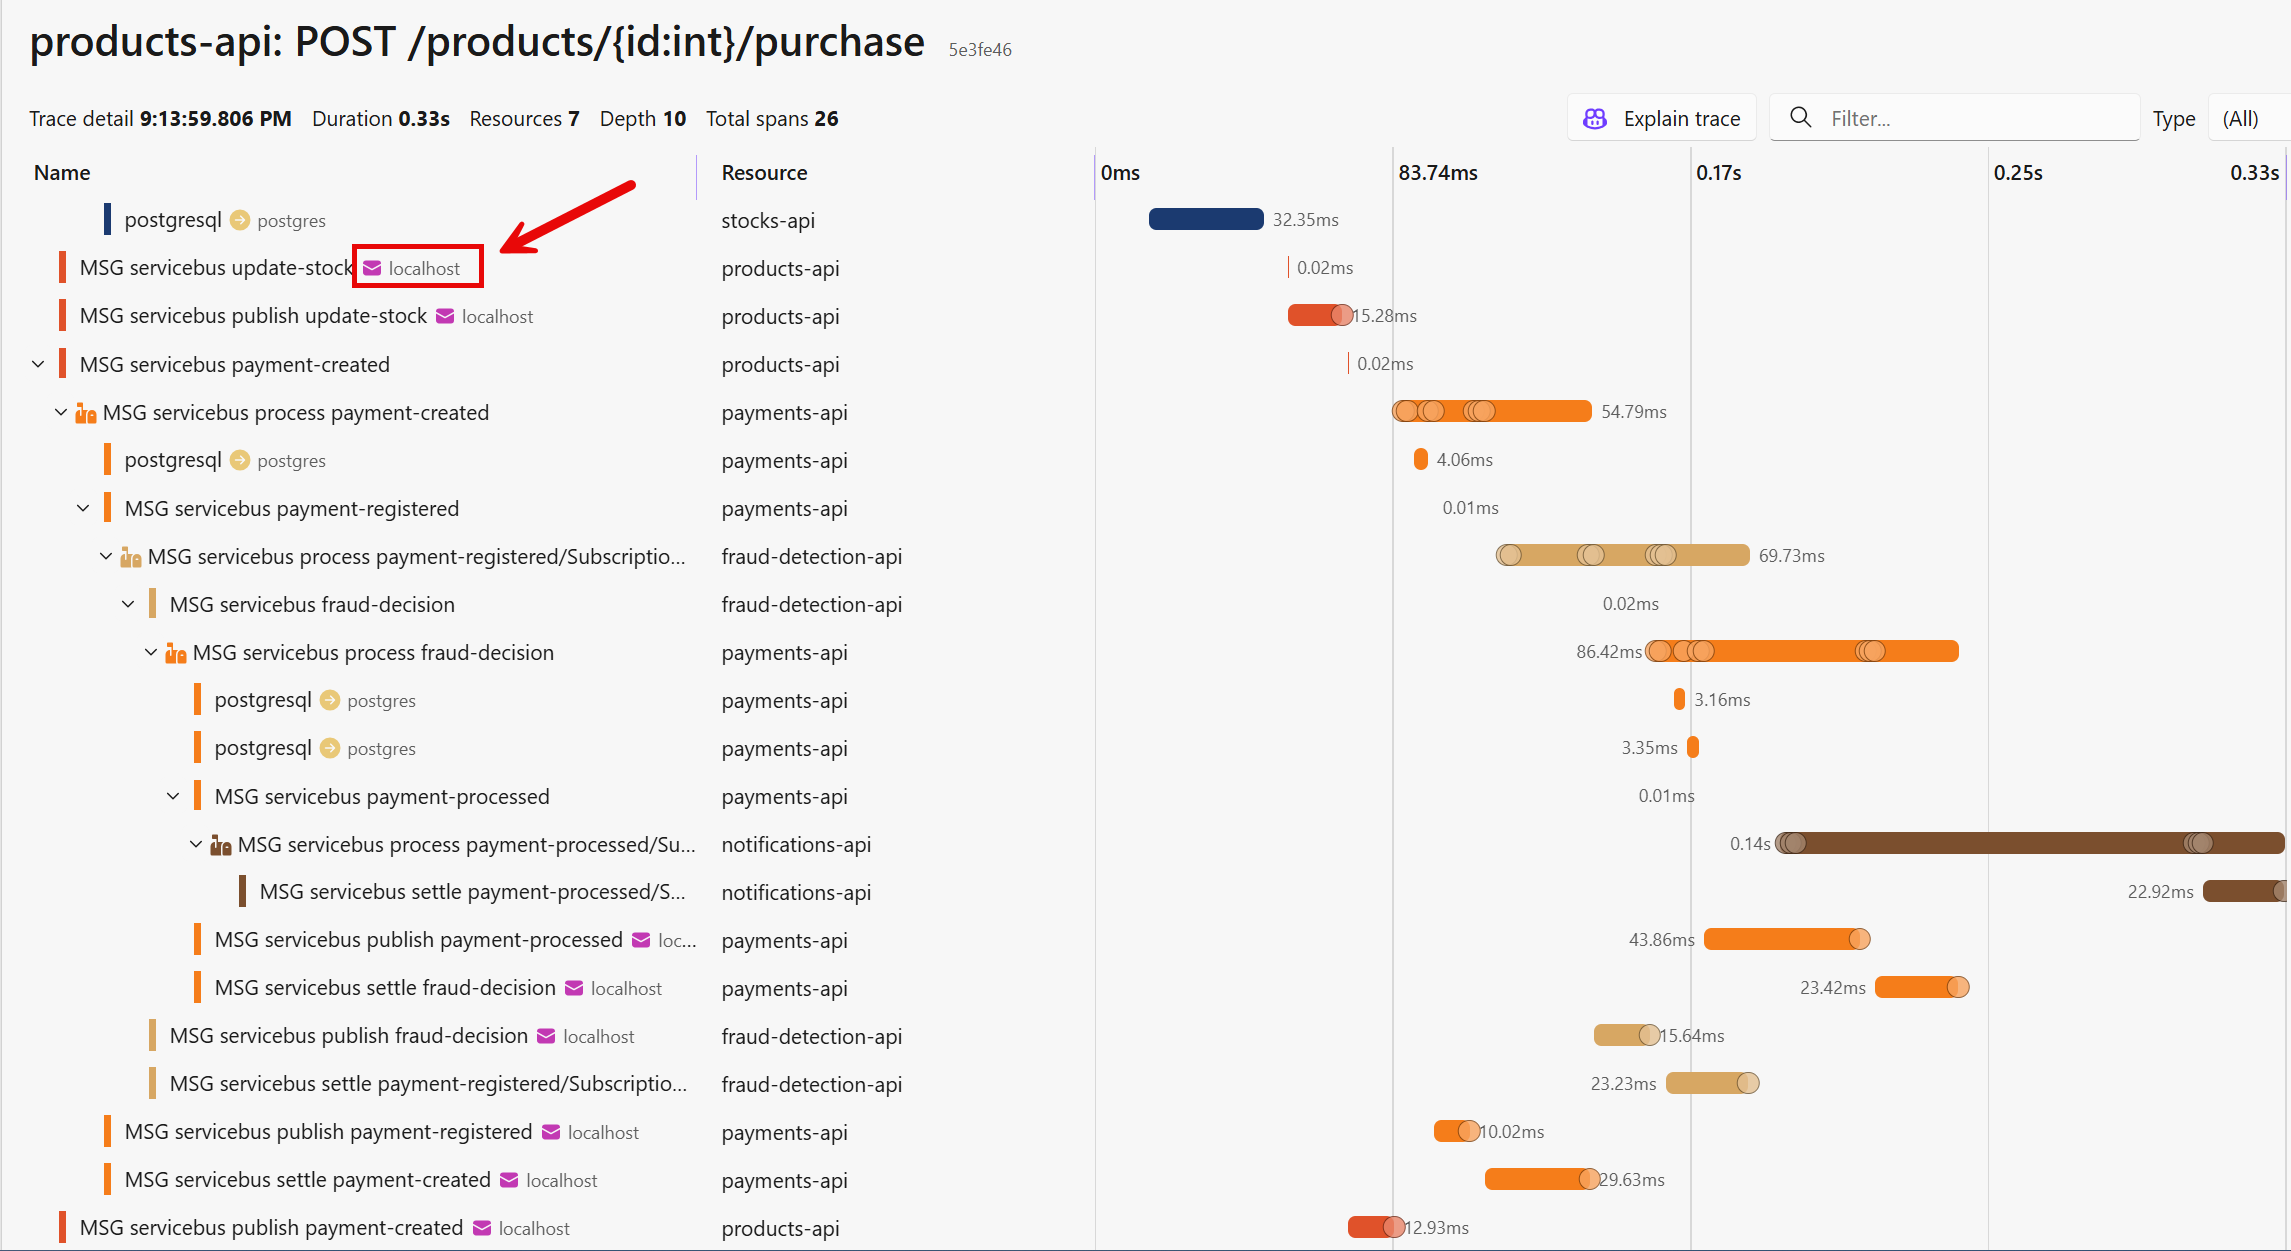
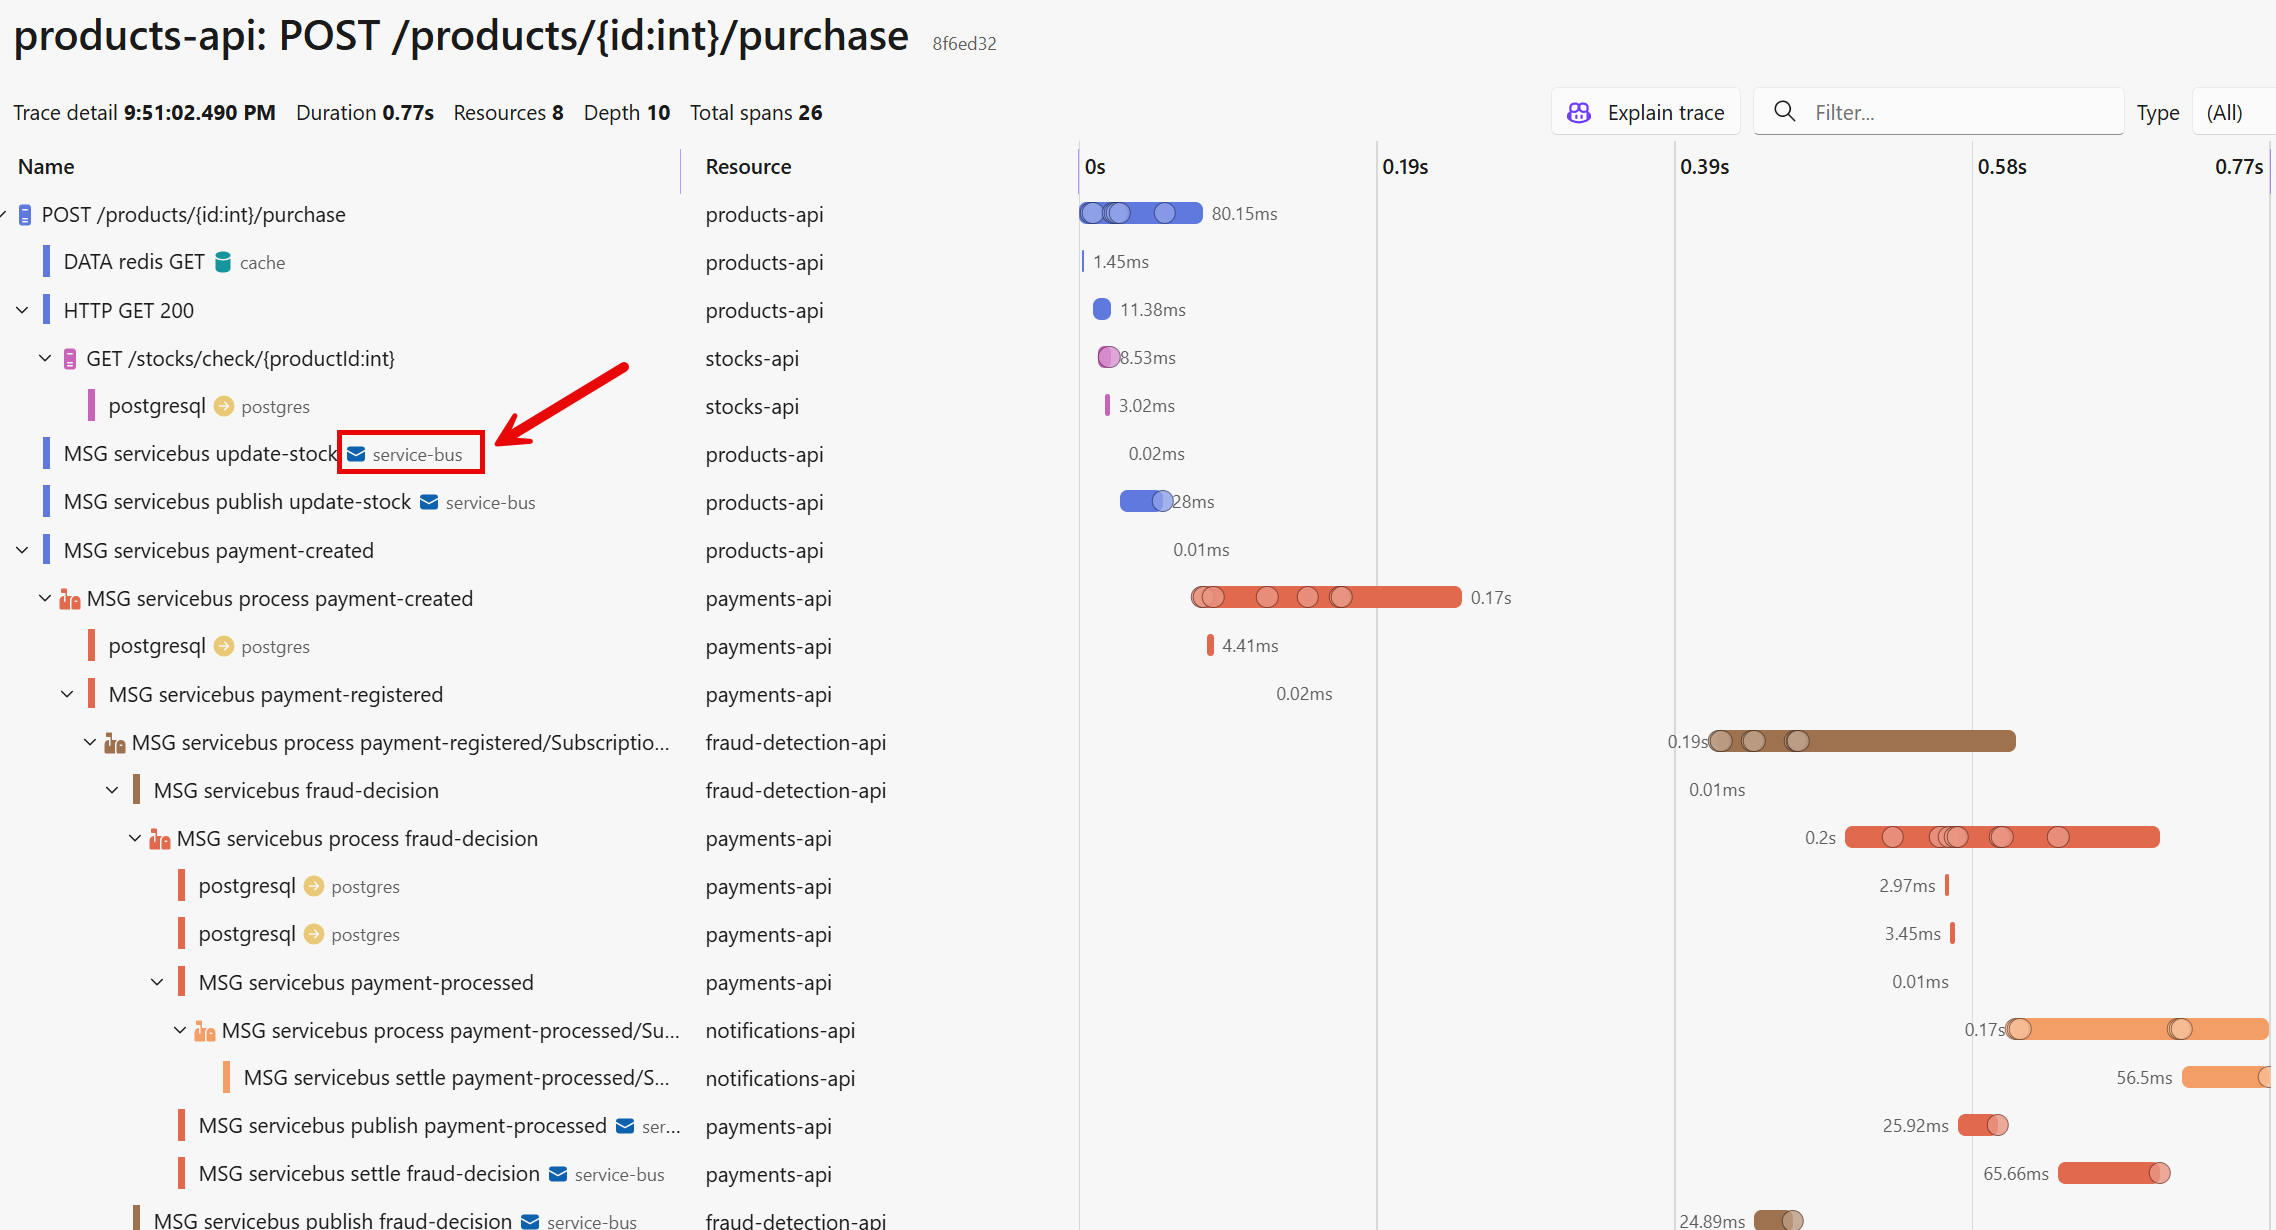
Then watch the logs in the Aspire dashboard. You will see messages flowing in distributed traces through all five services in sequence:
Deploying Microservices to Azure with Aspire
For production, you need to switch from the emulator to a real Azure Service Bus.
Aspire supports deploying to Azure Container Apps using the Azure Developer CLI (azd).
First, install the Azure Developer CLI:
bashwinget install microsoft.azd
Then run the following commands from the project's solution folder:
bashazd auth login azd init
azd auth login authenticates with Azure and downloads the Azure Developer CLI configuration.
You only need to run this once.
azd init initializes the Azure deployment configuration.
It scans your solution and generates Bicep infrastructure-as-code templates for all resources.
When deploying to Azure, we need a different configuration for AzureServiceBus with the RunAsEmulator() call removed:
csharpif (builder.Environment.IsProduction()) { // Existing Azure Service Bus: queues and topics already exist var serviceBus = builder.AddConnectionString("service-bus"); stocksApi.WithReference(serviceBus); productsApi.WithReference(serviceBus); paymentsApi.WithReference(serviceBus); fraudDetectionApi.WithReference(serviceBus); notificationsApi.WithReference(serviceBus); }
If we use an existing Service Bus, we can just use the AddConnectionString call and pass the connection string to the WithReference method to all services.
For this to work, we need to create queues and topics on the existing Azure Service Bus via Azure Portal or the Azure CLI:
First, add the queues:
- payment-created
- update-stock
- fraud-decision
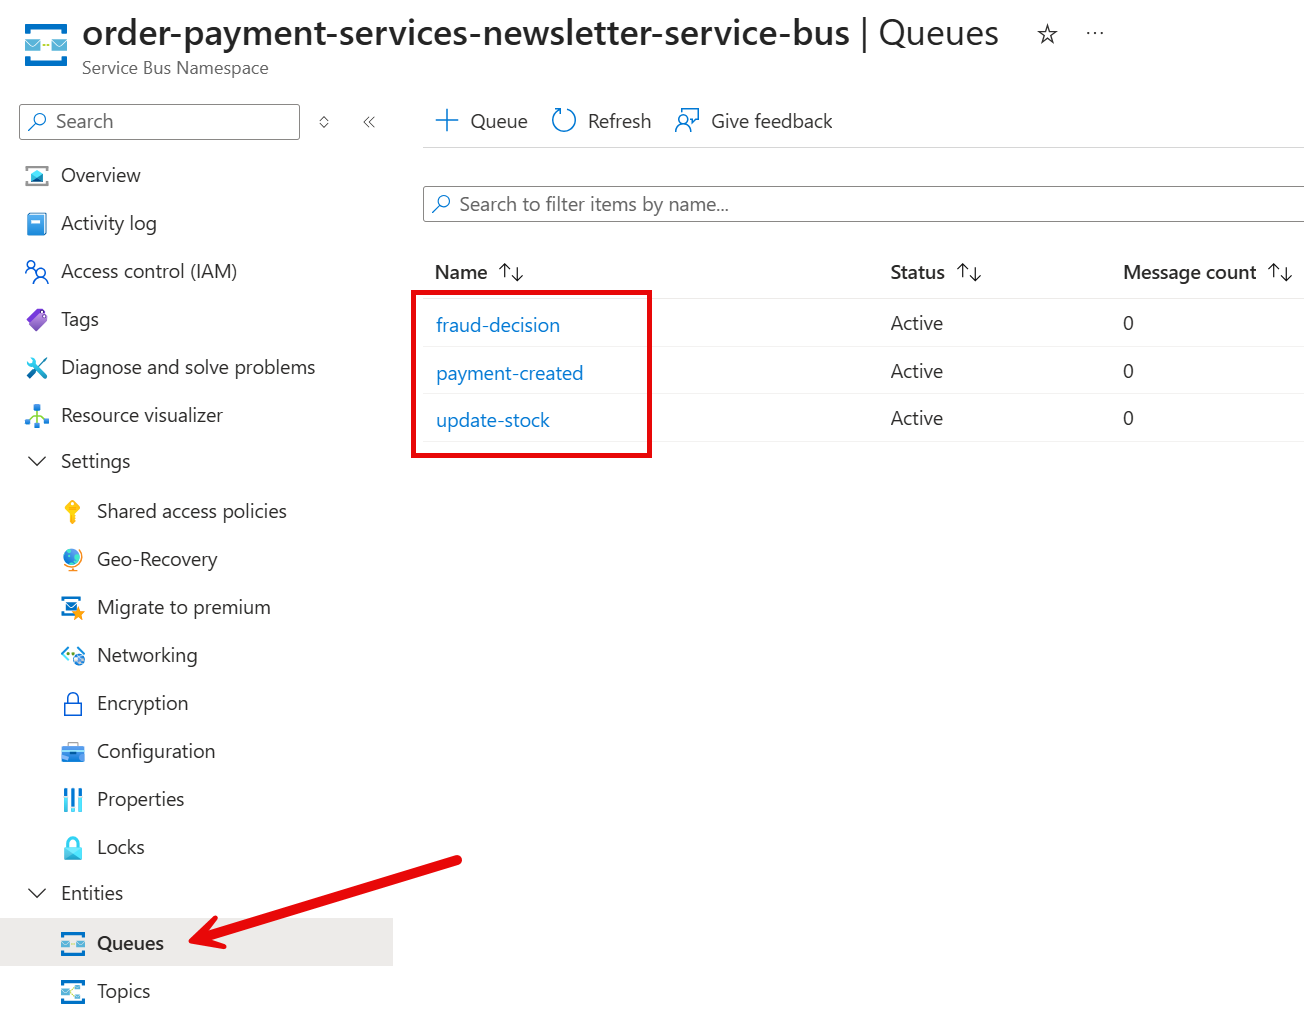
Second, create the topics:
- payment-registered
- payment-processed
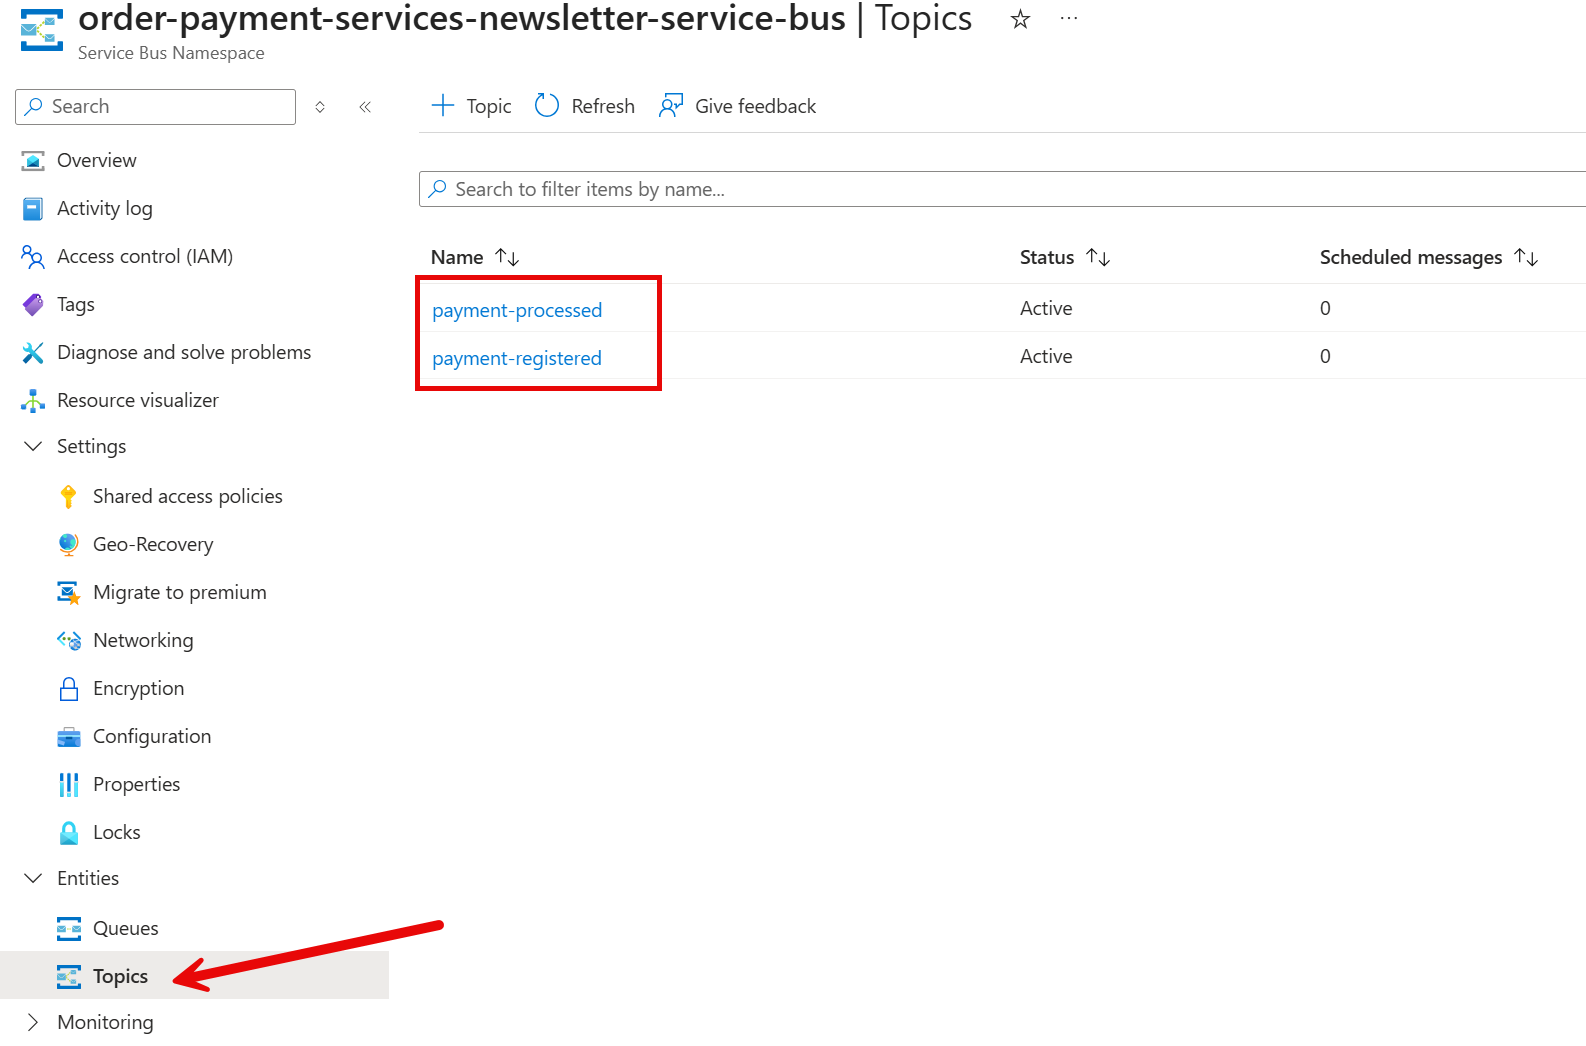
Third, create subscriptions for the topics:
- payment-registered -> fraud-detection
- payment-processed -> notifications
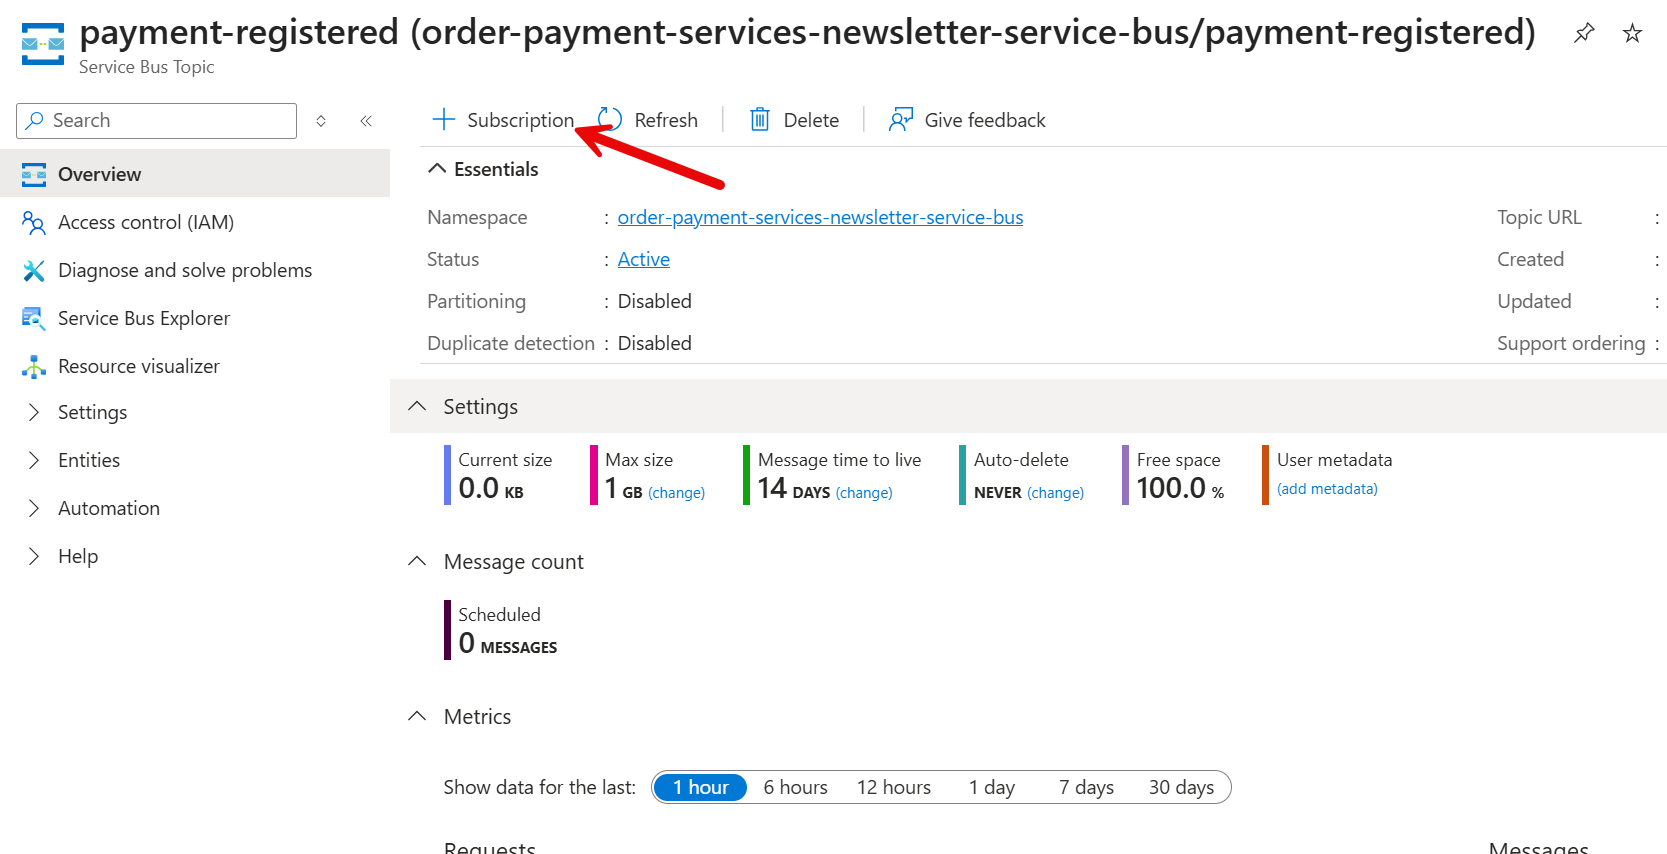
Finally, run the azd up command to provision Azure resources and deploy your application.
bashazd up
Aspire will create:
- Azure Container Apps for each of your five services
- Azure Database for PostgreSQL flexible server
- Azure Cache for Redis
- Azure Container Registry to store Docker images
All connection strings and service discovery are wired automatically, just as they would be locally.
Let's test the full pipeline by calling the purchase endpoint on the purchase API endpoint:
If you have created an Azure Service Bus in the Azure portal, you need to use the AddConnectionString to connect all services to it.
You can also AddConnectionString to connect to an existing Service Bus when running your services locally (if public access is enabled for this service).
If you want Aspire to create the Service Bus for you, use the AddAzureServiceBus as you have seen earlier.
Azure Service Bus vs Other Azure Messaging Services
Azure offers three messaging services. They are often confused because their names sound similar.
Azure Service Bus is an enterprise message broker with guaranteed delivery, dead-letter queue, sessions, and ordering. Use it for reliable service-to-service communication — commands, events, and workflows between microservices. This is what we use in this post.
Azure Event Hubs is a high-throughput event streaming platform built for millions of events per second. It has no dead-letter queue and no per-message acknowledgement. Use it for telemetry pipelines, log ingestion, and analytics workloads.
Azure Event Grid is a reactive eventing service for Azure infrastructure events. It is push-based and serverless. Use it to react to Azure resource changes — for example, when a blob is uploaded to Storage or a VM is deallocated.
If you need reliable delivery with retries and a dead-letter queue → use Service Bus. If you need massive-throughput event streaming → use Event Hubs. If you need to react to Azure resource events → use Event Grid.
Hope you find this newsletter useful. See you next time.
Comments