
Vertical Slice Architecture (VSA) is a design approach that structures an application by features rather than technical layers. Each slice encapsulates all aspects of a specific feature, including the UI, business logic, and data access. This approach contrasts with traditional architectures that typically segregate an application into horizontal layers.
In this blog post you will learn what is Vertical Slices architecture. I will share with you my experience on what are the best ways to structure vertical slices in your code.
Comparison with Other Architectures
N-Tier Architecture
N-Tier Architecture organizes the application into distinct layers, typically including:
- Presentation Layer: Handles the UI and user interactions.
- Business Logic Layer: Contains the core functionality and business rules.
- Data Access Layer: Manages data retrieval and storage.
Here are the differences between N-tier and Vertical Slice Architecture:
- VSA organizes by feature (vertical), while N-Tier organizes by function (horizontal).
- N-Tier can lead to tight coupling between layers, whereas VSA promotes loose coupling between the feature.
- Modifying a feature in N-Tier might involve changes across multiple layers, whereas in VSA, changes are contained within the feature slice.
Clean Architecture
Clean Architecture aims to separate the concerns of the application into distinct layers, promoting high cohesion and low coupling. It consists of the following layers:
- Domain: contains core business objects such as entities.
- Application Layer: implementation of Application use cases.
- Infrastructure: implementation of external dependencies like database, cache, message queue, authentication provider, etc.
- Presentation: implementation of an interface with the outside world like WebApi, gRPC, GraphQL, MVC, etc.
Here are the differences between Clean Architecture and Vertical Slice Architecture:
- Both emphasize separation of concerns, but VSA focuses on feature-specific separation while Clean Architecture separates by role and responsibility.
- Clean Architecture is designed for testability by isolating business logic. VSA can achieve similar testability by containing all logic within feature slices.
- VSA allows for more flexible and feature-specific changes, whereas Clean Architecture promotes reusability and clarity across the application.
Advantages of Vertical Slice Architecture
Vertical Slice Architecture is an extremely popular way to structure your projects nowadays. It strives for high cohesion within a slice (feature) and loose coupling between slices.
VSA has a lot of advantages:
- Feature Focused: changes are isolated to specific features, reducing the risk of unintended side effects.
- Scalability: easier to scale development by allowing other developers and teams to work on different features independently.
- Flexibility: allows using different technologies or approaches within each slice as needed.
- Maintainability: easier to navigate in the solution, understand and maintain since all aspects of a feature are contained within a single slice.
- Reduced Coupling: minimizes dependencies between different slices.
Disadvantages of Vertical Slice Architecture
Every architectural style is a tradeoff that comes with benefits and drawbacks. Let's explore what are the disadvantages of Vertical Slice Architecture:
- Duplication: potential for code duplication across slices.
- Consistency: ensuring consistency across slices and managing cross-cutting concerns (e.g., error handling, logging, validation) requires careful planning.
- Large number of classes and files: large application can have a lot of vertical slices, each containing multiple small classes.
With the first two disadvantages you can deal by carefully designing your architecture. For example, you can extract common functionality to its own classes. And use MediatR pipelines to manage the cross-cutting concerns such as error handling, logging, validation, etc.
The third disadvantage could be dealt with a good folder structure, which I want to show you in this blog post.
Let's dive into what are the best ways to structure your project with Vertical Slice Architecture.
Option #1: Feature-Based Folders
First, let's have a look at the most straightforward way to structure your projects using VSA.
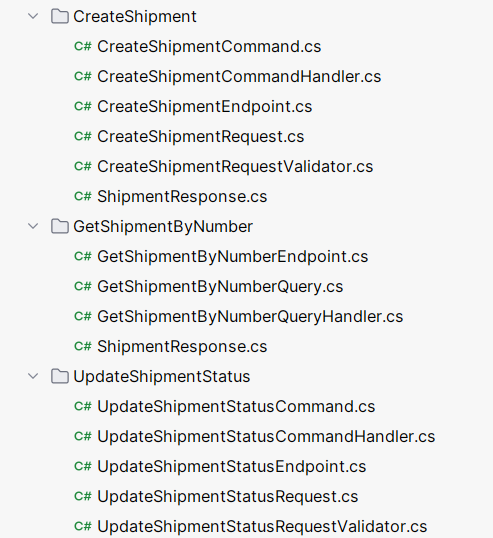
Here we have 3 use cases (vertical slices):
- Create Shipment
- Update Shipment Status
- Get Shipment by Number
Each vertical slice is placed in its own folder named after the use case.
Each vertical slice has a minimal API endpoint that uses MediatR that encapsulates application logic in command handlers.
csharppublic class CreateShipmentEndpoint : IEndpoint { public void MapEndpoint(WebApplication app) { app.MapPost("/api/v1/shipments", Handle); } private static async Task<IResult> Handle( [FromBody] CreateShipmentRequest request, IValidator<CreateShipmentRequest> validator, IMediator mediator, CancellationToken cancellationToken) { var validationResult = await validator.ValidateAsync(request, cancellationToken); if (!validationResult.IsValid) { return Results.ValidationProblem(validationResult.ToDictionary()); } var command = new CreateShipmentCommand( request.OrderId, request.Address, request.Carrier, request.ReceiverEmail, request.Items); var response = await mediator.Send(command, cancellationToken); if (response.IsError) { return response.Errors.ToProblem(); } return Results.Ok(response.Value); } }
Here request, response, command, handler, endpoint, validator for each use case are placed in separate files.
Let's have a look at the CreateShipmentCommand and its handler:
csharpinternal sealed record CreateShipmentCommand( string OrderId, Address Address, string Carrier, string ReceiverEmail, List<ShipmentItem> Items) : IRequest<ErrorOr<ShipmentResponse>>; internal sealed class CreateShipmentCommandHandler( EfCoreDbContext context, ILogger<CreateShipmentCommandHandler> logger) : IRequestHandler<CreateShipmentCommand, ErrorOr<ShipmentResponse>> { public async Task<ErrorOr<ShipmentResponse>> Handle( CreateShipmentCommand request, CancellationToken cancellationToken) { var shipmentAlreadyExists = await context.Shipments .Where(s => s.OrderId == request.OrderId) .AnyAsync(cancellationToken); if (shipmentAlreadyExists) { logger.LogInformation("Shipment for order '{OrderId}' is already created", request.OrderId); return Error.Conflict($"Shipment for order '{request.OrderId}' is already created"); } var shipmentNumber = new Faker().Commerce.Ean8(); var shipment = request.MapToShipment(shipmentNumber); context.Shipments.Add(shipment); await context.SaveChangesAsync(cancellationToken); logger.LogInformation("Created shipment: {@Shipment}", shipment); var response = shipment.MapToResponse(); return response; } }
Advantages of this code structure:
- All vertical slice files are placed in the same folder
- Convenient structure: every part of a vertical slice has its own file
Disadvantages of this code structure:
- Too many files
Personally, I don't find this approach the best one because it eliminates some advantages of Vertical Slice Architecture for me:
- Fast navigation in the codebase within a feature
- High speed of development of each feature
All because of too many files.
But still, this approach is preferable when you have complex command and query handlers or webapi endpoints with a lot of code.
Option #2: Single File per Slice with Nested Classes
Now let's explore other project structures that have fewer files.

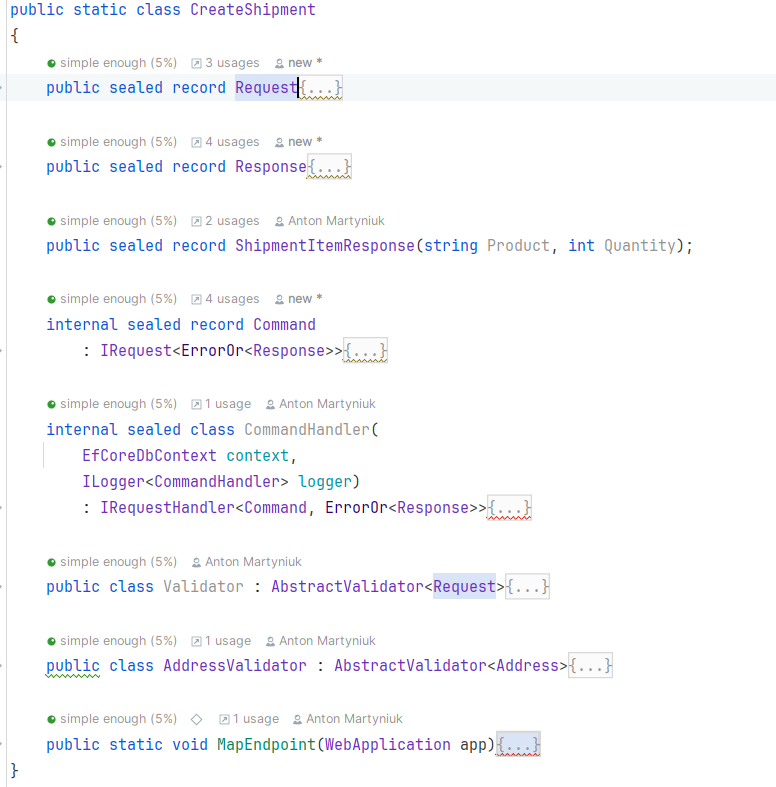
In this approach, you have a single file per vertical slice. On the top level, you have a static class that contains all the classes: request, response, command, handler, endpoint, validator nested within this static class.
Because of nesting, you can simplify the names of all the classes.
Instead of CreateShipmentRequest and ShipmentResponse you can have just Request and Response.
csharppublic static class CreateShipment { public sealed record Request(...); public sealed record Response(...); internal sealed record Command(...) : IRequest<ErrorOr<Response>>; internal sealed class CommandHandler( EfCoreDbContext context, ILogger<CommandHandler> logger) : IRequestHandler<Command, ErrorOr<Response>> { // ... } public class Validator : AbstractValidator<Request> { // ... } public static void MapEndpoint(WebApplication app) { app.MapPost("/api/v2/shipments", Handle); } private static async Task<IResult> Handle() { // ... } }
Advantages of this code structure:
- Fast and easy navigation. From any part of your codebase, you can navigate to your vertical slice and see all the feature codebase in one file
- Easier naming: you don't have to bother with naming your classes, simply use Request, Response, Command, CommandHandler, etc.
- High development speed as all the codebase is within a single file
Disadvantages of this code structure:
- Can lead to increased nesting inside a static class
- Can lead to a very tall vertical slice file if it contains complex logic or a large number of nested classes
I like this approach because of simplicity and brevity. However, it can become cumbersome at times due to too many classes placed in a single nested static class.
So, let me show you an improved version of this code structure.
Option #3: Single File for Main Code with Extracted Concerns
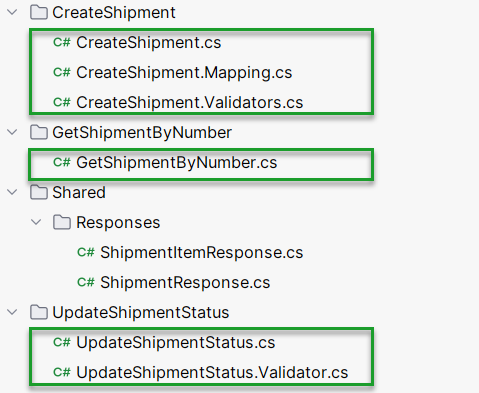
This code structure combines the advantages of the first two options.
I still use a single file for most of the codebase, but I don't have a static file that nests other classes. I also extract cross-cutting concerns such as validators and mappers into separate files, so I don't clutter the main file with too many classes.
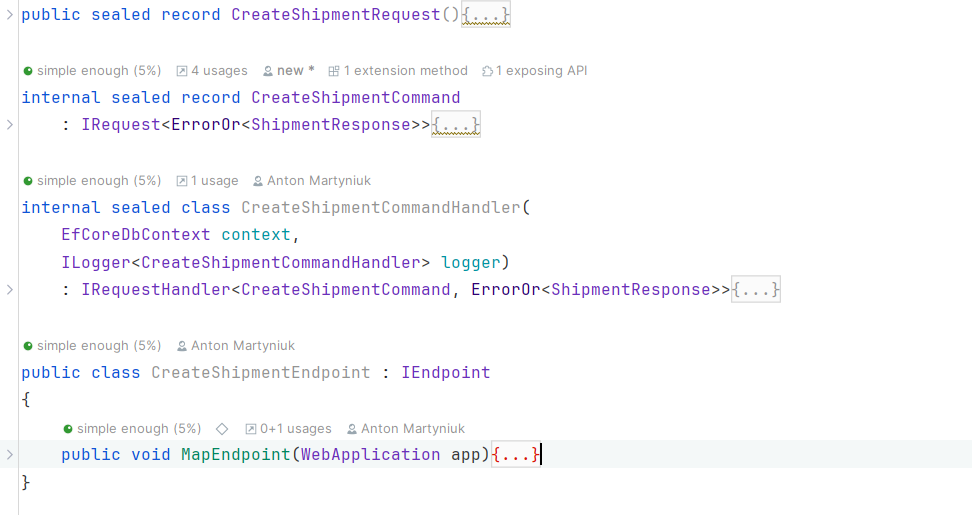
Here is how the main file looks like:
csharppublic sealed record CreateShipmentRequest( string OrderId, Address Address, string Carrier, string ReceiverEmail, List<ShipmentItem> Items); internal sealed record CreateShipmentCommand( string OrderId, Address Address, string Carrier, string ReceiverEmail, List<ShipmentItem> Items) : IRequest<ErrorOr<ShipmentResponse>>; internal sealed class CreateShipmentCommandHandler( EfCoreDbContext context, ILogger<CreateShipmentCommandHandler> logger) : IRequestHandler<CreateShipmentCommand, ErrorOr<ShipmentResponse>> { // ... } public class CreateShipmentEndpoint : IEndpoint { public void MapEndpoint(WebApplication app) { app.MapPost("/api/v3/shipments", Handle); } private static async Task<IResult> Handle(...) { } }
This approach eliminates the disadvantages of the first two options:
- Too many files
- Too many classes in one file
- Too much nesting in the file
With this approach, if my main file becomes too tall, I can extract an extra class into a separate file. If you have a repeatable logic, you can extract files into a shared folder within an entity (Shipment) for all its use cases.
When compared to the second option, I need to write the full names of the classes like CreateShipmentRequest.
But I find it a very small inconvenience.
Advantages of this code structure:
- Fast and easy navigation. From every part of your codebase you can navigate to your vertical slice and see all the feature codebase in one file, except the cross-cutting concerns like validation and mapping
- High speed of development as all the feature main codebase is within a single file
- Easier extraction of repeatable code into a shared directory
- No extra nesting inside a main file
Disadvantages of this code structure:
- You need to provide a full name for each class
Option #4: Pragmatic Approach for Small Solutions
The fourth approach is structurally similar to the third option, but the main difference is in the code.
This is a more pragmatic approach suitable for small solutions or separate microservices. Instead of using MediatR and having command and query handlers, you can put all the application logic inside your webapi endpoint:
csharppublic sealed record CreateShipmentRequest( string OrderId, Address Address, string Carrier, string ReceiverEmail, List<ShipmentItem> Items); public class CreateShipmentEndpoint : IEndpoint { public void MapEndpoint(WebApplication app) { app.MapPost("/api/v4/shipments", Handle); } private static async Task<IResult> Handle( [FromBody] CreateShipmentRequest request, IValidator<CreateShipmentRequest> validator, EfCoreDbContext context, ILogger<CreateShipmentEndpoint> logger, CancellationToken cancellationToken) { var validationResult = await validator.ValidateAsync(request, cancellationToken); if (!validationResult.IsValid) { return Results.ValidationProblem(validationResult.ToDictionary()); } var shipmentAlreadyExists = await context.Shipments .Where(s => s.OrderId == request.OrderId) .AnyAsync(cancellationToken); if (shipmentAlreadyExists) { logger.LogInformation("Shipment for order '{OrderId}' is already created", request.OrderId); return Error.Conflict($"Shipment for order '{request.OrderId}' is already created").ToProblem(); } var shipment = await CreateShipmentAsync(request, context, cancellationToken); logger.LogInformation("Created shipment: {@Shipment}", shipment); var response = shipment.MapToResponse(); return Results.Ok(response); } private static async Task<Shipment> CreateShipmentAsync(CreateShipmentRequest request, EfCoreDbContext context, CancellationToken cancellationToken) { var shipmentNumber = new Faker().Commerce.Ean8(); var shipment = request.MapToShipment(shipmentNumber); context.Shipments.Add(shipment); await context.SaveChangesAsync(cancellationToken); return shipment; } }
You can use a repository or DbContext directly in the web API endpoint, skipping the MediatR handlers completely. This simplifies the codebase and makes it smaller. However, you lose the ability for your code to be reusable, especially when implementing cross-cutting concerns (which can be implemented once in MediatR pipelines).
It's up to you whether to use this approach or not.
This approach is great for a small or simple codebase, like a separate microservice that implements just a CRUD API. In such cases, this approach offers simplicity and high speed of development.
Note that in all four approaches, we use minimal API endpoints. They fit ideally in the Vertical Slice Architecture as all slices are independent of each other. With controllers, you don't have the same flexibility to break them down into separate classes.
Advantages of this code structure:
- Fast and easy navigation. From every part of your application you can navigate to your vertical slice and see all the feature codebase in one file, except the cross-cutting concerns like validation and mapping
- High speed of development and simplicity. All the logic is implemented inside a single method — a webapi endpoint
- No extra nesting inside a main file
Disadvantages of this code structure:
- Possible code duplication as all the code is written directly in the web API endpoint, without extraction of repeatable logic in other classes (like MediatR handlers)
- Reduced flexibility and reusability due to the absence of MediatR, which limits the ability to implement and manage cross-cutting concerns.
- Hard to unit test (but you can cover all the code with integration tests)
Summary
In this blog post, we explored four effective methods for structuring your projects using Vertical Slice Architecture (VSA) in .NET applications. Each method balances different aspects of maintainability, scalability, and development speed.
Option #1: Feature-Based Folders This method involves organizing each vertical slice in its own folder, with separate files for requests, responses, commands, handlers, endpoints, and validators. It provides a clear and organized structure but can result in too many files, which may hinder fast navigation and development.
Option #2: Single File per Slice with Nested Classes Here, each vertical slice is encapsulated within a single file using a static class that nests all related classes (request, response, command, handler, etc.). This approach simplifies navigation and naming conventions but can lead to excessive nesting and very tall files if the logic is complex.
Option #3: Single File for Main Code with Extracted Concerns This approach strikes a balance by using a single file for the main codebase of each slice while extracting cross-cutting concerns like validation and mapping into separate files. It reduces the disadvantages of having too many files or too much nesting and maintains easy navigation and high development speed.
Option #4: Pragmatic Approach for Small Solutions Ideal for small solutions or microservices, this method embeds all logic directly within the web API endpoint, bypassing MediatR handlers. It offers simplicity and rapid development but may lead to code duplication and reduced flexibility due to the lack of reusable components and centralized management of cross-cutting concerns.
Each method has its own set of advantages and disadvantages, allowing you to choose the one that best fits your project's requirements. By carefully selecting the right structure, you can enhance the maintainability, scalability, and development efficiency of your applications using Vertical Slice Architecture.
Hope you find this newsletter useful. See you next time.
