You just pushed your code, and now you wait.
Did the build pass? Did the tests run? Is the Docker image ready to ship?
If you are checking these by hand, you are doing work a machine should do for you.
A good CI/CD pipeline builds, tests, and ships every change the same way, every time - without you babysitting it.
Over the years, I have set up these pipelines for many .NET projects, and GitHub Actions has become my default.
It lives right next to your code, it is free for most projects, and it can take a single commit all the way from a pull request to a published Docker image.
In this post, we will explore:
- What are GitHub Actions
- Building and testing your .NET app
- Publishing a NuGet package after tests pass
- Building a Docker image that runs tests
- Setting up secrets in GitHub Actions
- Pushing the Docker image to the registry
Let's dive in.
What Are GitHub Actions?
GitHub Actions is a built-in automation platform inside every GitHub repository.
You describe what should happen when something occurs in your repository - a push, a pull request, a new tag, a schedule or manual - and GitHub runs it for you on a fresh virtual machine.
You need to know these terms to be able to read any workflow:
- Workflow: an automated process defined in a YAML file under
.github/workflows. A repository can have many. - Event: what triggers a workflow - a
push, apull_request, arelease, or aschedule. - Job: a group of steps that runs on one machine. Jobs run in parallel by default, or in order when one
needsanother. - Step: a single task - either a shell command (
run) or a reusable action (uses). - Runner: the machine that executes a job. GitHub hosts Linux, Windows, and macOS runners, and you can host your own.
Any workflow in GitHub Actions is a series of steps that run on a virtual machine.
With these, you can automate almost anything related to your code: run tests on every pull request, publish a NuGet package with a new release, build and push a Docker image, run a nightly security scan, or post a message to Slack.
Because a workflow is just a file in your repository, it is versioned with your code and reviewed in pull requests like everything else. The pipeline evolves together with the application it builds.
Every workflow is a single YAML file.
Here is the smallest one that does real work - it runs on each push to main and prints a line on an Ubuntu runner:
yamlname: HELLO on: push: branches: [ "main" ] jobs: hello: runs-on: ubuntu-latest steps: - run: echo "GitHub Actions is running"
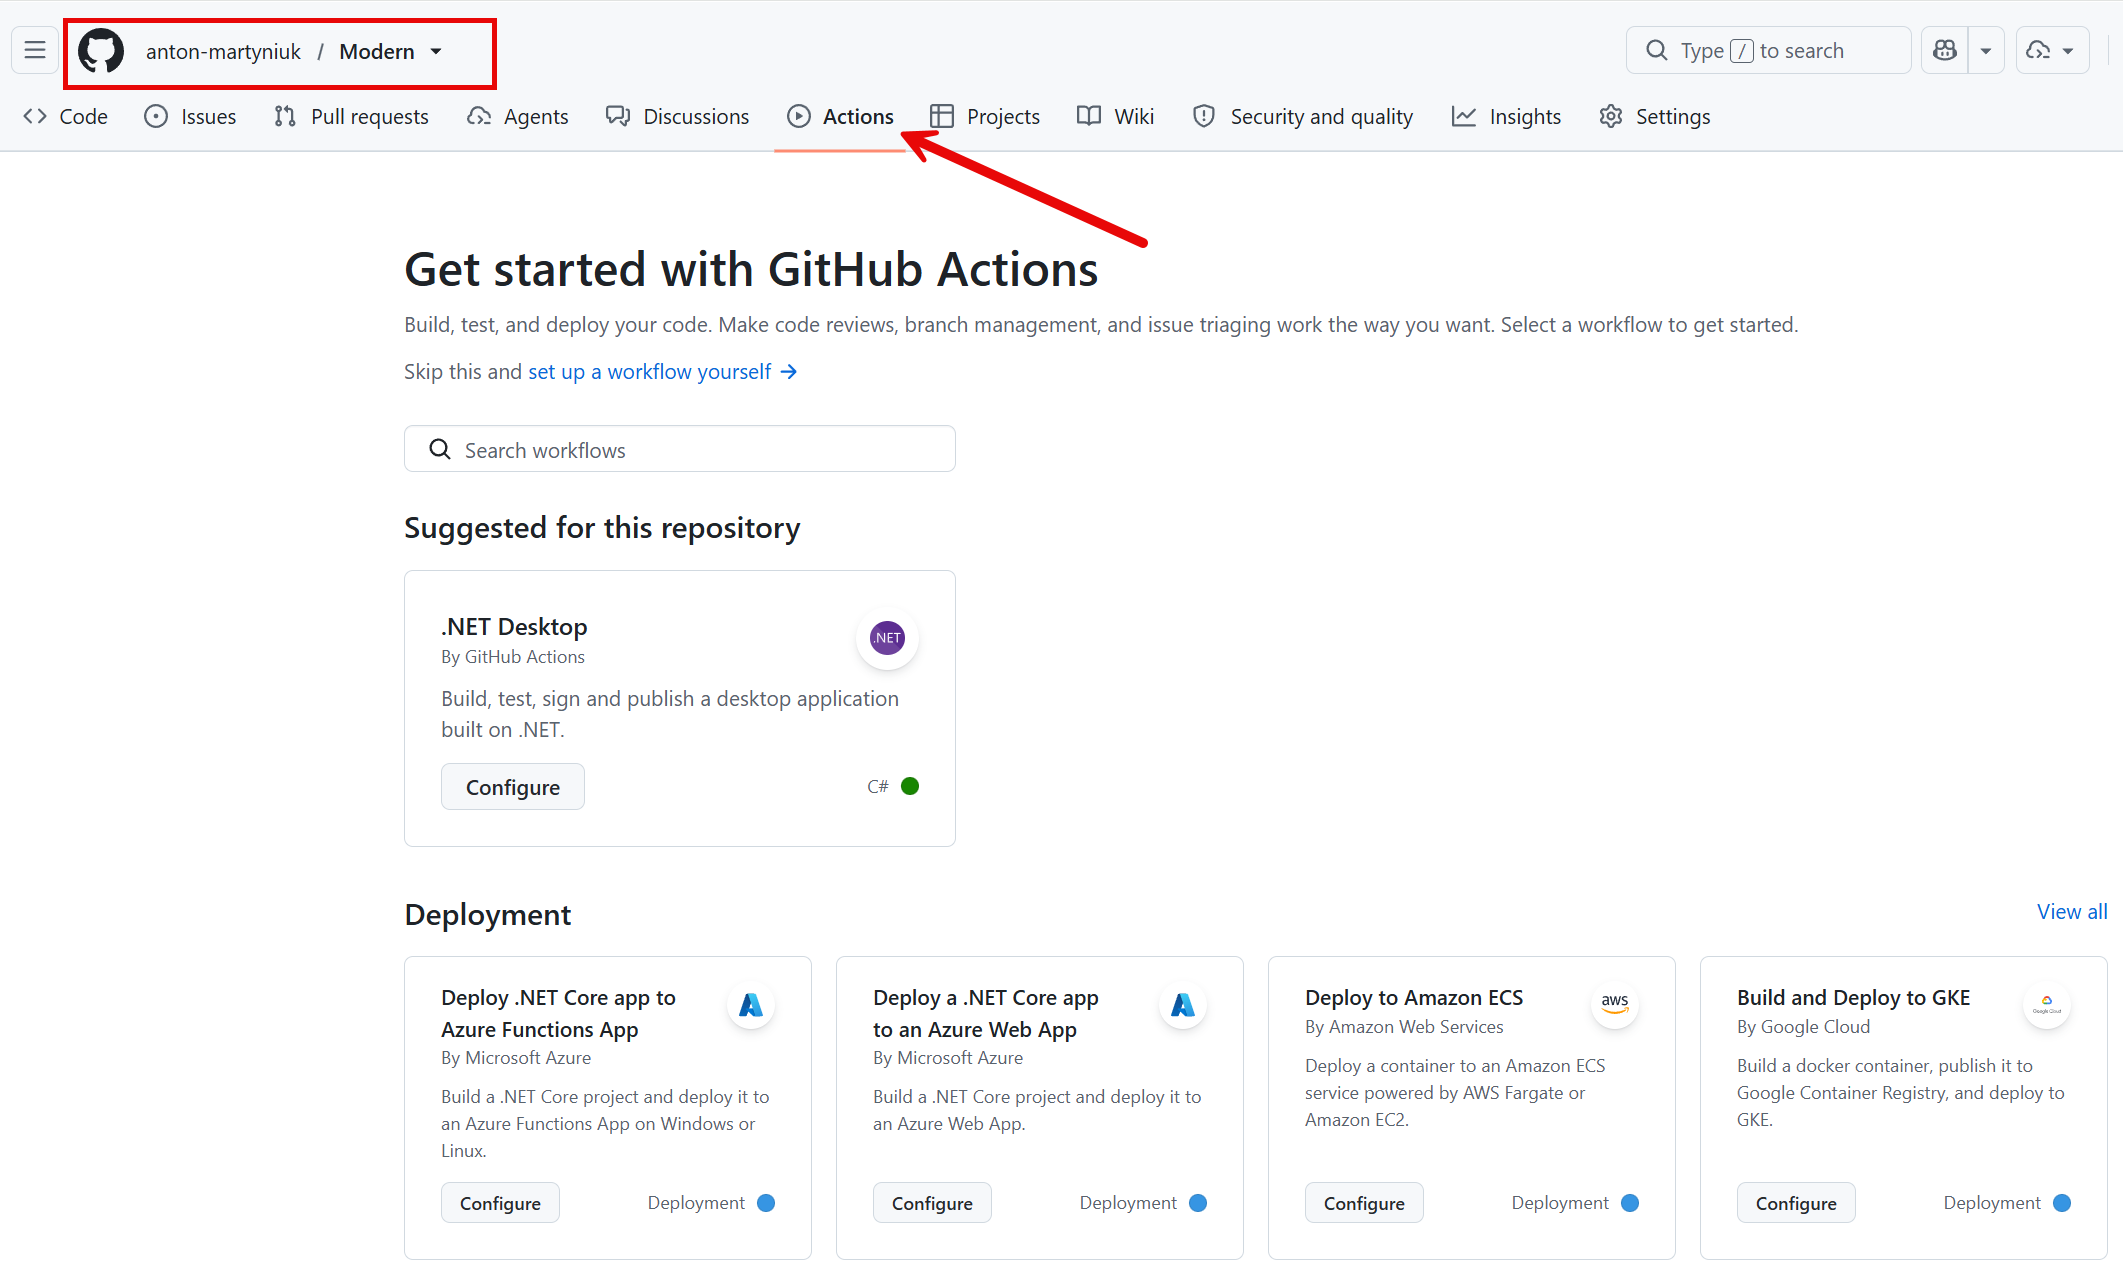
Save this as .github/workflows/hello.yml, push it, and open the Actions tab in your repository to watch it run.
Building and Testing Your .NET App
Let's explore an example of a ShippingService Web API that tracks shipments, backed by PostgreSQL.
The solution has a unit test project and an integration test project, and the first job every pipeline needs is to restore, build, and test on every change.
Create .github/workflows/ci.yml:
yamlname: BUILD_AND_TEST on: push: branches: [ "main" ] pull_request: branches: [ "main" ] jobs: build-and-test: runs-on: ubuntu-latest steps: - name: Checkout code uses: actions/checkout@v4 - name: Setup .NET uses: actions/setup-dotnet@v4 with: dotnet-version: '10.0.x' - name: Restore dependencies run: dotnet restore - name: Build run: dotnet build --no-restore --configuration Release - name: Run tests run: dotnet test --no-build --configuration Release --verbosity normal
Here is what each step does:
actions/checkout@v4clones your repository onto the runner so the rest of the steps can see your code.actions/setup-dotnet@v4installs the .NET 10 SDK.dotnet restore, thendotnet build --no-restore, thendotnet test --no-build- each step reuses the previous one's output, so you compile once and test exactly what you built.--configuration Releasetests the same build you will ship, not a debug build.
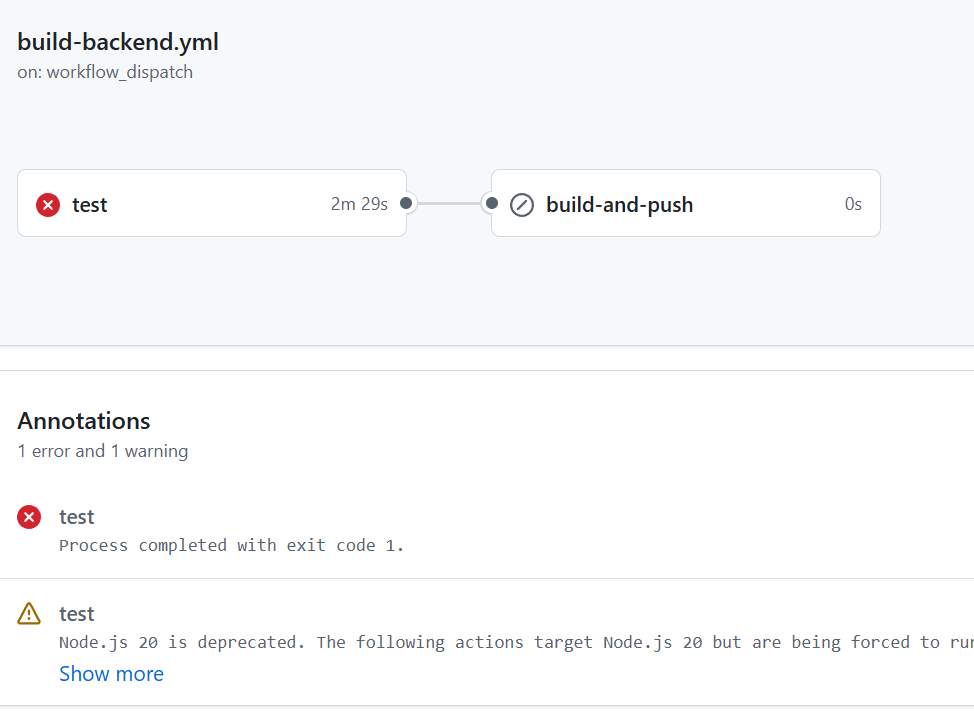
This runs on every push to main and on every pull request, so a broken test blocks the merge before it reaches your main branch.
Each job shows up as a status check on the pull request, with a green tick or a red cross and a full log you can open.
The dotnet test step decides the result: if any test fails, the step returns a non-zero exit code, the job turns red, and the merge is blocked.
Running integration tests with Testcontainers
Unit tests run anywhere - they have no external dependencies. Integration tests are different: they need a real database.
One way to provide it is to configure a database service in the workflow, but there is a cleaner option that requires no workflow configuration.
Testcontainers starts a throwaway PostgreSQL container from inside your test code, runs the tests against it, and deletes it afterward:
csharppublic class ShippingApiFactory : WebApplicationFactory<Program>, IAsyncLifetime { private readonly PostgreSqlContainer _postgres = new PostgreSqlBuilder() .WithImage("postgres:17") .Build(); public async Task InitializeAsync() => await _postgres.StartAsync(); public new async Task DisposeAsync() => await _postgres.DisposeAsync(); protected override void ConfigureWebHost(IWebHostBuilder builder) { builder.UseSetting("ConnectionStrings:Postgres", _postgres.GetConnectionString()); } }
Because the container lives inside the test run, the workflow above already works.
GitHub's Ubuntu runners have Docker pre-installed, and Testcontainers uses it automatically - no services: block, no connection strings in YAML, no cleanup step.
The same tests that pass on your machine pass in the pipeline.
Note: if you would rather manage the database in the workflow, GitHub Actions supports
services:containers - apostgresservice that GitHub starts before your job and tears down after. Testcontainers keeps that detail inside the test project, which is why I prefer it.
For a more in-depth guide, see ASP.NET Core Integration Testing Best Practices.
Publishing a NuGet Package After Tests Pass
A library does nothing for anyone until it is published.
If your repository includes a reusable library - in our case, Shipping.Contracts, the shared models other services depend on - you can publish it to NuGet automatically, but only when the tests are green.
Add a second job that needs the first. A job with needs waits for the named job to succeed, so the package never ships on a red build:
yamlpublish-nuget: needs: build-and-test runs-on: ubuntu-latest if: startsWith(github.ref, 'refs/tags/v') steps: - name: Checkout code uses: actions/checkout@v4 - name: Setup .NET uses: actions/setup-dotnet@v4 with: dotnet-version: '10.0.x' - name: Pack run: dotnet pack src/Shipping.Contracts/Shipping.Contracts.csproj --configuration Release -o ./artifacts - name: Push to NuGet run: dotnet nuget push ./artifacts/*.nupkg --api-key ${{ secrets.NUGET_API_KEY }} --source https://api.nuget.org/v3/index.json --skip-duplicate
What each part does:
needs: build-and-testchains the jobs - publishing runs only after the build-and-test job passes.if: startsWith(github.ref, 'refs/tags/v')limits publishing to version tags likev1.2.0, so a normal push tomainnever publishes a package. You tag a release, and the package goes out.dotnet packproduces the.nupkgfile from your library project.dotnet nuget pushuploads it to nuget.org, authenticating with a secret API key.--skip-duplicatekeeps a re-run safe if that version already exists.
Tag-based publishing fits semantic versioning cleanly: you push a tag like v1.2.0, the workflow packs that exact commit, and the tag's version becomes the NuGet version. Day-to-day commits keep flowing to main without releasing anything.
You store the NUGET_API_KEY value as a repository secret, never in the YAML - the Setting Up Secrets section below shows how.
Note: to publish to GitHub Packages instead of nuget.org, point
--sourceathttps://nuget.pkg.github.com/<owner>/index.jsonand authenticate with the built-inGITHUB_TOKEN.
Building a Docker Image That Runs Tests
To ship the Web API, you need a Docker image.
A multi-stage Dockerfile builds the app in one stage and copies only the result into a small runtime image. You can add a test stage in the middle, so the tests run as part of the build - if a test fails, the image is never produced:
dockerfile# Build stage FROM mcr.microsoft.com/dotnet/sdk:10.0 AS build WORKDIR /src COPY . . RUN dotnet restore RUN dotnet build --no-restore --configuration Release # Test stage - the build fails here if any test fails FROM build AS test RUN dotnet test --no-build --configuration Release # Publish stage FROM build AS publish RUN dotnet publish src/ShippingService/ShippingService.csproj \ --no-build --configuration Release -o /app # Runtime stage - small final image, no SDK FROM mcr.microsoft.com/dotnet/aspnet:10.0 AS final WORKDIR /app COPY /app . ENTRYPOINT ["dotnet", "ShippingService.dll"]
Each FROM starts a new stage:
- build restores and compiles the solution on the full .NET SDK image.
- test runs
dotnet teston top of the build. If a test fails, this layer fails and the wholedocker buildstops. - publish produces the trimmed, ready-to-run output.
- final copies that output onto the lightweight ASP.NET runtime image - no SDK, no source code, a much smaller image to deploy.
Note: Keeping the SDK out of the final image is not only about size. The runtime image ships without compilers or build tools, which means a faster pull on every deployment and a smaller attack surface in production.
Now build that image in the workflow. This job also waits for the fast unit-test job first, so you fail cheaply before spending time on a Docker build:
yamldocker-build: needs: build-and-test runs-on: ubuntu-latest steps: - name: Checkout code uses: actions/checkout@v4 - name: Build Docker image run: docker build -t shipping-service:${{ github.sha }} .
Tagging the image with ${{ github.sha }} - the commit hash - gives every build a unique, traceable tag.
Because the Dockerfile includes a test stage, docker build also runs your tests. The image only exists if they pass.
Setting Up Secrets in GitHub Actions
Pipelines need sensitive values: a NuGet API key, a cloud password and a connection string.
These must never live in your YAML, where anyone with read access to the repository could see them.
GitHub Secrets stores these values encrypted and injects them into a workflow only at runtime.
To add one, open your repository and go to Settings -> Secrets and variables -> Actions -> New repository secret.
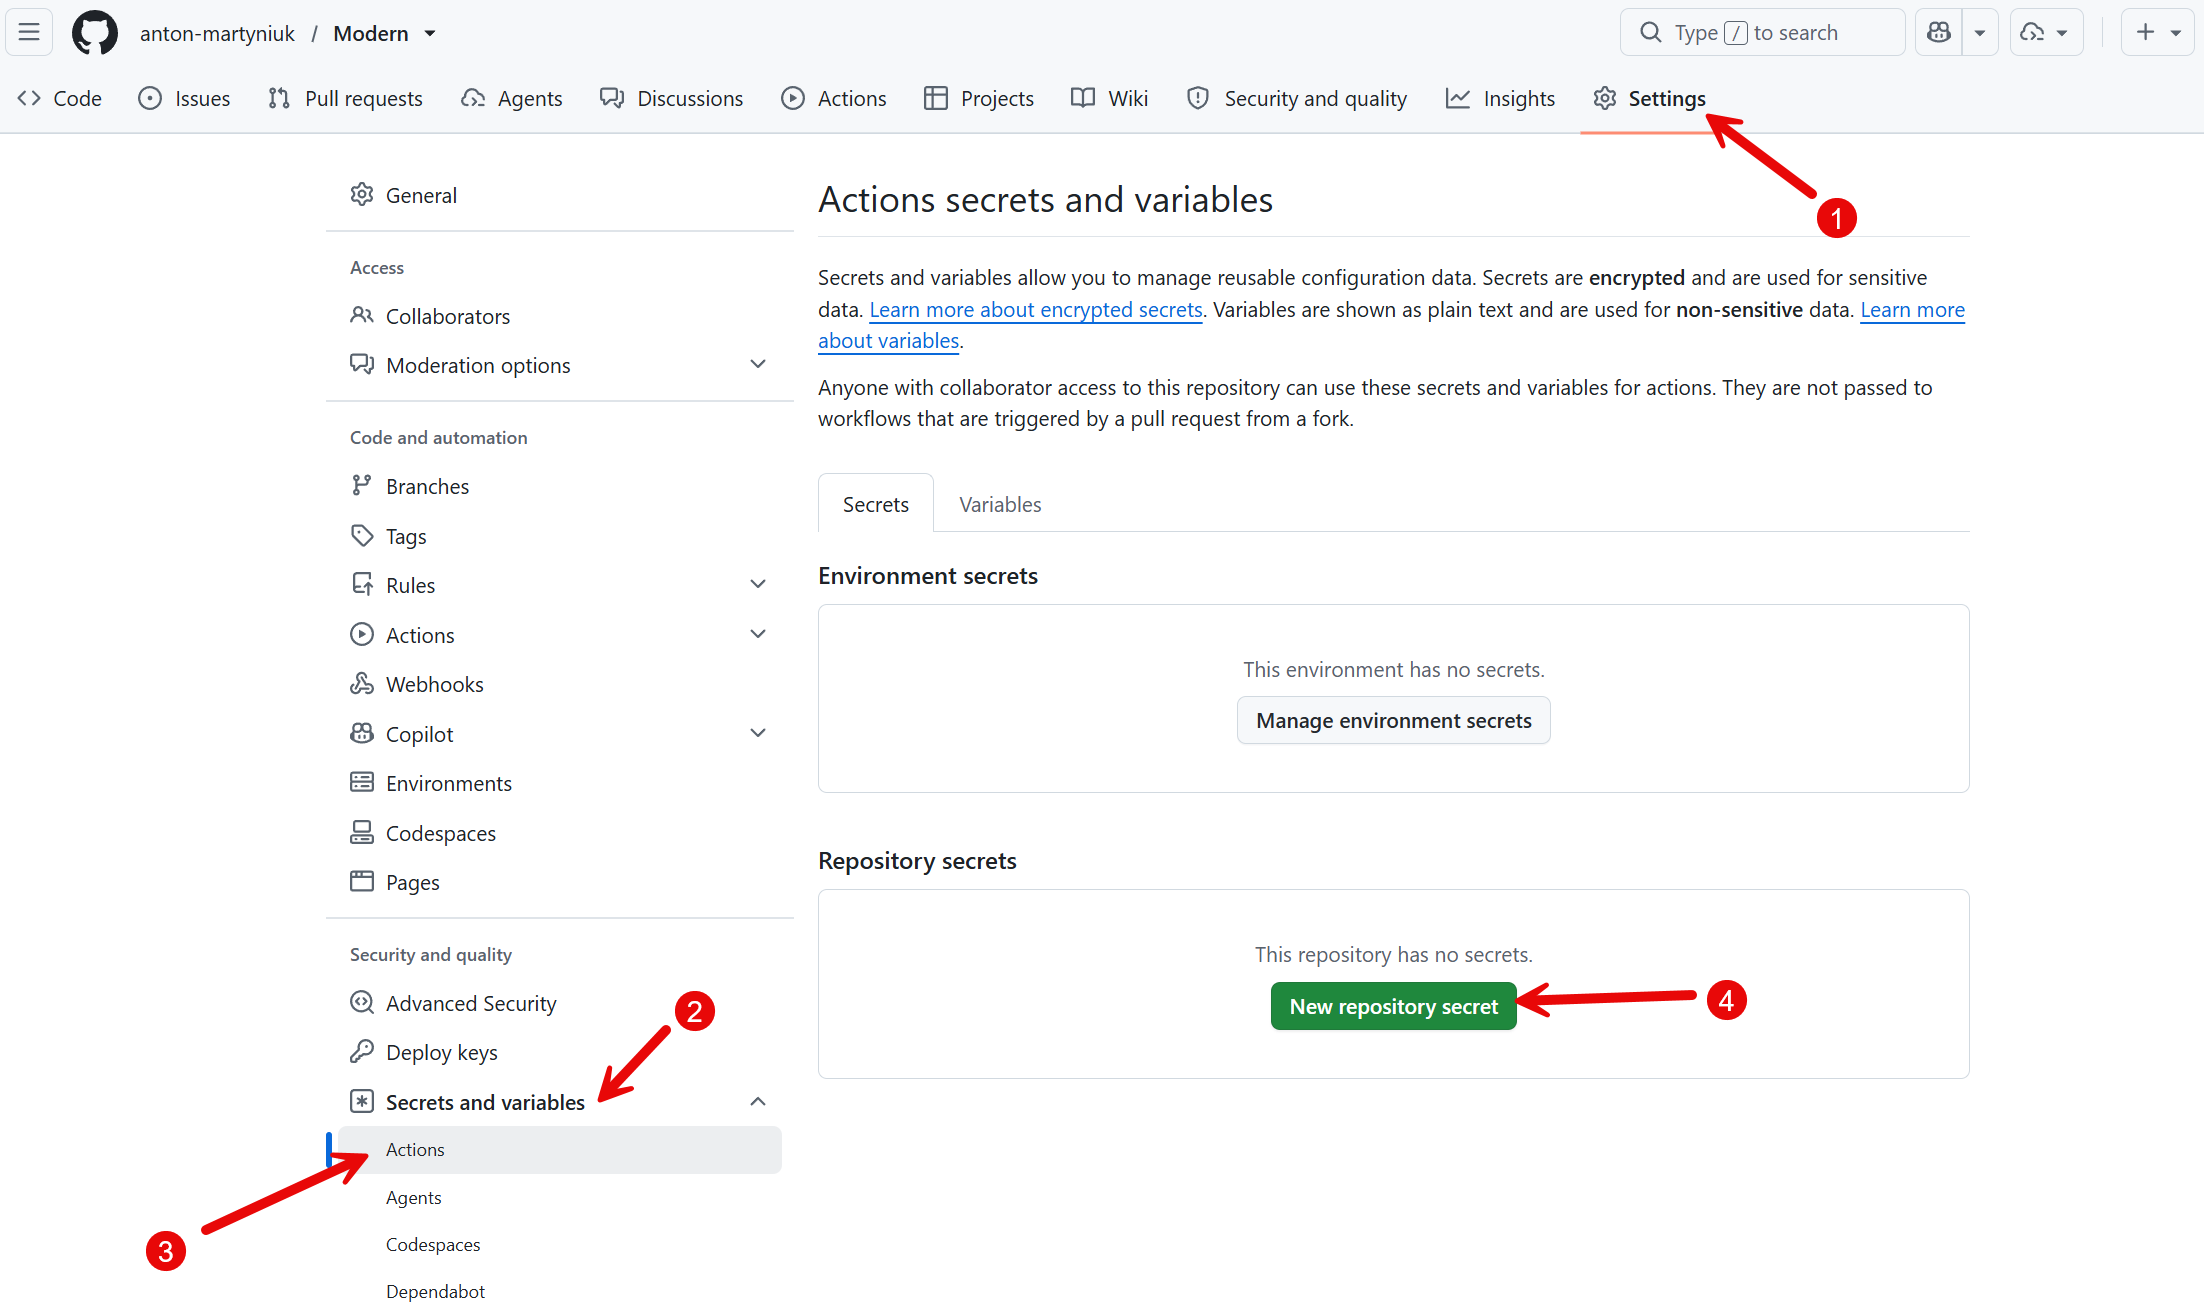
Give it a name like NUGET_API_KEY and paste the value.
Reference it in any workflow through the secrets context:
yaml- name: Push to NuGet run: dotnet nuget push ./artifacts/*.nupkg --api-key ${{ secrets.NUGET_API_KEY }} --source https://api.nuget.org/v3/index.json
A few rules are worth knowing:
- Repository secrets are available to every workflow in the repo. Environment secrets belong to a named environment like
productionand can require manual approval before a job uses them. - GitHub masks secret values in logs. If a secret ever lands in output, it shows as
***. - You cannot read a secret back in the UI after saving it. To change it, you overwrite it.
- Every workflow automatically gets a
GITHUB_TOKENsecret - a short-lived token scoped to the repository. You will use it in the next section to push to the container registry, with no setup at all.
Treat secrets as the only place credentials belong. A value in ${{ secrets.X }} is safe; the same value typed into YAML is a leak waiting to happen.
Also, I recommend you turn on multifactor authentication so that whenever you need to change your secret, you'll be prompted to verify your second factor, such as a Passkey or your GitHub mobile app.
Pushing the Docker Image to the Registry
A built image does nothing until it lives somewhere your servers can pull it. That place is a container registry.
This example pushes to the GitHub Container Registry (ghcr.io), because it needs no extra secret - the automatic GITHUB_TOKEN from the previous section is enough.
Here is the complete Docker job.
It logs in to the registry, then builds and pushes in one step with the official docker/build-push-action:
yamldocker-build: needs: build-and-test runs-on: ubuntu-latest permissions: contents: read packages: write steps: - name: Checkout code uses: actions/checkout@v4 - name: Set up Docker Buildx uses: docker/setup-buildx-action@v3 - name: Log in to GitHub Container Registry uses: docker/login-action@v3 with: registry: ${{ env.REGISTRY }} username: ${{ github.actor }} password: ${{ secrets.GITHUB_TOKEN }} - name: Build and push uses: docker/build-push-action@v6 with: context: ./src file: ./src/docker/Backend.Dockerfile push: true tags: | ghcr.io/${{ github.repository }}:latest ghcr.io/${{ github.repository }}:${{ github.sha }}
The important parts:
permissions: packages: writeletsGITHUB_TOKENpush to the registry. Without it, the push is denied.docker/login-actionsigns in toghcr.iousing the workflow's own identity (github.actor) and the built-in token - no secret to manage.docker/build-push-actionruns the same multi-stage Dockerfile, so the tests still run during the build, then pushes the result.- Two tags:
latestfor the most recent image, and${{ github.sha }}so you can always trace an image back to the commit that produced it.
After this runs, your image is available at ghcr.io/<owner>/<repo>, ready to pull. By default, the image is private to your repository - other workflows can pull it with the same GITHUB_TOKEN, and you can make the package public from its page in your GitHub profile.
From here to a running container is one more pull on your host. On a server with Docker, deployment is:
bashdocker pull ghcr.io/<owner>/<repo>:latest docker compose up -d
You can run that over SSH from a final workflow step, hand the image to a platform like Azure Web App for Containers, or let an orchestrator such as Kubernetes pull the new tag. The image is the same trusted artifact either way.
To deploy a .NET app to Azure end-to-end, see How to Deploy a .NET Application to Azure.
Summary
GitHub Actions takes a commit from a pull request all the way to a published Docker image, without you touching a thing.
Let's recap the key takeaways:
- Start with build and test. A workflow that runs
restore,build, andteston every push and pull request is the foundation - it keeps broken code from merging. - Use Testcontainers for integration tests. They spin up a real database from your test code, so the same tests pass locally and in the pipeline with no workflow configuration.
- Gate releases on green tests. Chain jobs with
needs:and trigger NuGet publishing on a version tag, so a package only ships when the tests pass. - Run tests inside the Docker build. A multi-stage Dockerfile with a test stage guarantees you never produce an untested image.
- Keep secrets out of YAML. Store API keys and passwords as GitHub Secrets, reference them with
${{ secrets.NAME }}, and lean on the automaticGITHUB_TOKENwhere you can. - Push to a registry. Publishing the image to
ghcr.iogives every environment one trusted artifact to pull.
You do not need a complex setup to get value from CI/CD.
Start with a single build-and-test workflow, then add publishing, Docker, and deployment one step at a time as your project grows.
Hope you find this newsletter useful. See you next time.